
If you're managing social for one brand or several clients and your week keeps getting hijacked by missing assets, late approvals, duplicate posts, and last-minute rewrites, the problem usually isn't creativity. It's the system behind the work. A content calendar for social media fixes that, but only when it's built as an operating system, not just a posting sheet.
Organizations often start with a template and then wonder why the process still feels chaotic. The template isn't the hard part. The hard part is deciding what belongs on the calendar, who owns each step, how approval moves, what gets adapted across platforms, and how performance feeds back into the next cycle.
Quick Answer: What Goes in a Social Media Content Calendar?
A content calendar for social media should track publish date, time, platform, campaign tag, content pillar, copy, asset link, owner, and status — at minimum. Strong calendars also include approval workflow, post performance data, and platform-specific adaptations.
The 5-step framework:
- Set the primary goal for your social program (lead gen, brand awareness, or retention)
- Define 3–5 content pillars so every post has a clear bucket
- Choose a tool that matches team size — a spreadsheet for solo, a dedicated platform for teams
- Set cadence by capacity, not by competitor output
- Review monthly and remove weak formats before adding more volume
This guide walks through each step in detail, with sample calendars, approval workflows, and analytics loops you can copy.
Laying the Groundwork for Your Content Calendar
A calendar fails fast when it starts as a list of post ideas. It works when it starts with constraints. Teams need to know what the social program is trying to do, which content already earns attention, and which themes deserve repeated investment.

A useful benchmark is how common this has become. In 2026, 92% of marketers utilize content calendars for social media planning, a 7 percentage point increase from 2025, and the same source notes that calendars help teams hit peak engagement windows that can boost visibility by up to 35% according to ALM Corp's social media calendar guide.
Start with one primary job for social
A lot of calendar problems start upstream. The team is trying to make every post do everything at once. Brand awareness, community engagement, product education, lead generation, recruiting, support, and thought leadership all get dumped into one feed with no priority.
Pick the primary job first. Then choose secondary jobs.
For example:
-
Lead generation first
LinkedIn posts may lean into educational insights, proof points, webinar promotion, and clear handoffs to landing pages. Instagram becomes support content, not the main conversion channel. -
Brand visibility first
Short-form video, trend-aware creative, repeatable hooks, and creator-style distribution matter more than direct-response copy. -
Customer retention first
Product tips, onboarding content, FAQs, case-based walkthroughs, feature reminders, and support-driven posts deserve more slots.
Practical rule: If the team can't name the main purpose of this month's content, the calendar will fill up with random requests.
Audit before you add more content
What's needed isn't more ideas. It's a better filter.
Run a simple audit across the last publishing cycle and review:
-
Top formats
Which formats keep earning attention? Carousels, short videos, text posts, quote graphics, product demos, or founder clips. -
Topics that repeat well
Look for themes with replay value. FAQs, comparisons, mistakes, behind-the-scenes workflows, client education, and timely industry commentary often repeat better than one-off announcements. -
Posts that created operational pain
Some posts aren't worth repeating if they always require legal review, hard-to-get assets, or client signoff from multiple stakeholders. -
Platform fit
A post that worked on LinkedIn may have failed on Instagram because the format wasn't native, not because the idea was weak.
If you need a practical walkthrough for this planning stage, this guide on how to plan social media content is a helpful reference for turning goals and past posts into a usable workflow.
Define content pillars that are broad enough to scale
Content pillars keep the calendar from turning into a dumping ground. They also make delegation easier because writers, designers, editors, and account managers know which buckets a post belongs to.
A good set of pillars is usually small. Too many pillars create overlap and slow approvals because nobody agrees on where a post fits.
A common working model looks like this:
| Pillar | What belongs here | Common mistake |
|---|---|---|
| Educational | Tips, how-tos, explainers, FAQs, industry insights | Making it too technical for the platform |
| Trust-building | Testimonials, proof, process transparency, team expertise | Turning every proof post into a sales pitch |
| Community and engagement | Polls, questions, reactions, conversation starters | Posting filler with no real point |
| Promotional | Offers, launches, demos, service pages, CTAs | Letting this dominate the calendar |
Build guardrails before the first post is scheduled
Before anyone opens a spreadsheet or scheduler, document a few basic rules:
- Which platforms matter
- Which content pillars each platform should emphasize
- What requires approval
- What can be published without client review
- What counts as done for copy, design, and scheduling
- What gets published manually because native posting works better
This is the boring part, but it's what stops the daily "what are we posting today?" spiral.
All your social media in one simple dashboard
Schedule posts, track analytics, and reply to comments/DMs — without switching tabs.

Engagement
+18%
Views
52.8k
How to Build Your Social Media Content Calendar
Once the strategy is clear, the next decision is practical. Are you running the calendar in a spreadsheet, or are you using a dedicated planning tool? Both can work. They just break in different ways.

Spreadsheet or software
Spreadsheets are still useful, especially early on. Agencies often start in Google Sheets or Airtable because they're flexible, cheap, and familiar.
That flexibility becomes a problem once the team grows.
| Option | Where it works | Where it breaks |
|---|---|---|
| Google Sheets or Airtable | Small teams, low post volume, simple approvals, early-stage brands | Asset sprawl, version confusion, weak scheduling, no native approval record |
| Dedicated scheduling tool | Multi-platform publishing, role-based workflows, shared visibility, repeated campaigns | Setup takes longer, and bad configuration still creates mess |
A spreadsheet is fine when one person writes, designs, approves, and schedules. It starts to drag when account managers, clients, designers, and copywriters all need access.
For teams comparing systems, it helps to also build a social media content plan before choosing software. Tool choice matters less than process clarity.
The fields every content calendar needs
No matter which system you use, the calendar needs the right columns or fields. If a field doesn't support planning, production, approval, scheduling, or reporting, remove it.
These are the fields I consider essential:
| Field | Why it matters | Common mistake |
|---|---|---|
| Publish date | The anchor of the calendar — sort and filter by this first | Tracking only due dates, not publish dates |
| Publish time | Critical for region-specific posts and launch timing | Leaving it blank and hoping for the best |
| Platform | Each format (IG carousel, LinkedIn post, TikTok video, X thread) is a separate output | Bundling all platforms into one generic "social" item |
| Campaign or initiative | Lets you see which posts belong to which launch or push | No tagging — campaigns get lost in volume |
| Content pillar | How you check mix and balance, not just volume | Missing pillar = every post counts as "general" |
| Working headline or hook | Quick read of intent without opening five docs | Vague titles like "Tuesday post" |
| Final copy | Approved caption lives with the post, not in a buried comment | Copy scattered across Slack, Docs, comment threads |
| Asset link | Link to final creative in Canva, Drive, Dropbox, or your media library | Linking to working folders instead of approved versions |
| Owner | One named person, not a department | "Marketing team" — nobody owns it |
| Status | Reflects real handoffs (Drafting, Pending Review, Approved, Scheduled, Published) | Vague labels like "In progress" |
| Notes | Tag instructions, legal flags, UTM reminders, manual publishing notes | Cramming strategy debates here |
What to avoid putting in the calendar
The calendar shouldn't become your entire project management system. That's how teams create giant, unreadable boards.
Keep these outside the main calendar view when possible:
- Long creative briefs
- Full revision history
- Internal debates in comment threads
- Every version of every asset
- General strategy notes unrelated to the post
The calendar should answer one question quickly: what's going live, where, when, and in what state?
When a visual calendar becomes worth it
At agency scale, drag-and-drop scheduling matters because rescheduling is constant. Launch dates move. Client feedback arrives late. A product team changes a screenshot. Someone asks to hold a post because a news event changes the tone.
A dedicated calendar shifts the focus from mere convenience to operational control. PostPlanify is one option that handles visual scheduling, shared media, role-based collaboration, and status tracking across multiple platforms, which is the kind of setup teams usually try to recreate in a spreadsheet and then outgrow. If you want to see different calendar structures before setting one up, these social media content calendar examples are useful for comparing simple and team-based layouts.
A clean calendar isn't one that looks full. It's one that makes the next decision obvious.
Content Calendar Tool Comparison (2026)
If you've outgrown spreadsheets, the right tool depends on your bottleneck — approvals, multi-platform reach, analytics, or client reporting. Here's how the major options compare:
| Tool | Best for | Calendar view | Approvals | Social inbox | Platforms |
|---|---|---|---|---|---|
| PostPlanify | Multi-platform teams, agencies | Drag-and-drop daily/weekly/monthly | Multi-step | 5 platforms | 10 |
| Buffer | Solo creators, small brands | Calendar + queue | Team plan only | Paid plans | 11 |
| Hootsuite | Enterprise teams | Streams + calendar | Yes | Yes | Wide support |
| Later | Visual-first brands | Visual grid + calendar | Advanced+ only | Growth+ only | 8 (no X, no Google Business) |
| Sprout Social | Enterprise, customer-facing | Calendar + queue | Yes | Yes | Wide support |
| Loomly | Mid-size teams | Calendar | All paid plans | Interactions inbox | 9 |
| SocialBee | Content categorization | Category-based queue | Yes | No | 10 |
| Planable | Agencies, client review | Feed + calendar | Yes (core feature) | No | Wide support |
For a deeper breakdown by use case, see the best social media scheduling tools guide and the top free scheduling tools for creators roundup.
Planning Your Content Mix and Posting Cadence
A packed calendar can still underperform if the mix is wrong. The common failure mode is easy to spot. Too much promotion, too little value, and no adaptation by platform.
The better approach is to start with one strong idea and reshape it. According to EvergreenFeed's content calendar best practices, expert teams develop a single high-value piece of content and adapt it for each channel rather than creating every post from scratch. That only works when each version matches the platform's format and audience expectations.
Use a framework, but don't obey it blindly
Two frameworks are practical because they force restraint:
-
The 80/20 rule
Most posts should inform, engage, or help. A smaller share should promote directly. -
The rule of thirds
One part promotion, one part curated or shared perspective, one part interaction and relationship-building.
These are good guardrails, not laws. A product launch month may skew more promotional. A founder-led brand may lean harder into opinion and interaction. The point is to prevent a feed from becoming a repetitive sequence of asks.
Turn one idea into five native posts
Teams save time in this way without making content feel duplicated.
Take one source idea, like "three mistakes brands make when launching a new service."
You can adapt it like this:
-
Instagram
Carousel with one mistake per slide, short caption, strong first slide hook. -
LinkedIn
Text-led post with sharper commentary, business framing, and a cleaner CTA. -
TikTok
Short talking-head breakdown with examples and quicker pacing. -
X
Thread format with a tighter sentence style and more direct language. -
Facebook
Often works best when the post is either community-driven, visual, or tied to a link and conversation prompt.
If you're working on B2B specifically, this breakdown of LinkedIn posting strategy is useful because LinkedIn usually needs a different tone and structure than visual-first platforms.
Sample Weekly Calendar (B2B SaaS Example)
Here's what a balanced week looks like for a B2B SaaS brand emphasizing lead generation. Notice that each day touches at least one pillar, no two days are identical, and promotion sits at roughly 20% of the week:
| Day | X | Pillar | ||
|---|---|---|---|---|
| Monday | Educational carousel (industry trend) | Quote graphic from CEO | Thread expanding the LinkedIn post | Educational |
| Tuesday | Customer case study | Behind-the-scenes Reel | — | Trust-building |
| Wednesday | Product feature post | Carousel walkthrough | Tip thread | Educational + Promo |
| Thursday | Founder POV / opinion | UGC repost | Quote tweet conversation | Community |
| Friday | Weekly roundup | Tutorial Reel | Thread digest | Educational |
The pattern matters more than the specific posts. For more layouts by team type and industry, see social media content calendar examples.
Plan for Holidays and Seasonal Moments
Most calendar gaps happen because seasonal moments sneak up. Build a yearly framework first, then layer monthly planning on top.
Three categories to track:
- Major holidays — New Year, Valentine's Day, Mother's Day, Black Friday, end-of-year campaigns
- Industry-specific moments — product launches, conference seasons, fiscal cycles, awareness months relevant to your audience
- Cultural moments — World Mental Health Day, Pride, Earth Day — only join if your brand has genuine context
Block these on the calendar 8–12 weeks before they happen. That gives time for creative production, paid amplification, and approval cycles. For timing recommendations across each platform, see our best time to post on social media guide.
Set cadence by production capacity first
A lot of bad social planning comes from copying someone else's publishing rhythm. Teams commit to a frequency they can't sustain, then the quality drops and the calendar turns into cleanup work.
A better way to set cadence is:
- List how much content your team can realistically produce well
- Separate planned content from reactive content
- Reserve space for approvals, delays, and manual posting tasks
- Adjust per platform based on effort, not ambition
Some practical platform notes:
- Instagram needs stronger visual standards. Carousel design and Reel editing take time.
- TikTok rewards speed and native feel, but forced volume usually shows.
- LinkedIn can be efficient when you have real expertise to publish, but weak thought leadership is obvious.
- X tolerates more frequent posting, yet that only helps if someone can monitor replies and context.
- Facebook often needs more deliberate community use than teams expect.
Teams don't burn out because they used a calendar. They burn out because the calendar promises more output than the workflow can support.
Cadence also needs to reflect audience timing. If you're refining posting windows, this guide to the best time to post on social media is a useful operational reference when you start assigning actual slots.
All your social media in one simple dashboard
Schedule posts, track analytics, and reply to comments/DMs — without switching tabs.
Engagement
+18%
Views
52.8k
Establishing Your Team Collaboration and Approval Workflow
Most team calendars don't fail because nobody had ideas. They fail because nobody could tell what was approved, who was waiting, or which version was final.
For agencies, this gets worse fast. One client wants every post approved. Another only wants to review campaign launches. A third replies late and then asks for a full reschedule.

The operational cost is real. For agency teams managing multiple clients, real-time shared calendars with approval workflows can enable 40% faster publishing, and a 2025 HubSpot survey cited in Neil Patel's guide found agencies lose 1-2 hours daily to manual rescheduling and fragmented tools in this article on social media content calendars.
Use statuses that reflect actual handoffs
A vague status system creates false confidence. "In progress" tells nobody anything.
Use statuses that match real movement:
| Status | What it means | Who owns the next action |
|---|---|---|
| Briefed | Topic approved, inputs gathered | Strategist or account lead |
| Drafting | Copy or concept in progress | Writer or social manager |
| Needs visuals | Copy approved internally, design required | Designer |
| Pending internal review | Team review before client sees it | Account lead or senior reviewer |
| Pending client approval | Awaiting client decision | Client |
| Approved | Ready to schedule | Scheduler or social manager |
| Scheduled | Platform slot assigned | Social manager |
| Published | Live and complete | Reporting owner |
| Needs revision | Changes requested, not ready | Original owner |
This isn't bureaucracy. It's how you stop Slack from becoming your source of truth.
Define who can approve what
A scalable content calendar for social media needs role clarity. Otherwise every post turns into committee work.
Keep approval rules simple:
- Writers draft copy and make first-pass platform adaptations.
- Designers produce approved creative versions tied to the platform spec.
- Account managers protect deadlines and client communication.
- Strategists or senior reviewers check message quality and campaign fit.
- Clients approve only what requires client review.
If three people can all give final approval, nobody has final approval.
A common agency mistake is sending unfinished work to clients. That creates extra feedback cycles because the client starts editing strategy, copy, and design all at once. Internal review should happen before client review, not during it.
Make feedback visible and tied to the post
Feedback scattered across email, Slack, comments in Canva, and meeting notes is what causes version mistakes. Centralize it where the post lives.
Useful feedback rules:
- One thread per post
- One decision-maker for final signoff
- Change requests must be explicit
- Late feedback changes the publish date unless everyone agrees otherwise
This is also where a dedicated tool helps more than a spreadsheet. Teams that need client signoff, shared calendars, and clear publishing records usually do better with software built for approval workflows. If you're comparing options, this roundup of social media tools with approval workflows is a practical place to start.
A short demo can help you think through how this should look in practice:
Build separate lanes for fast content and high-risk content
Not every post deserves the same review path.
Use two lanes:
- Fast lane for routine educational posts, lightweight engagement content, and recurring formats
- Full review lane for launches, regulated content, claims-sensitive posts, partnerships, and anything brand-critical
That split keeps the calendar moving without lowering standards.
Scheduling Posts and Mastering Platform Nuances
Once content is approved, scheduling should feel mechanical. In practice, teams often experience surprises with platform limitations, broken previews, missing permissions, and post types that don't publish as expected.
Use queues for repeatable content and manual slots for sensitive posts
Queues are useful when you have recurring series. Weekly tips, customer education, curated industry commentary, and evergreen posts are good queue candidates.
Manual scheduling is usually safer for:
- product launches
- time-sensitive event posts
- posts tied to external announcements
- content that needs final review close to publish time
Bulk scheduling is best used when the inputs are standardized. If your team is still changing copy or swapping assets after upload, bulk actions create rework instead of saving time.
Match the scheduling method to the platform
A few platform-specific realities matter:
-
Instagram
Third-party publishing can be limited depending on the account type, connected permissions, and the specific post format. Some teams still need manual checks for certain formats and final visual review. -
LinkedIn
Personal profiles and company pages don't always behave the same way in scheduling tools. Document-style posts and other native formats may require extra testing before you rely on automation. -
TikTok
Native behavior matters more here than on many other platforms. Caption length, sound choices, and edit style can affect whether a scheduled asset still feels platform-appropriate. -
X
High-frequency scheduling is easy to overdo. If nobody is available to monitor replies or context, the queue can keep publishing into the wrong moment. -
Facebook
Cross-posting from Instagram often creates weak Facebook posts. Schedule for Facebook intentionally when the audience and post type justify it.
Watch the permissions, not just the post
Many "scheduling bugs" are really permission issues.
Check these first when posts fail:
-
Correct account type
Business or creator settings can affect access depending on platform and tool. -
Expired tokens or disconnected profiles
Common after password changes, security reviews, or admin changes. -
Wrong admin level
Someone may have access to view an account but not publish from it. -
Media spec mismatch
Aspect ratio, file type, length, or thumbnail problems often cause silent failures or degraded posts. -
API delay or sync lag
Calendar changes don't always appear instantly across every connected profile.
Schedule early enough that failure still leaves time for a manual publish.
If your team relies on timing suggestions or automated send windows, test them against your actual workflow. A "best time" recommendation only helps if the post is approved, loaded correctly, and monitored after it goes live.
Using Analytics to Measure and Refine Your Calendar
A content calendar isn't finished when the post is published. If the results never loop back into planning, you're just organizing output.
Teams improve faster when they review performance at the level of pillar, format, platform, and workflow. That tells you not only what performed, but what was worth producing.

Track metrics that match the post's job
Not every post should be judged by the same metric.
Use a simple mapping:
-
Awareness posts
Reach, impressions, and profile visits matter more than direct conversions. -
Engagement posts
Comments, saves, shares, and conversation quality matter more than raw likes. -
Traffic posts
Link clicks and landing page behavior matter most. -
Conversion-focused posts
Leads, signups, or other downstream actions matter most.
The mistake I see most is teams calling a post "successful" because it got likes, even though it was supposed to drive clicks. The opposite happens too. A reach-focused post gets judged too harshly because it didn't convert directly.
Review the calendar monthly, not only campaign by campaign
A monthly review works well because it's frequent enough to catch patterns without overreacting to one post.
Look for:
- Which pillars consistently produce useful outcomes
- Which formats are expensive to make but weak in return
- Which platforms deserve more adapted content
- Which approval paths slow down posts that don't need heavy review
- Which posting slots are worth repeating
If your reporting process is still basic, this guide on how to analyze social media data is a solid reference for turning raw platform numbers into decisions.
Feed the insights back into planning
Analytics only matter when they change the next calendar.
That usually means making decisions like these:
| Finding | Calendar adjustment |
|---|---|
| Educational carousels keep earning saves | Increase their share in the next cycle |
| Thought-leadership posts perform on LinkedIn but not Instagram | Adapt the idea differently instead of cross-posting |
| Posts with long review chains publish late | Move them into a separate workflow |
| A recurring series no longer gets traction | Retire or rework it instead of preserving it by habit |
For teams that want a cleaner reporting loop, a combined calendar and dashboard setup helps because it ties published posts to performance without a separate spreadsheet cleanup. This overview of social media analytics and reporting is useful if you're tightening that process.
The best calendars get smaller before they get better. Teams remove weak formats, unnecessary reviews, and filler posts long before they add more volume.
How PostPlanify Handles Content Calendars
If you've outgrown spreadsheets but don't want to stitch together five separate tools to run your calendar, PostPlanify keeps planning, scheduling, approvals, and reporting in one workflow.
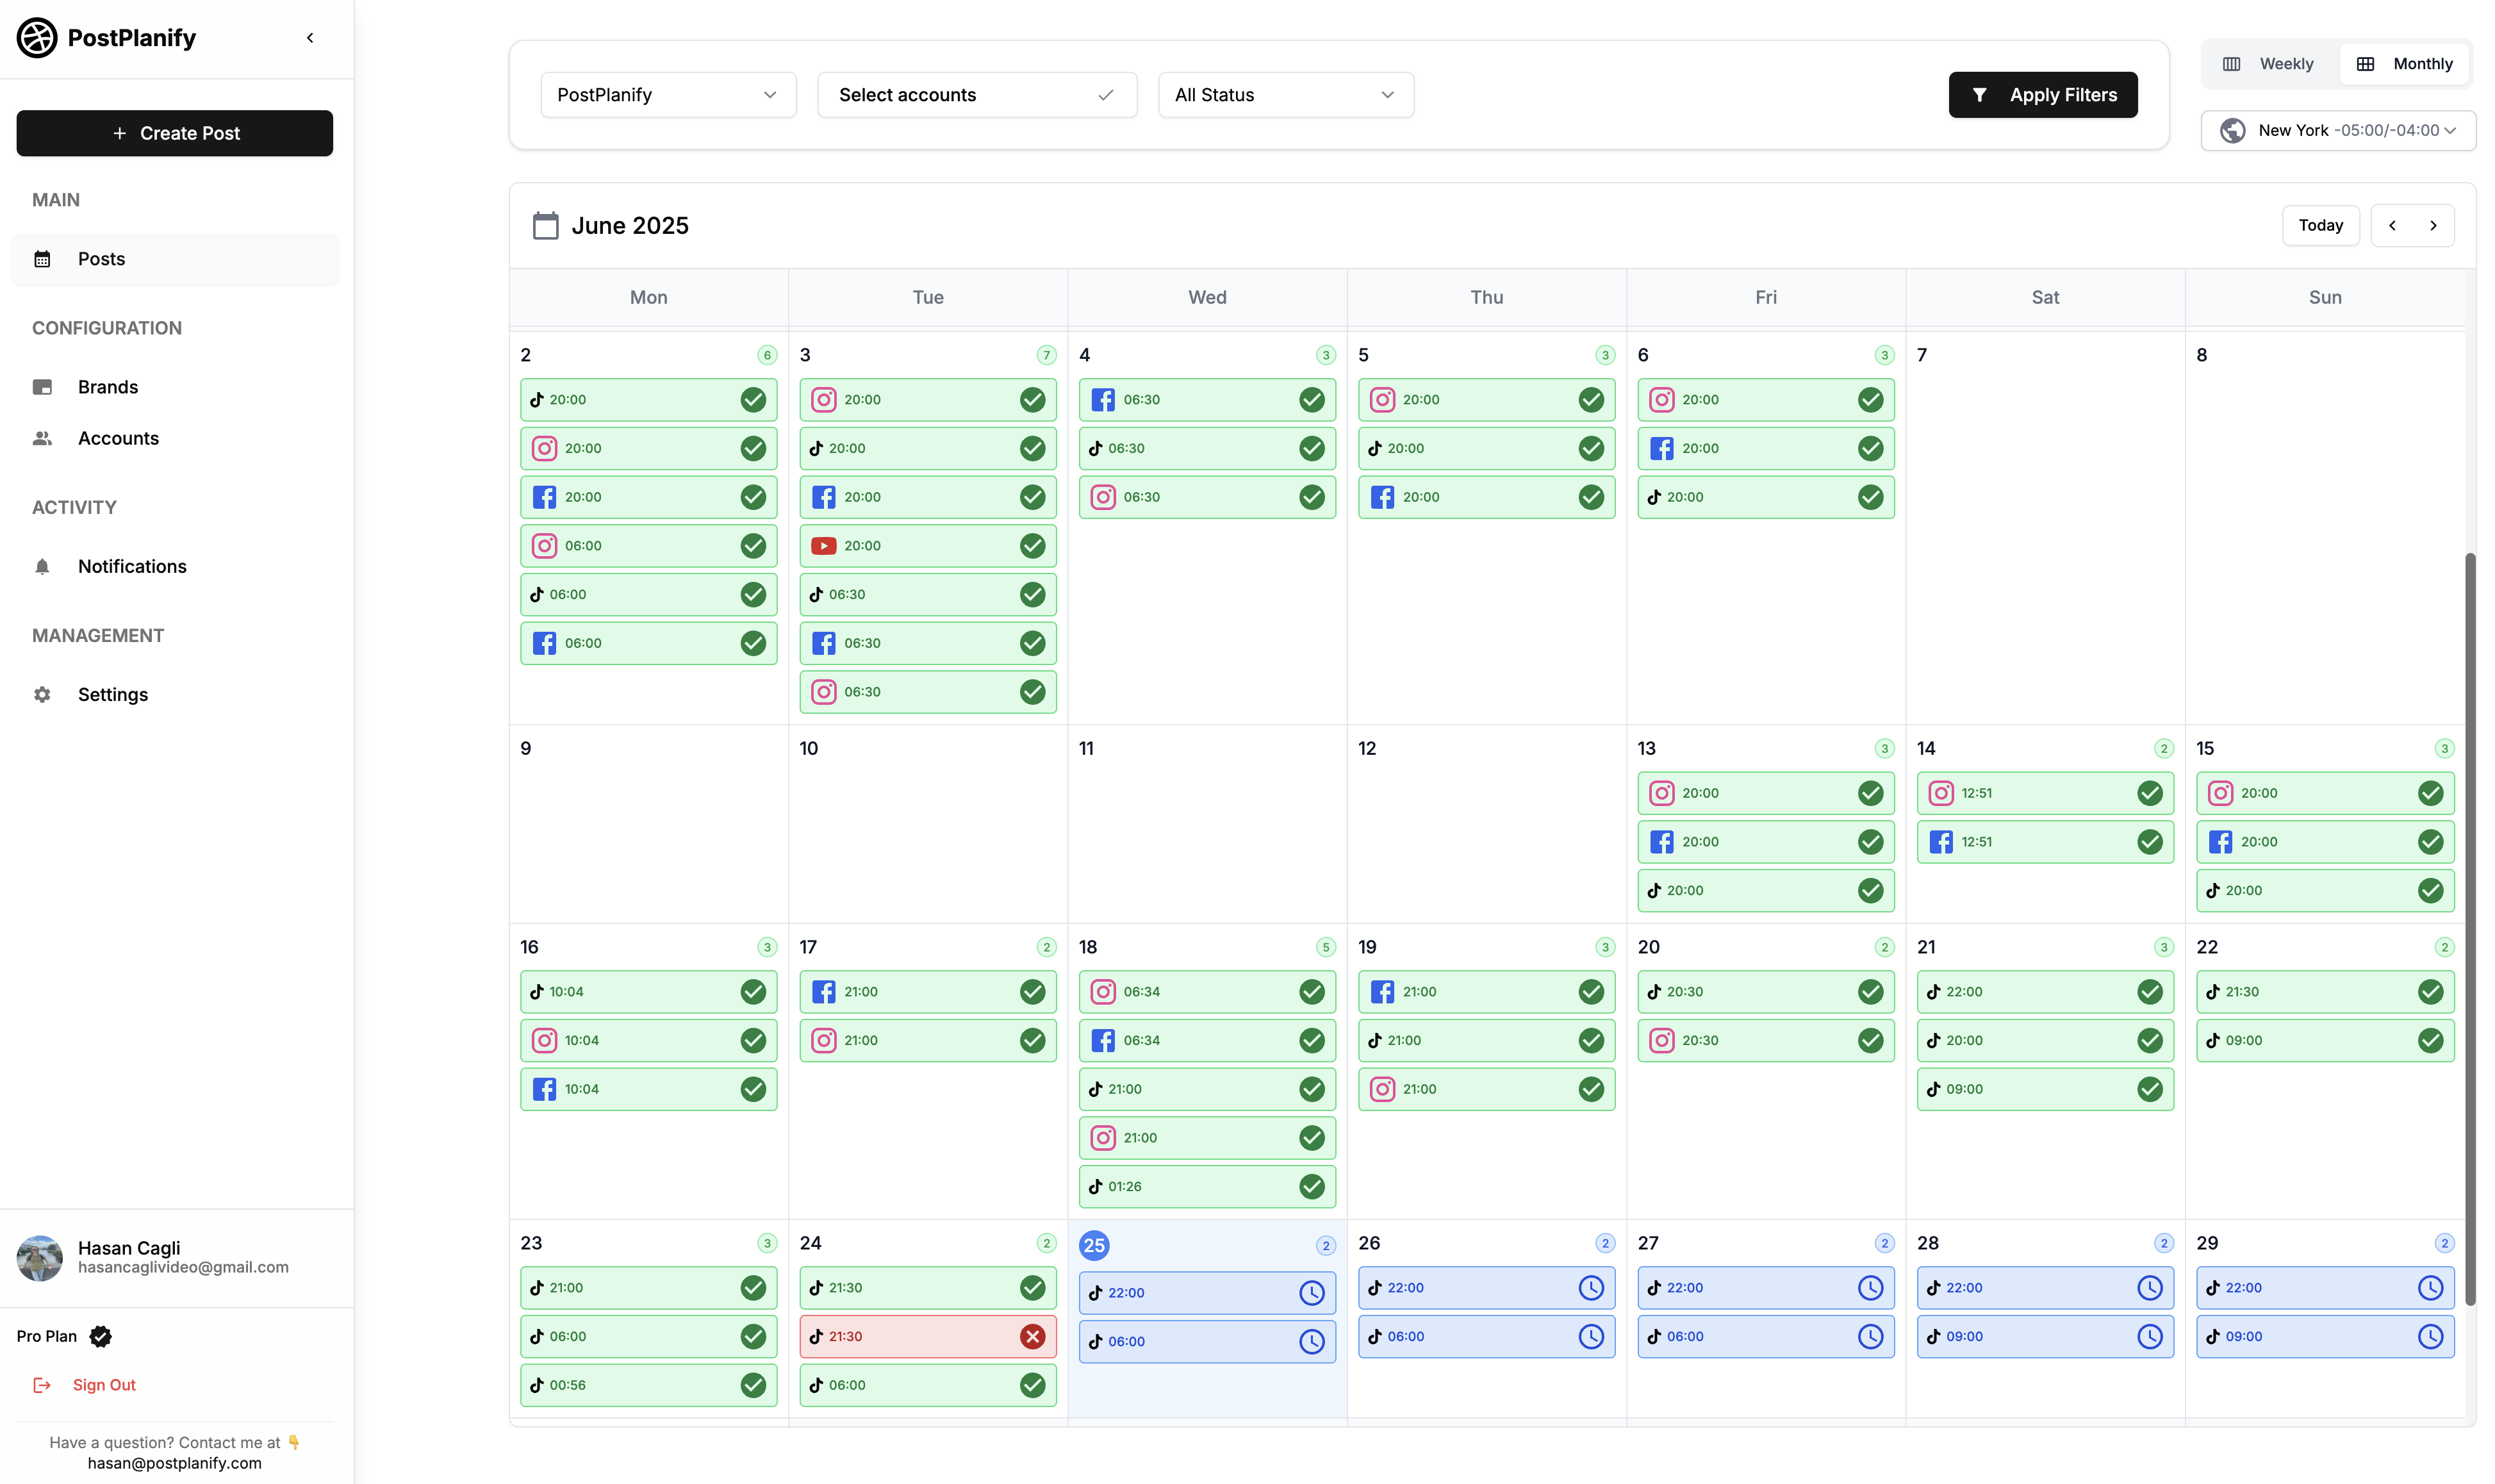
What's included:
- Visual content calendar — drag-and-drop scheduling across daily, weekly, and monthly views with color-coding by platform, campaign, or pillar
- Multi-platform scheduling — publish to Instagram, Facebook, X, LinkedIn, TikTok, YouTube, Threads, Pinterest, Bluesky, and Google Business from one queue
- Approval workflows — multi-step review with assigned approvers, status tracking, and a clean record of who approved what and when
- Team collaboration — role-based access for designers, writers, account managers, and clients (Growth: 3 members, Premium: 6, Scale: 12, Enterprise: unlimited)
- Analytics for every platform — performance data feeds back into planning so you can see which pillars, formats, and slots actually earn results
- Best time to post — data-driven posting windows per platform per audience, built into the scheduler
- Social inbox — comments, DMs, and mentions for Instagram, Facebook, LinkedIn, YouTube, and Google Business in one view, so engagement work lives next to the calendar
- AI assistant — vision-powered caption generation, platform-specific adaptation, and hashtag suggestions from a single source idea
- White-label PDF reports — scheduled monthly reports for clients with your branding (Premium+; full white-label on Scale)
- Bulk scheduling — CSV import or batch upload for high-volume content cycles
- Media library — shared assets accessible to the full team with versioning
Pricing starts at $99/mo (Growth — 15 accounts, 3 team members) and scales to $299/mo (Scale — 100 accounts, 50 workspaces, 12 team members).
Try PostPlanify free for 7 days.
Key Takeaways
- A content calendar is an operating system, not just a posting sheet — it works only when ownership, approvals, pillars, and reporting are baked in
- Pick one primary goal (lead gen, brand awareness, or retention) before adding more content — calendars fail when every post tries to do everything
- 3–5 content pillars prevent the calendar from becoming a dumping ground; more than 5 creates overlap and slows approvals
- The calendar should answer one question fast: what's going live, where, when, and in what state? Move long briefs and revision history elsewhere
- 80/20 rule or rule of thirds — most posts should inform or engage, with promotion as a smaller share
- Adapt one source idea into 5+ native platform versions instead of cross-posting identical content
- Cadence should match team capacity, not ambition — burnout comes from over-promised volume, not from using a calendar
- Use two review lanes: fast for routine posts, full review for launches and claims-sensitive content
- Permissions, tokens, and account types cause more "scheduling bugs" than the tools themselves — schedule early enough that failure leaves time for manual recovery
- Track metrics tied to each post's job (reach, engagement, traffic, conversion) and review monthly to remove weak performers before adding new volume
Content Calendar FAQ
What is a social media content calendar?
A content calendar for social media is a structured plan that organizes what gets posted, where, when, and by whom across every platform. It tracks publish dates, content pillars, approval status, asset links, and ownership in one shared view. The goal is to replace ad-hoc posting with a repeatable system that supports campaigns, approvals, and reporting.
How far in advance should I plan social media content?
Most teams plan 4–8 weeks ahead for evergreen content and 1–2 weeks ahead for reactive or trending posts. Brand campaigns and launches typically need 6–12 weeks of lead time. Planning further than 8 weeks ahead for evergreen posts often creates rework because trends, products, or messaging shifts.
What's the 80/20 rule for social media content?
The 80/20 rule means 80% of your posts should inform, educate, or entertain — building trust and engagement — while only 20% directly promote products or services. It prevents feeds from becoming sales-heavy. Some teams use the rule of thirds instead (one part promotion, one part curated, one part conversation).
Should I use a spreadsheet or a content calendar tool?
Spreadsheets work for solo creators or small teams with simple workflows. Dedicated tools like PostPlanify, Hootsuite, or Buffer become essential when you have multi-platform publishing, role-based approvals, asset libraries, or client signoff. The breakpoint is usually around 3+ team members or 4+ connected platforms.
How many social media posts should I publish per week?
There's no universal answer, but typical baselines are: Instagram 3–5 posts/week, LinkedIn 3–4 posts/week, X 5–10 posts/week, TikTok 3–5 videos/week, Facebook 3–5 posts/week. Adjust based on your team's production capacity rather than competitor output. Quality consistently beats volume.
What should a content calendar include?
At minimum: publish date, publish time, platform, campaign tag, content pillar, working headline, final copy, asset link, owner, status, and notes. Avoid putting full creative briefs, revision histories, or general strategy notes in the calendar — keep those in a separate doc.
How do I measure if my content calendar is working?
Track metrics tied to each post's job, not a single vanity metric. Awareness posts → reach and impressions. Engagement posts → comments, saves, shares. Traffic posts → link clicks. Conversion posts → leads or signups. Run monthly reviews to spot which pillars and formats consistently earn results. For a deeper reporting loop, see our social media analytics and reporting guide.
How do agencies handle client approvals in content calendars?
The best approach is two review lanes: a fast lane for routine content (publishes after internal review only) and a full review lane for launches or claims-sensitive posts (requires client signoff). Use clear status labels (Pending Internal, Pending Client, Approved, Scheduled) and one decision-maker per post. Tools with built-in approval workflows prevent feedback from getting scattered across email and Slack — see the best social media tools with approval workflows for a comparison.
Are there free content calendar templates I can use?
Yes — Google Sheets, Notion, and Airtable all have community templates that work well for solo creators and small teams. The limitation is that spreadsheets don't handle multi-platform publishing, asset libraries, or approval routing natively. Most teams outgrow spreadsheet templates within 6–12 months of consistent posting.
What's the best content calendar tool for agencies in 2026?
The strongest agency tools combine a visual calendar, multi-platform scheduling, approval workflows, role-based access, and analytics in one place. PostPlanify, Hootsuite, Sprout Social, and Loomly are common picks. Match the tool to your specific bottleneck — if approvals slow you down, prioritize approval workflows; if reporting takes hours, prioritize white-label analytics.
How do I plan content for multiple platforms without copy-pasting?
Start with one strong source idea, then adapt the format to each platform's native style. A "3 mistakes" insight becomes an Instagram carousel, a LinkedIn text post, a TikTok talking head, and an X thread — each with different pacing and structure. Cross-posting identical content across platforms typically underperforms native adaptations.
Can AI help build my social media content calendar?
Yes — AI assistants speed up ideation, caption drafting, hashtag research, and platform-specific adaptation. The most useful integration is generating multiple platform-native versions from one source idea. PostPlanify's AI assistant uses vision to analyze your visual content and generate captions matched to each platform's tone.
How often should I audit my content calendar?
Run a lightweight monthly review for cadence, mix, and approval bottlenecks, plus a deeper quarterly review for pillar performance, format ROI, and platform-specific results. Annual audits should reset goals, refresh pillars, and retire underperforming series. The point is to remove weak content before adding new volume.
What's the difference between a content calendar and an editorial calendar?
They overlap heavily but aren't identical. An editorial calendar typically covers all content (blog posts, newsletters, video, podcasts) with longer lead times. A social media content calendar focuses specifically on social posts, scheduling, and platform adaptation. Most teams maintain both and link them — long-form content from the editorial calendar gets adapted into social posts.
All your social media in one simple dashboard
Schedule posts, track analytics, and reply to comments/DMs — without switching tabs.
Engagement
+18%
Views
52.8k
Your Content Calendar Checklist and Next Steps
A content calendar for social media becomes scalable when it does more than hold dates. It should show priorities, ownership, status, approval, platform adaptation, and the performance signals that shape the next round.
Use this checklist to pressure-test your current setup:
- Goals are defined and each platform has a clear role.
- Past content has been audited so the team isn't planning blind.
- Content pillars are limited and clear enough to guide ideas and delegation.
- The calendar includes essential fields like platform, owner, status, asset link, and final copy.
- Posting cadence matches production capacity instead of wishful thinking.
- Core ideas are adapted by platform rather than copied word-for-word.
- Approval statuses reflect real handoffs and everyone knows who signs off.
- Client review is controlled so routine posts don't stall.
- Scheduling rules account for platform quirks like permissions, account types, and format limitations.
- Analytics are reviewed on a recurring basis and used to remove weak content, not just report on it.
If your current process still depends on scattered spreadsheets, buried comments, and manual rescheduling, don't rebuild everything at once. Fix the workflow first. Then fix the tool stack. The calendar should reduce decisions, not create more of them.
If you want one place to plan, schedule, approve, and review posts across multiple platforms, PostPlanify is built for that agency and team workflow. It combines a drag-and-drop calendar, approval flows, role-based access, scheduling, analytics, and a unified inbox so you can run the process in one system instead of stitching it together across separate tools.
Try PostPlanify free for 7 days.
Related Reading
- Social Media Content Calendar Examples
- How to Plan Social Media Content
- Best Social Media Tools with Approval Workflows
- Social Media Analytics and Reporting
- Best Time to Post on Social Media
- Best Social Media Scheduling Tools
- Top 5 Free Social Media Scheduling Tools for Creators
- How to See Scheduled Posts on Instagram
- Instagram Post Scheduler Tools 2026
- Automating Instagram Posts Safely
- How to Schedule Anything on Instagram
- How to Collaborate on Instagram
All your social media in one simple dashboard
Schedule posts, track analytics, and reply to comments/DMs — without switching tabs.
Engagement
+18%
Views
52.8k
About the Author

Hasan Cagli
Founder of PostPlanify, a content and social media scheduling platform. He focuses on building systems that help businesses, agencies, and teams plan, publish, and manage content and social media more efficiently across platforms.


