
You can schedule Instagram Reels for free using Instagram's native scheduler (up to 75 days ahead) or Meta Business Suite, or use third-party tools like PostPlanify (from $99/mo, or $79/mo billed yearly) for AI captions, bulk scheduling, and cross-platform posting. The best method depends on whether you need basic scheduling (native), visual calendar planning (Meta Business Suite), or advanced features like Canva integration and multi-platform posting (PostPlanify).
Manual posting Reels daily takes 45-60 minutes (filming, editing, captioning, posting at optimal time). Scheduling reduces this to one 3-4 hour batching session per week — saving 15-20 hours monthly.
This complete guide covers:
- How to schedule Instagram Reels (step-by-step for native + Meta Business Suite + PostPlanify)
- 5 best Reels schedulers compared (features, pricing, pros/cons)
- Best times to post Reels (2026 data-backed recommendations)
- Reels optimization tips (covers, captions, hashtags, hooks)
- Common scheduling mistakes (and how to avoid them)
- FAQ (15+ questions answered)
Quick comparison:
| Scheduler | Price | Best For | Key Features |
|---|---|---|---|
| Instagram Native | Free | Solo creators, 1-2 Reels/week | Mobile app, up to 75 days ahead |
| Meta Business Suite | Free | Desktop users, multiple accounts | Calendar view, cross-post to Facebook |
| PostPlanify | $79/mo (yearly) | Multi-platform creators | AI captions, Canva, bulk upload |
| Later | $25/mo | Visual planners | Media library, best time suggestions |
| Buffer | $6/channel | Simplicity seekers | Proven tool, mobile app |
Let's dive into each method and find the best fit for your workflow.
Why Schedule Instagram Reels?
Instagram Reels dominate the platform in 2026. The algorithm prioritizes Reels over static posts, pushing them to Explore pages and recommended feeds. But consistent Reels posting is exhausting without a system.
Here's why scheduling changes everything:
1. Post at Peak Times Without Being Glued to Your Phone
Your audience might be most active at 7 AM or 9 PM. Scheduling lets you post during these high-engagement windows even if you're asleep or in meetings.
Result: 40-60% more initial reach when you post during proven peak times (Buffer 2024 study).
2. Maintain Consistency (The Algorithm's #1 Ranking Factor)
Instagram's algorithm rewards accounts that post Reels regularly. Scheduling ensures you maintain a steady rhythm (3-4 Reels/week recommended) without daily stress.
Data: Accounts posting 3+ Reels weekly grow 2.3x faster than inconsistent posters (Later 2024).
3. Batch-Create Content Efficiently
Film 5-7 Reels in one afternoon, schedule them throughout the week. This batching workflow:
- Saves setup/breakdown time (lighting, props, wardrobe)
- Preserves creative energy (film while inspired, not forced)
- Reduces decision fatigue
Time saved: 10-15 hours per month for active Reels creators.
4. Test Different Posting Times Without Manual Effort
Schedule the same Reel concept at different times across weeks. Analyze which time slot performs best. Optimize future posts accordingly.
5. Cross-Platform Efficiency
Tools like PostPlanify let you schedule the same Reels to Instagram + TikTok + Facebook + YouTube Shorts simultaneously—with platform-specific captions.
Time saved: 15-20 minutes per post (no re-uploading, rewriting).
6. Never Miss Content Opportunities Trending audio expires fast. Seasonal content has narrow windows. Scheduling ensures you capitalize on trends without scrambling last-minute.
Bottom line: Scheduling transforms Reels from a daily chore into a strategic growth engine. Now let's explore how to actually schedule them.
All your social media in one simple dashboard
Schedule posts, track analytics, and reply to comments/DMs — without switching tabs.

Engagement
+18%
Views
52.8k
How to Schedule Instagram Reels: 3 Methods Compared
Method 1: Instagram Native Scheduler (Free, Mobile)
Instagram's built-in Reels scheduler is free and works directly in the app—no third-party tools needed.
Requirements
- Creator or Business account (Personal accounts can't schedule)
- Instagram app (iOS or Android)
- Video ready to upload (edited, trimmed, exported)
Step-by-Step: Schedule a Reel in Instagram App
Step 1: Create Your Reel
- Open Instagram app
- Tap + icon → Reel
- Upload pre-edited video OR record/edit within Instagram
- Add music, text overlays, stickers, effects
- Tap Next
Step 2: Write Caption and Add Details
- Write caption (up to 2,200 characters)
- Add hashtags (5-8 recommended in 2026)
- Tag location (boosts local reach)
- Tag collaborators (if applicable)
- Tap Advanced Settings
Step 3: Enable Scheduling
- In Advanced Settings, find Schedule this Reel
- Toggle switch ON
- Choose date (up to 75 days ahead)
- Choose time (uses your phone's timezone)
- Tap Done
Step 4: Confirm Schedule
- Review preview
- Tap Schedule button
- Confirmation appears: "Your Reel is scheduled"
Step 5: Manage Scheduled Reels
- Go to Profile → Menu (☰)
- Tap Scheduled Content
- View all scheduled Reels
- Edit, reschedule, or delete before they publish
Instagram will notify you when the Reel goes live.
What Instagram Native Scheduler CAN Do
Pros:
- ✅ 100% free forever
- ✅ Mobile-first (schedule on the go)
- ✅ Up to 75 days advance scheduling
- ✅ No third-party app needed (official Instagram feature)
- ✅ All Reels features supported (music, effects, text, stickers)
- ✅ Push notifications when Reels publish
Supported:
- ✅ Reels up to 90 seconds (optimal length) — for longer videos, see our guide on how to post a long video on Instagram
- ✅ Vertical video (9:16 ratio, 1080x1920px)
- ✅ Cover image selection
- ✅ Caption, hashtags, location tags
- ✅ Collaborator tags
- ✅ Alt text for accessibility
What Instagram Native Scheduler CAN'T Do
Limitations:
- ❌ No bulk uploading (one Reel at a time)
- ❌ No desktop scheduling (mobile app only)
- ❌ No calendar view (just a list of scheduled posts)
- ❌ Can't edit after scheduling (must delete and reschedule)
- ❌ No cross-posting to Facebook/TikTok/YouTube
- ❌ No AI caption help
- ❌ No Canva integration
- ❌ No first comment scheduling
- ❌ No analytics beyond Instagram Insights
- ❌ No team collaboration features
- ❌ No best time recommendations (you pick manually)
When Instagram Native Scheduler is Enough
Use native scheduling if you:
- Post 1-3 Reels per week
- Manage one Instagram account
- Already edit Reels on your phone
- Have $0 budget for tools
- Don't need cross-platform posting
- Don't need AI or team features
Outgrow it when you need: Bulk scheduling, desktop workflow, calendar view, cross-posting, AI captions, or team collaboration.
👉 How to Schedule Instagram Posts in 2026 (Complete Guide)
Method 2: Meta Business Suite (Free, Desktop + Mobile)
Meta Business Suite is Facebook's official tool for managing Instagram and Facebook. It offers a calendar view, desktop workflow, and cross-posting—all free.
Requirements
- Instagram Business or Creator account
- Facebook Page linked to your Instagram
- Desktop browser OR Meta Business Suite mobile app
Step-by-Step: Schedule Reels with Meta Business Suite
Step 1: Link Instagram to Facebook Page
- Go to
business.facebook.com - Settings → Linked Accounts
- Connect your Instagram account
- Authorize connection
Without this link, Reels scheduling won't appear.
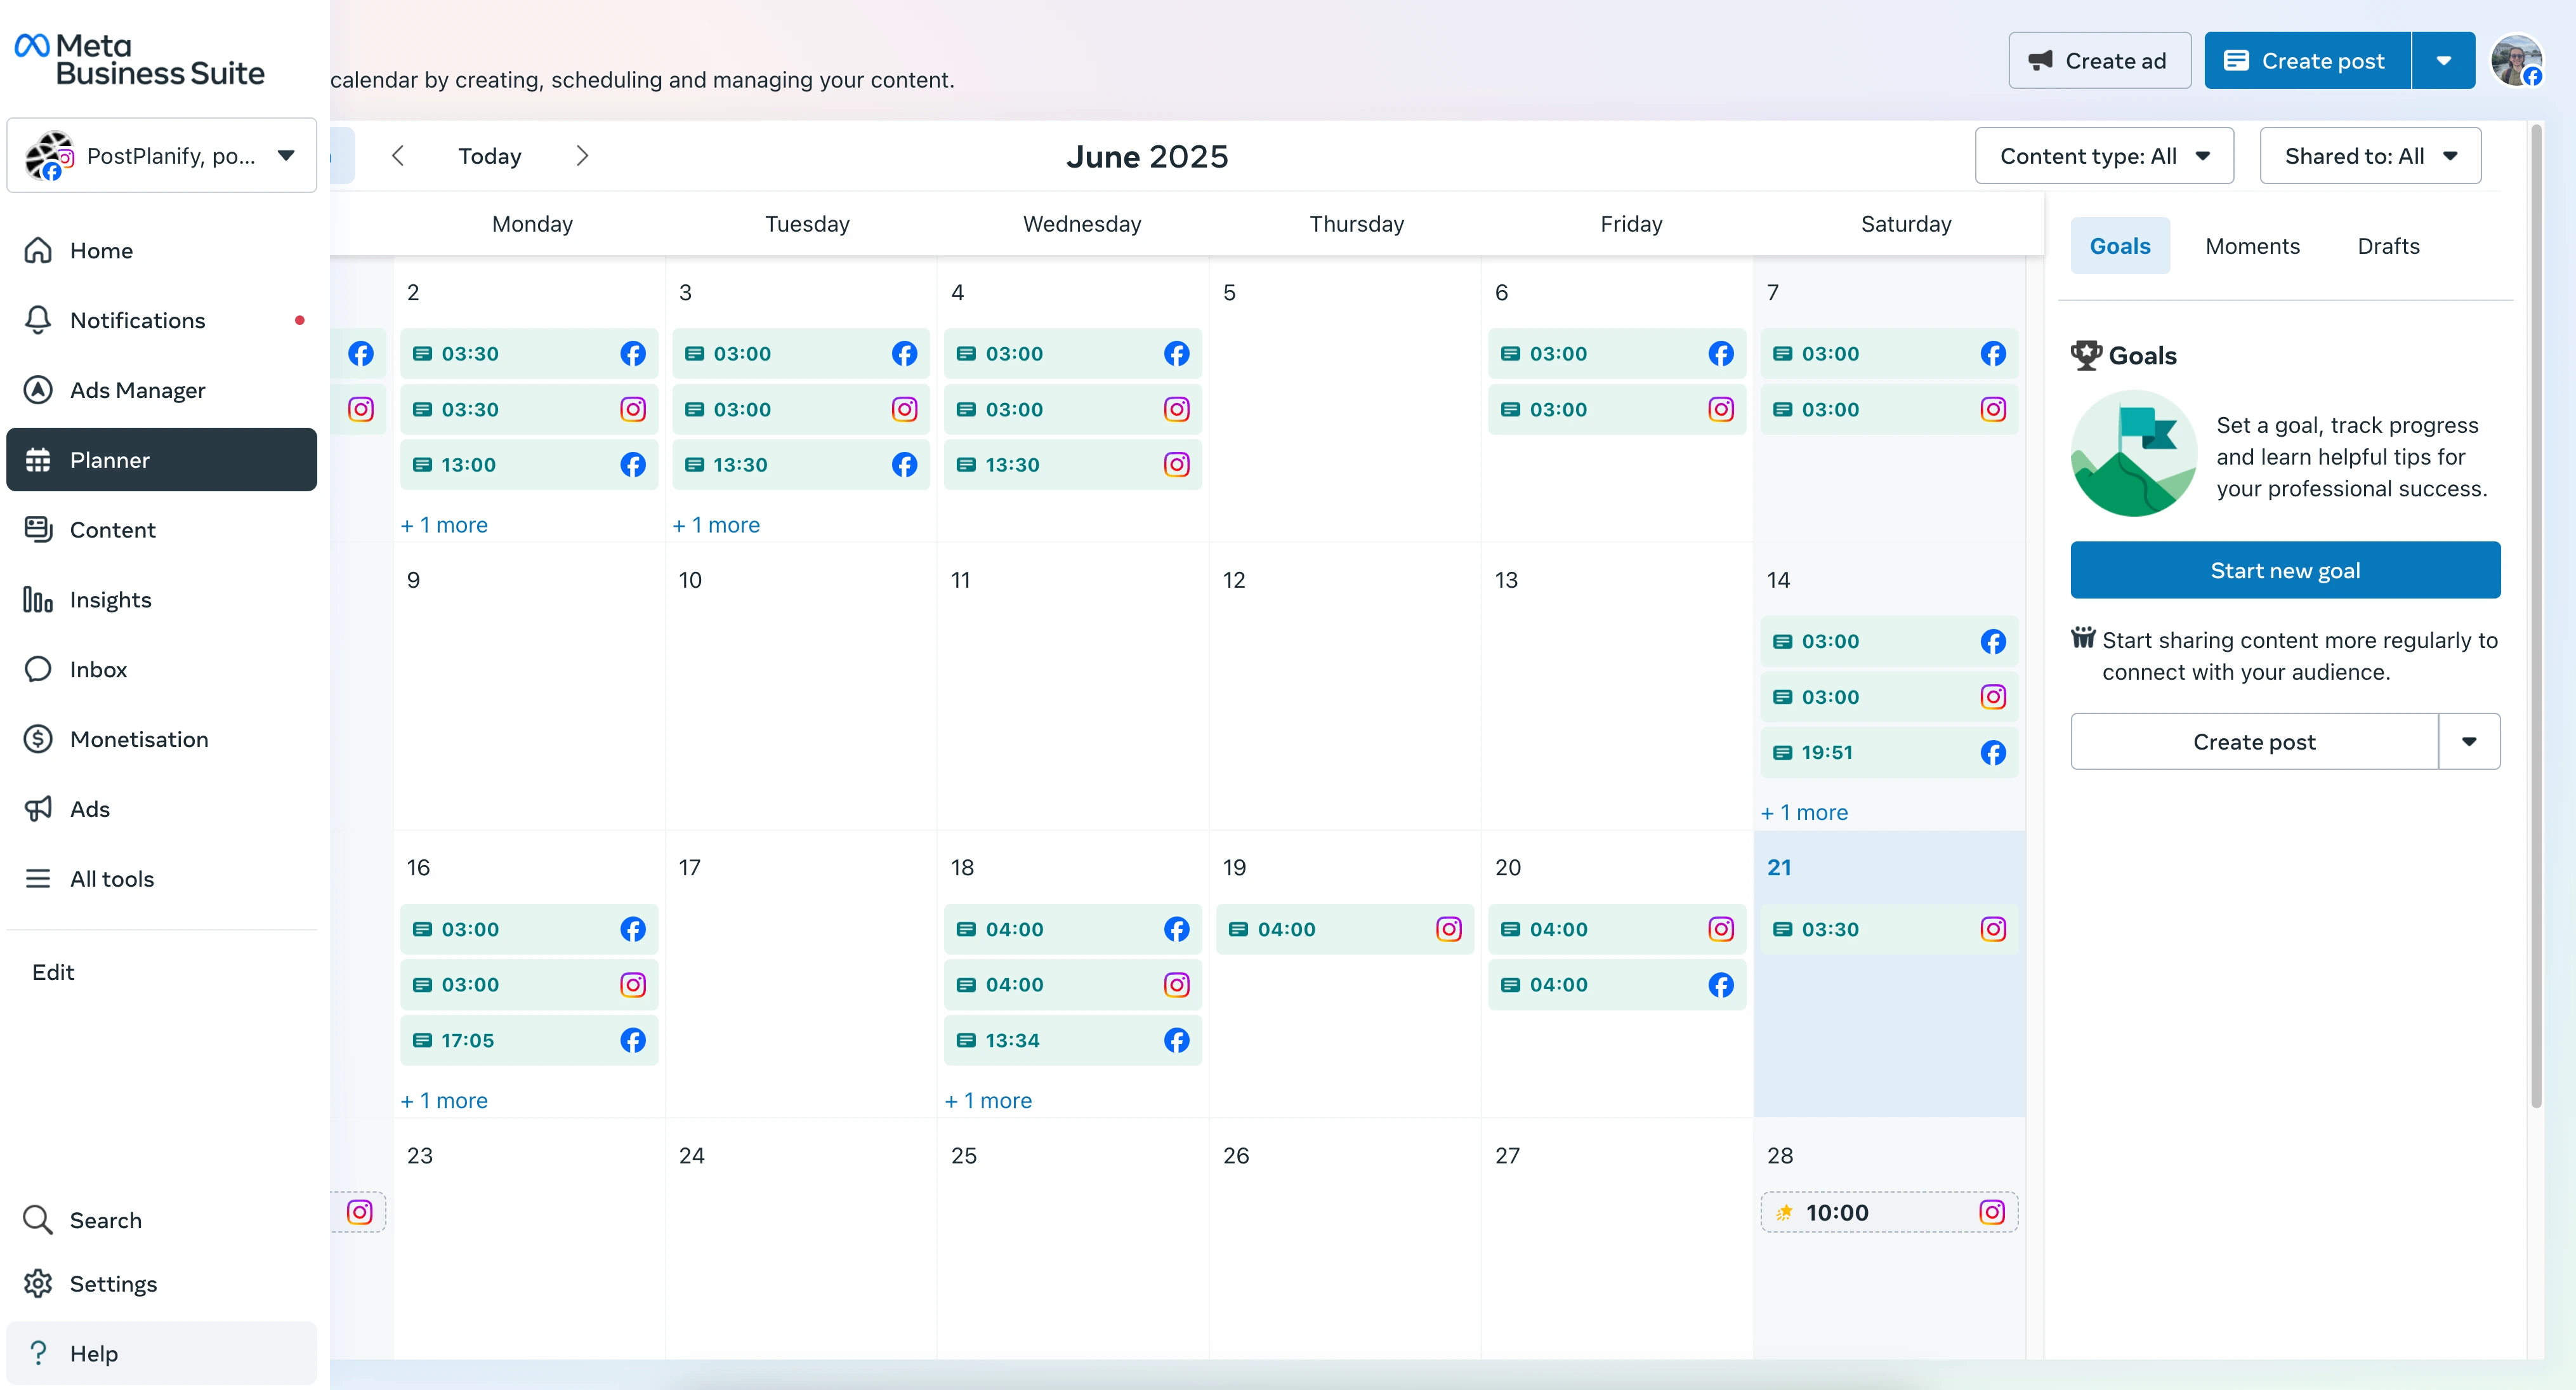
Step 2: Open Planner
- Click Planner in left sidebar (or Content → Calendar)
- Navigate to desired posting date/time
- Click Create Reel
Step 3: Upload Your Reel
- Select Instagram account (+ Facebook Page if cross-posting)
- Upload video:
- Drag-and-drop MP4 file, OR
- Click "Choose File" → select video
- Max file size: 250MB
- Max length: 90 seconds (recommended under 60 seconds)
Step 4: Write Caption and Add Details
Caption:
- Full keyboard access (easier than mobile)
- Add hashtags, emojis, line breaks
- Tag locations and collaborators
- Pro tip: First 125 characters visible before "...more"
Cover Image:
- Hover over video preview
- Click Choose Thumbnail
- Scrub timeline to best frame
- Click Save
Accessibility:
- Add alt text for screen readers
Step 5: Schedule Your Reel
Instead of "Publish Now":
- Click dropdown arrow
- Select Schedule
- Choose date (up to 90 days ahead for Reels)
- Choose time (uses your computer's timezone—verify!)
- Click Schedule button
Confirmation: Reel appears in calendar with purple play icon.
Step 6: Manage Scheduled Reels
View/edit scheduled posts:
- Calendar view shows all scheduled content
- Click any scheduled Reel to:
- Edit caption, time, or cover
- Duplicate for similar content
- Delete if plans change
Color coding: Purple = Reel, Blue = Feed post, Orange = Story
What Meta Business Suite Adds Over Native
Advantages:
- ✅ Desktop workflow (easier caption writing, file management)
- ✅ Calendar view (see full month at a glance)
- ✅ Cross-post to Facebook (publish to Facebook Reels simultaneously)
- ✅ Drag-and-drop rescheduling (move posts around calendar)
- ✅ Mobile app available (Meta Business Suite app)
- ✅ Multiple account management (switch between Pages/accounts)
- ✅ Basic analytics (reach, engagement, profile visits)
Still can't do:
- ❌ No bulk upload (still one Reel at a time)
- ❌ No AI captions
- ❌ No Canva integration
- ❌ No TikTok/YouTube cross-posting
- ❌ Limited analytics (basic metrics only)
- ❌ No first comment scheduling
When to Use Meta Business Suite
Best for:
- Desktop-first creators who hate typing on phones
- Managing Instagram + Facebook from one dashboard
- Agencies juggling multiple client accounts
- Visual thinkers who need calendar overview
- Free solution seekers who need more than native app
Limitations:
- Still one-by-one scheduling
- Requires Facebook Page linkage
- No advanced features like AI or cross-platform beyond Facebook
👉 How to Schedule Instagram & Facebook Carousel Posts
Method 3: PostPlanify (Advanced Features, Multi-Platform)
PostPlanify is a third-party scheduler designed for creators, agencies, and teams who need AI captions, Canva integration, and cross-platform posting.
Price: Growth $99/mo or $79/mo billed yearly (15 accounts, 5 workspaces, 3 users) | Premium $199/mo or $159/mo billed yearly (30 accounts, 15 workspaces, 6 users, approvals + reports) | Scale $299/mo or $239/mo billed yearly (100 accounts, 50 workspaces, 12 users, white-label PDF reports) | Enterprise custom pricing Free trial: 7 days, with a 14-day money-back guarantee
Step-by-Step: Schedule Reels with PostPlanify
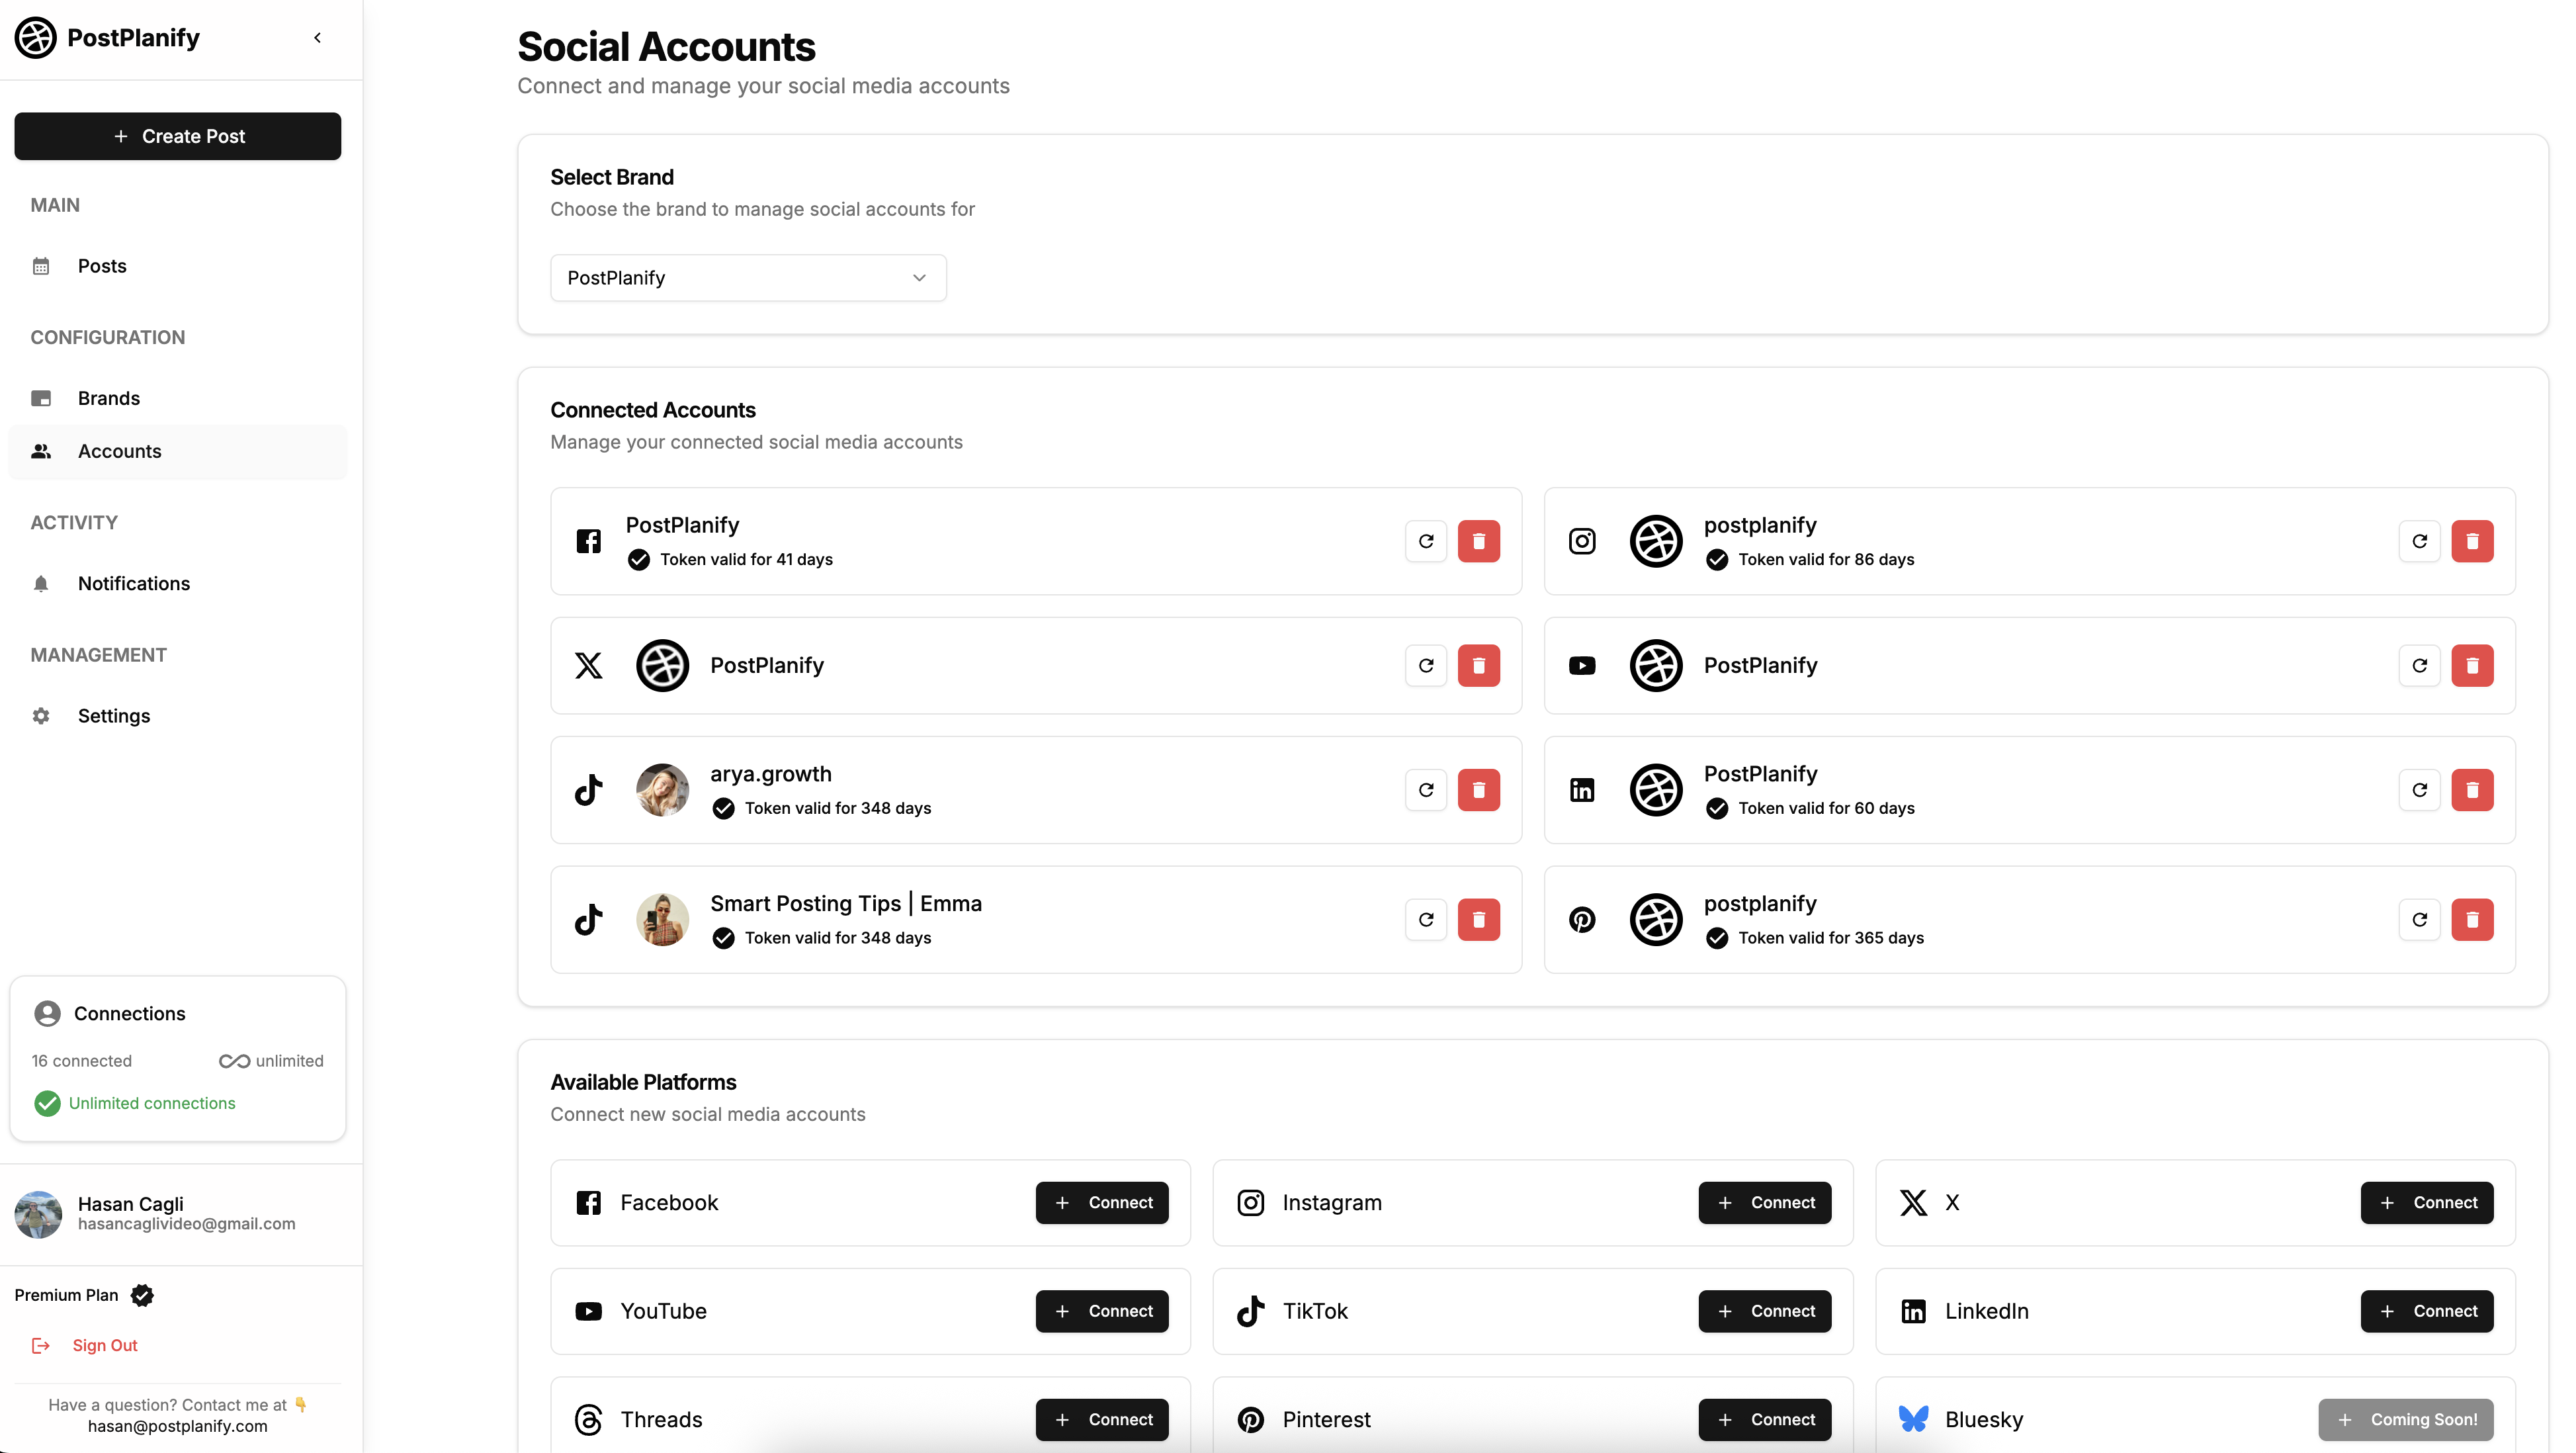
Step 1: Connect Instagram Account
- Sign up at postplanify.com
- Go to Social Accounts → Connect Account
- Select Instagram
- Choose Business or Creator account
- Authorize PostPlanify (official Instagram API)
Step 2: Upload or Import Your Reel
Option A: Upload from computer
- Drag-and-drop MP4 file
- Max 250MB, 90 seconds
- Vertical 9:16 (1080x1920px) recommended — see the social media safe zones guide for exact safe areas on every platform
Option B: Import from Canva (PostPlanify exclusive)
- Click Import from Canva
- Browse your Canva projects
- Select Reel design
- Click Import
- No manual downloading needed — PostPlanify pulls directly from Canva
Option C: Import from Google Drive
- Connect Google Drive
- Select video file
- Import directly
Step 3: Select Platforms (Multi-Platform Magic)
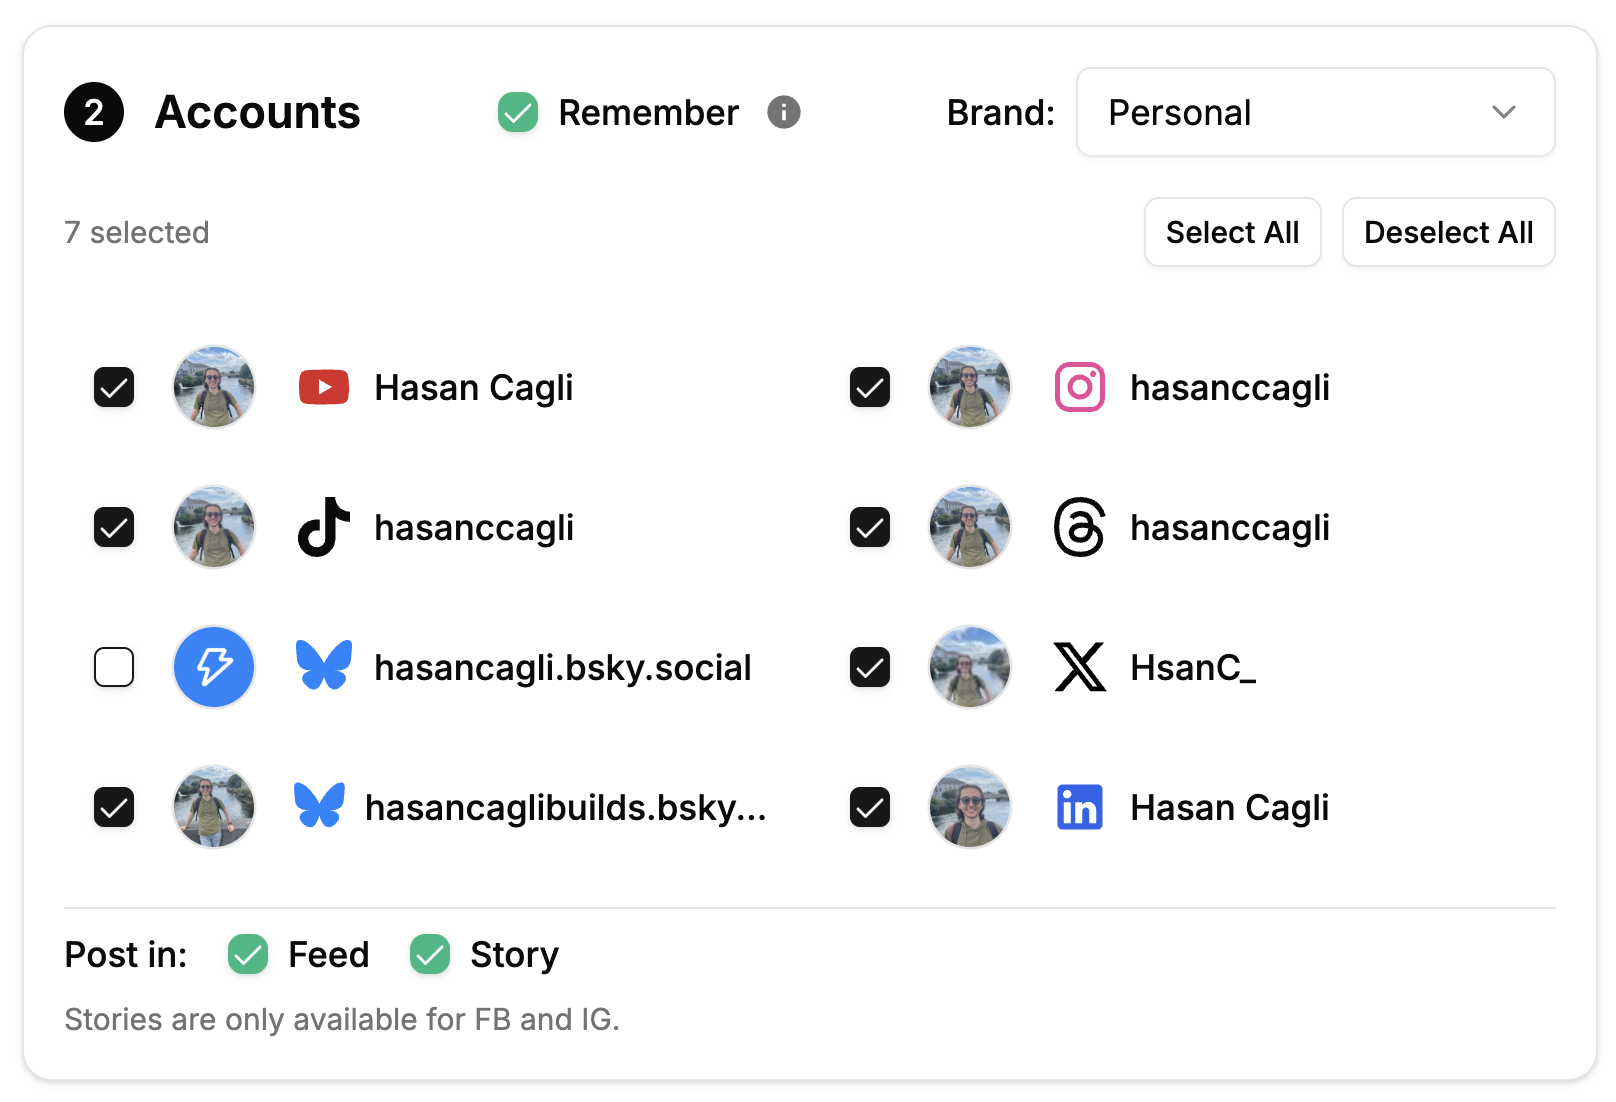
Instagram + Cross-posting:
- Check Instagram
- Optionally check:
- TikTok (adapt caption automatically)
- Facebook Reels (cross-post)
- YouTube Shorts (cross-post)
- LinkedIn (if appropriate)
- X/Twitter (if video fits)
- Threads
- Pinterest (video pins)
- Bluesky
PostPlanify adapts captions per platform:
- Instagram: Emoji-heavy, 5-8 hashtags, conversational
- TikTok: Trending hashtags, casual tone
- LinkedIn: Professional, business-focused
- Facebook: Community-oriented
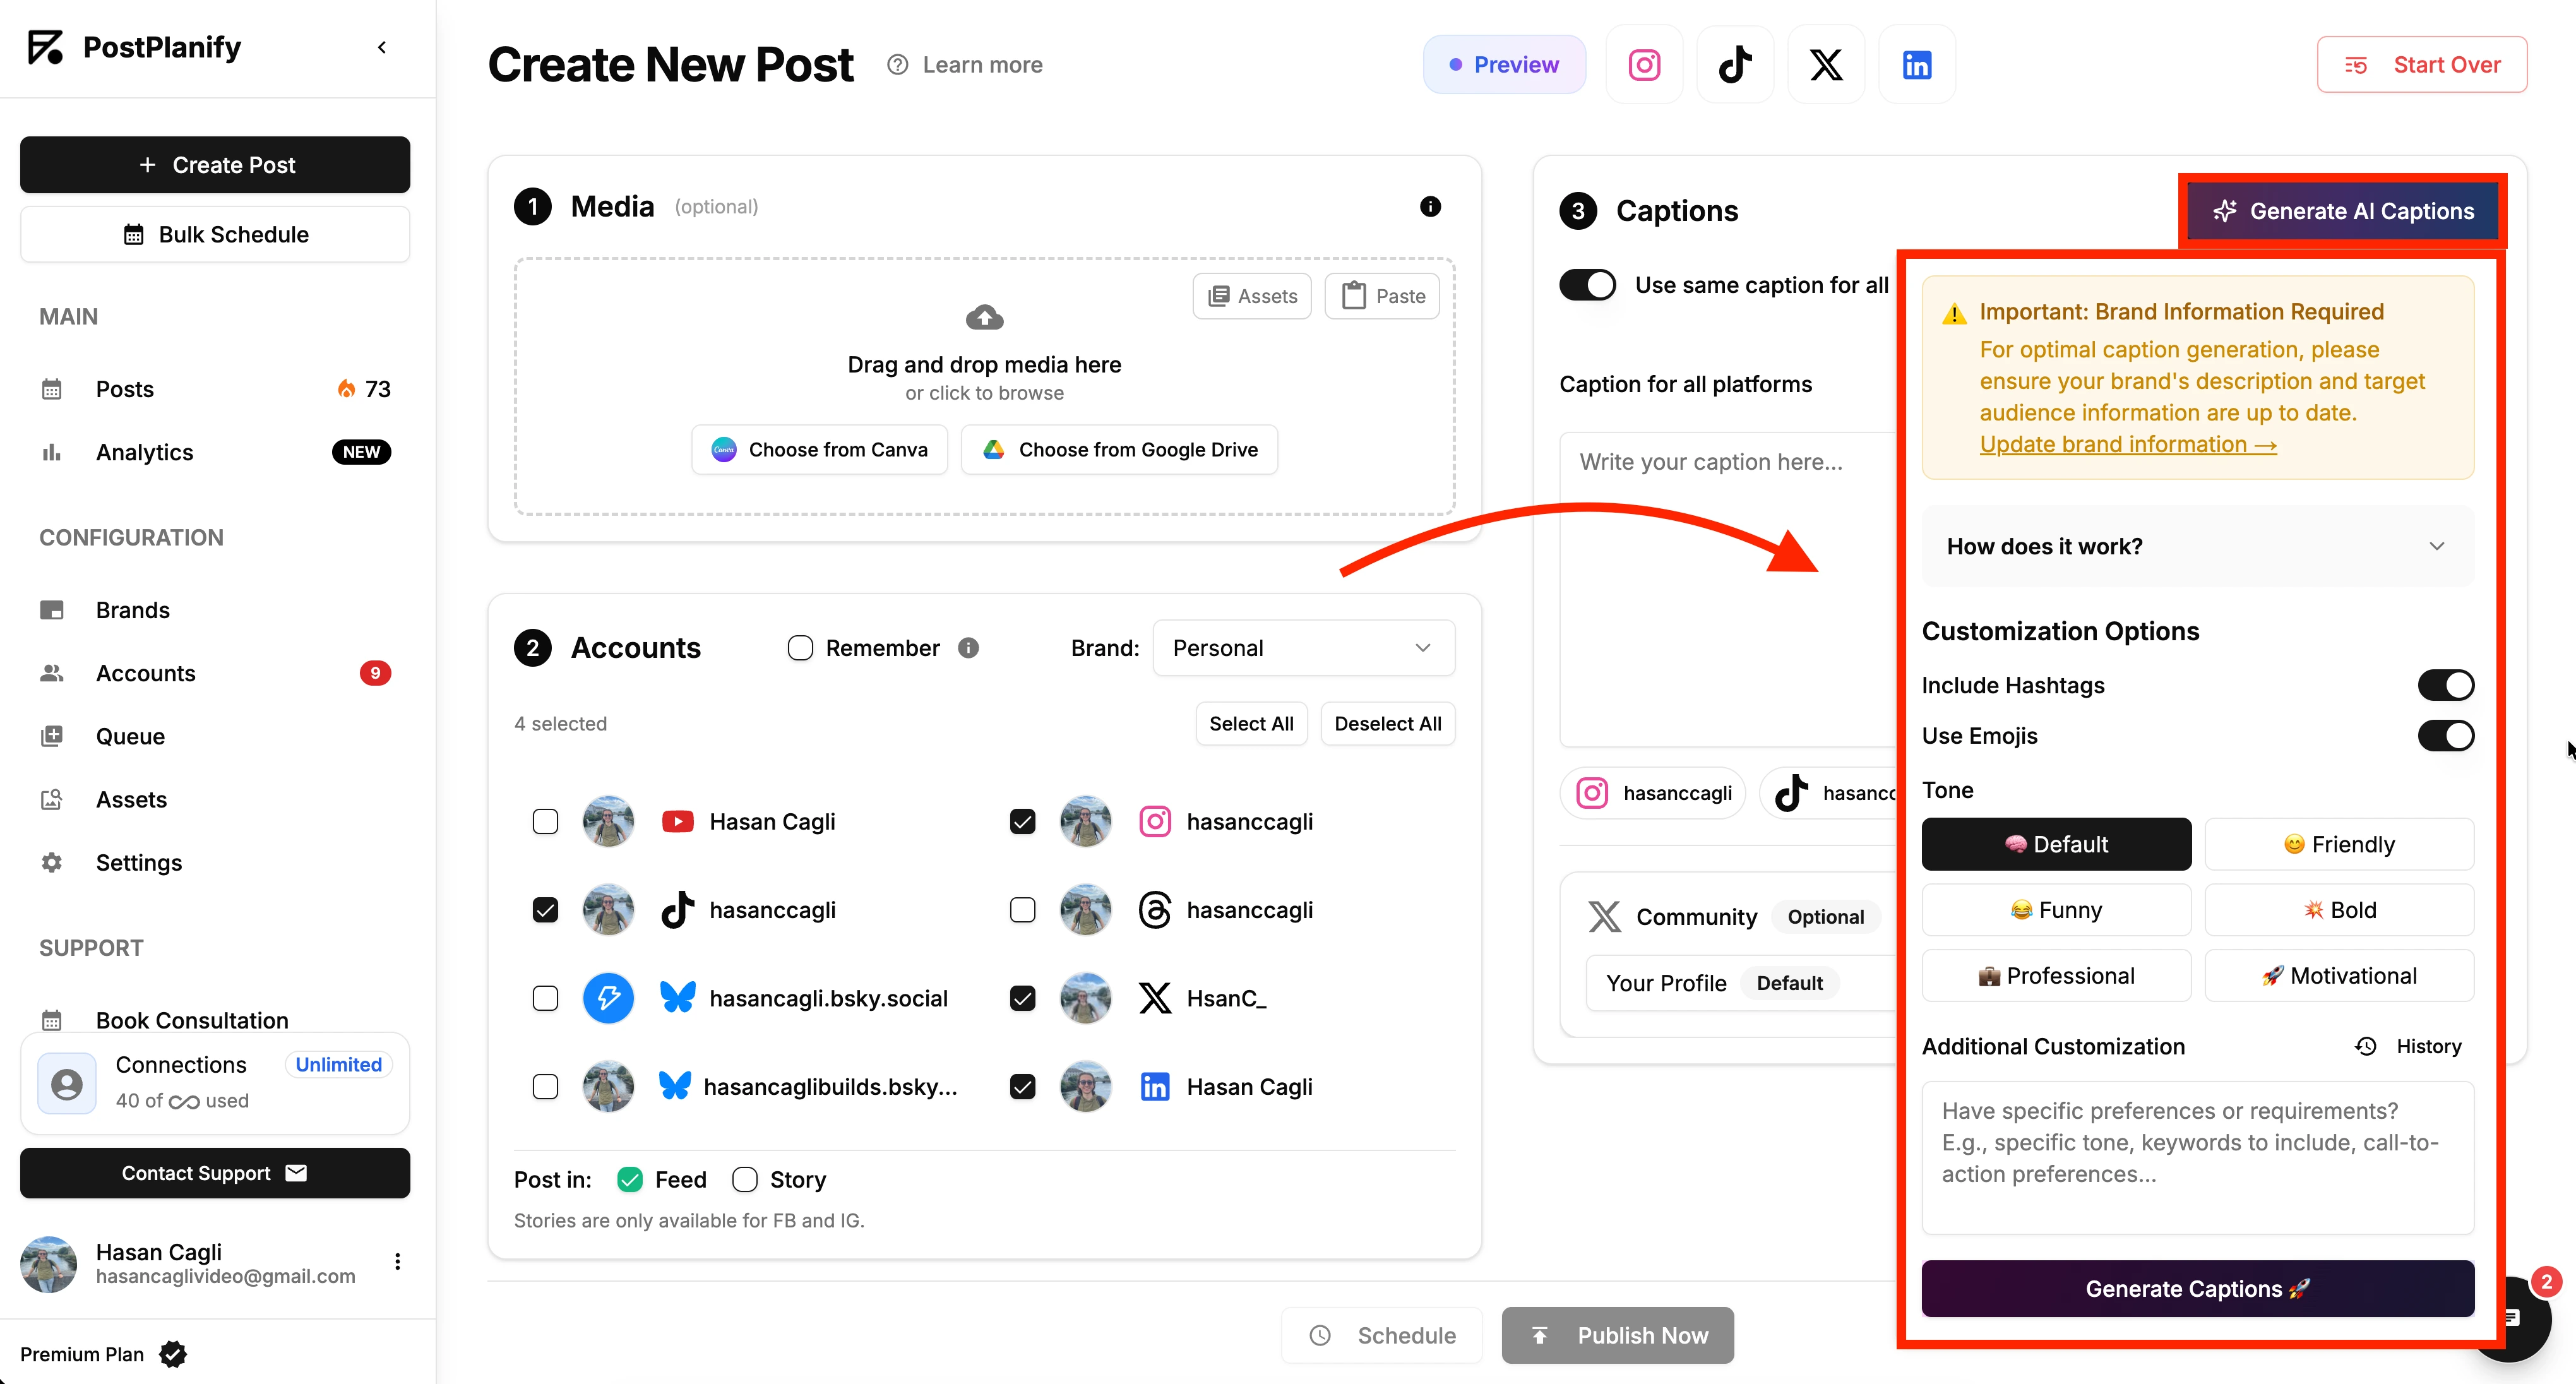
Step 4: Write Caption (or Use AI)
Option A: Manual writing
- Type caption (up to 2,200 characters for Instagram)
- Add hashtags
- Include call-to-action
- Add emojis and line breaks
Option B: AI caption generation (saves 5-10 min/post)
- Click Generate AI Caption
- AI analyzes:
- Your video content
- Brand voice (set in settings)
- Target audience
- Platform (Instagram vs TikTok tone)
- Receive 3 caption variations
- Choose best one
- Edit to personalize
AI learns your style:
- First few captions: edit heavily
- After 10+ posts: AI mimics your voice accurately
- Saves 10-15 hours/month on caption writing
Step 5: Preview Your Reel
Platform-specific previews:
- See exactly how Reel appears on Instagram feed
- Check mobile vs desktop view
- Verify cover image crops correctly
- Confirm caption formatting (line breaks, emojis)
- Test hashtag placement
Why preview matters:
- Catch cropping issues before publishing
- Ensure text overlays aren't cut off
- Verify call-to-action is visible
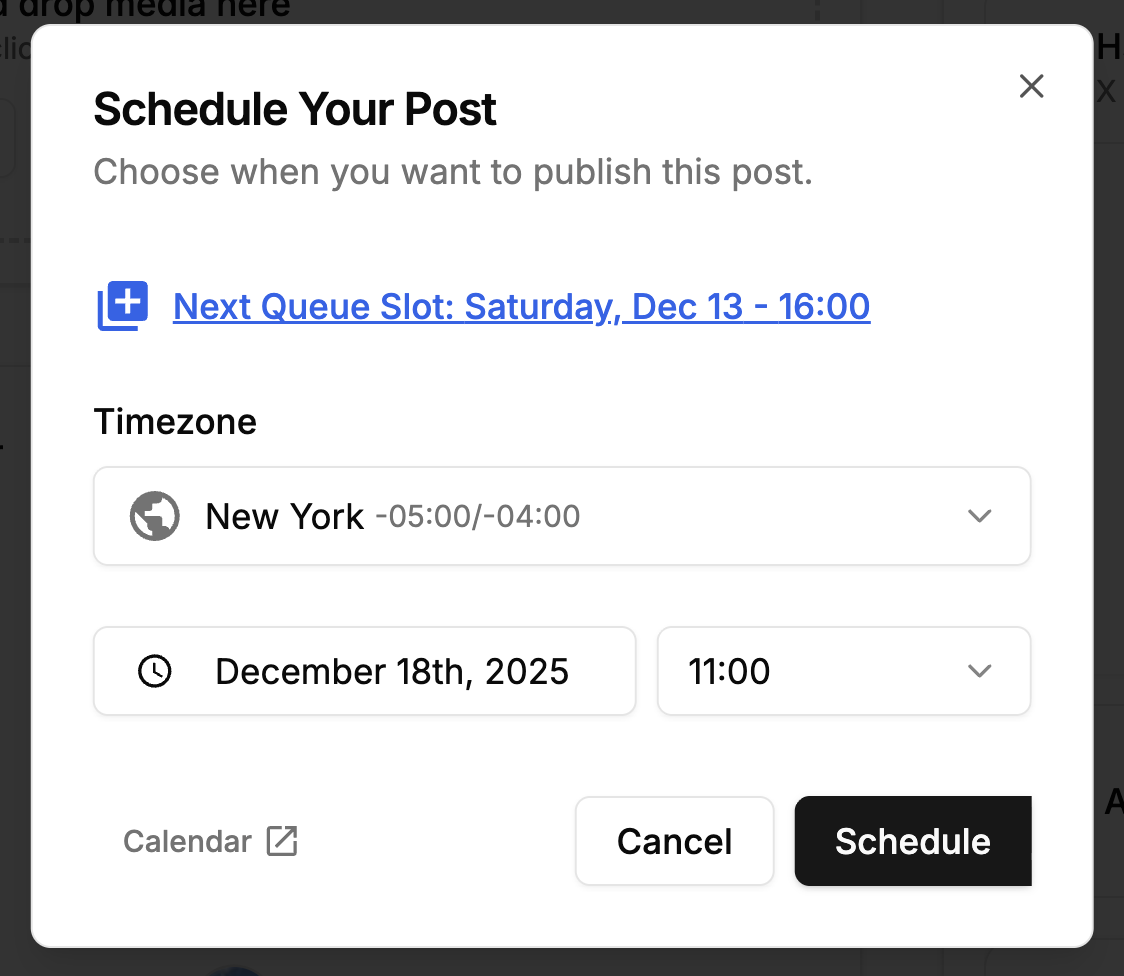
Step 6: Schedule Your Reel
Option A: Specific date/time
- Click Schedule
- Select date
- Select time
- Choose timezone (auto-detects or manual override)
- Click Confirm
Option B: Add to queue
- Click Add to Queue
- Reel fills next available queue slot
- Queue times customizable (e.g., Mon/Wed/Fri 9 AM, 6 PM)
Option C: Save as draft
- Click Save as Draft
- Finish later
- Access from Drafts folder
Option D: Publish immediately
- Click Publish Now if ready to go live
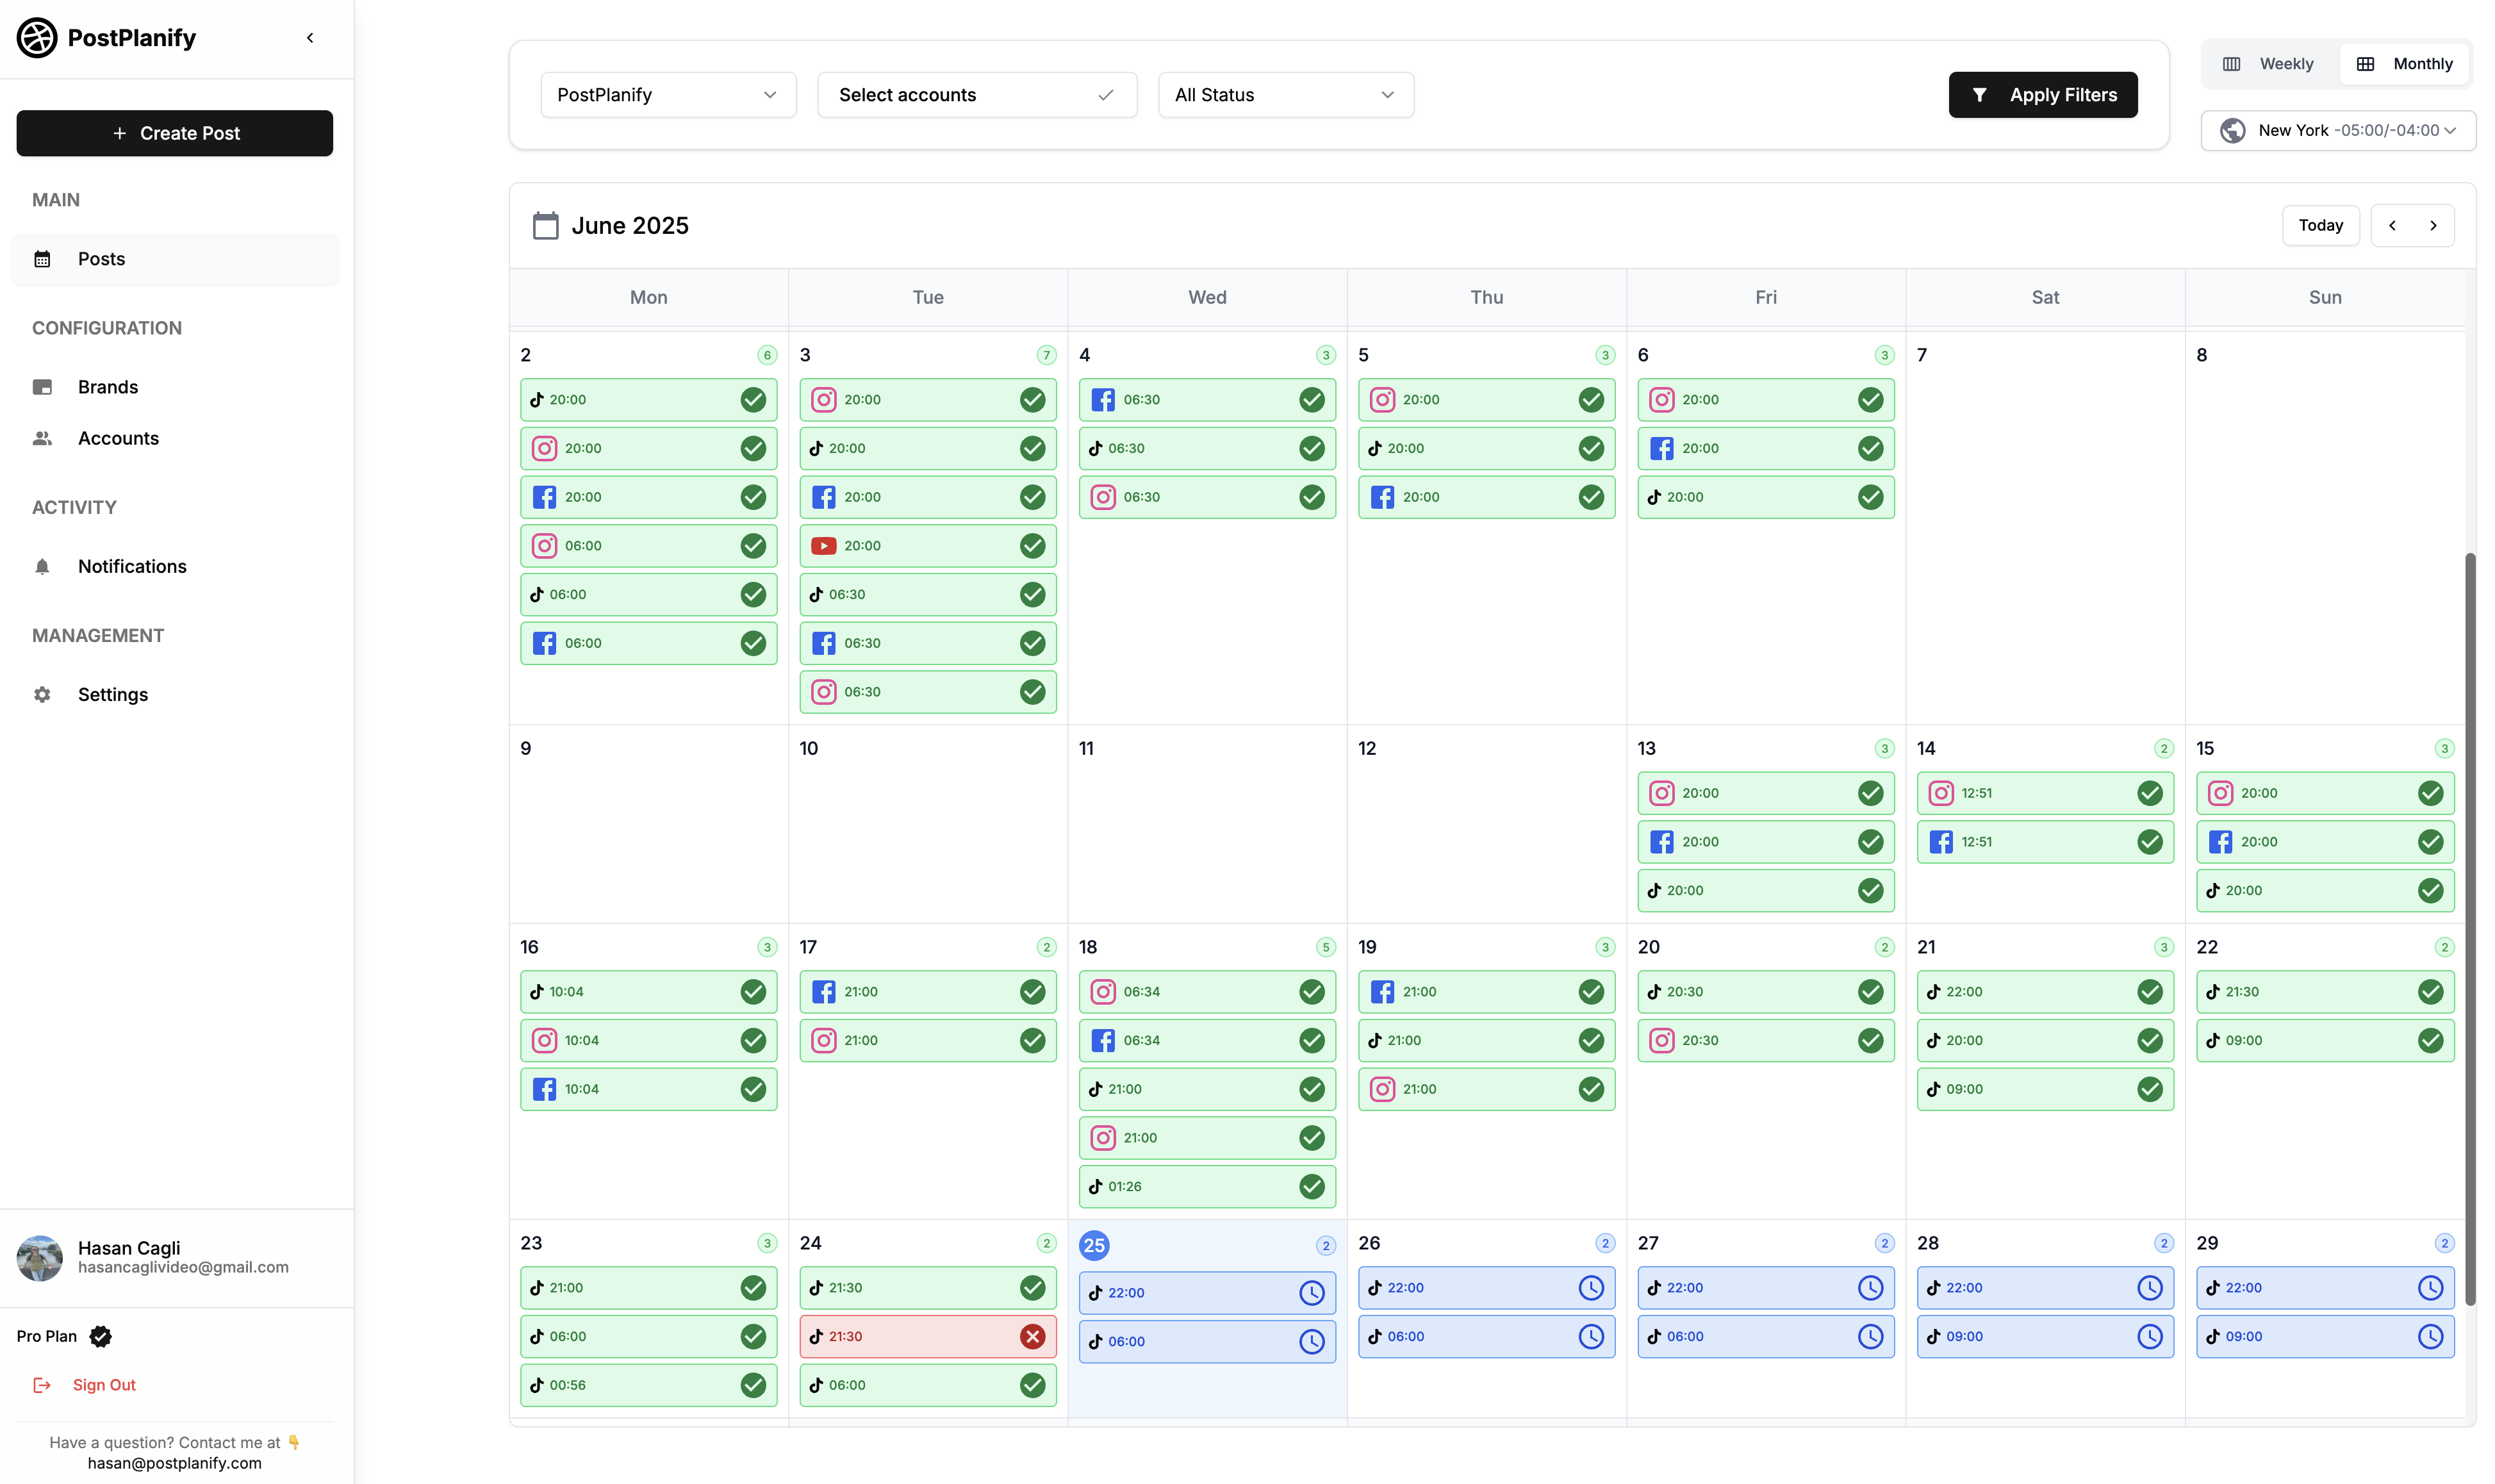
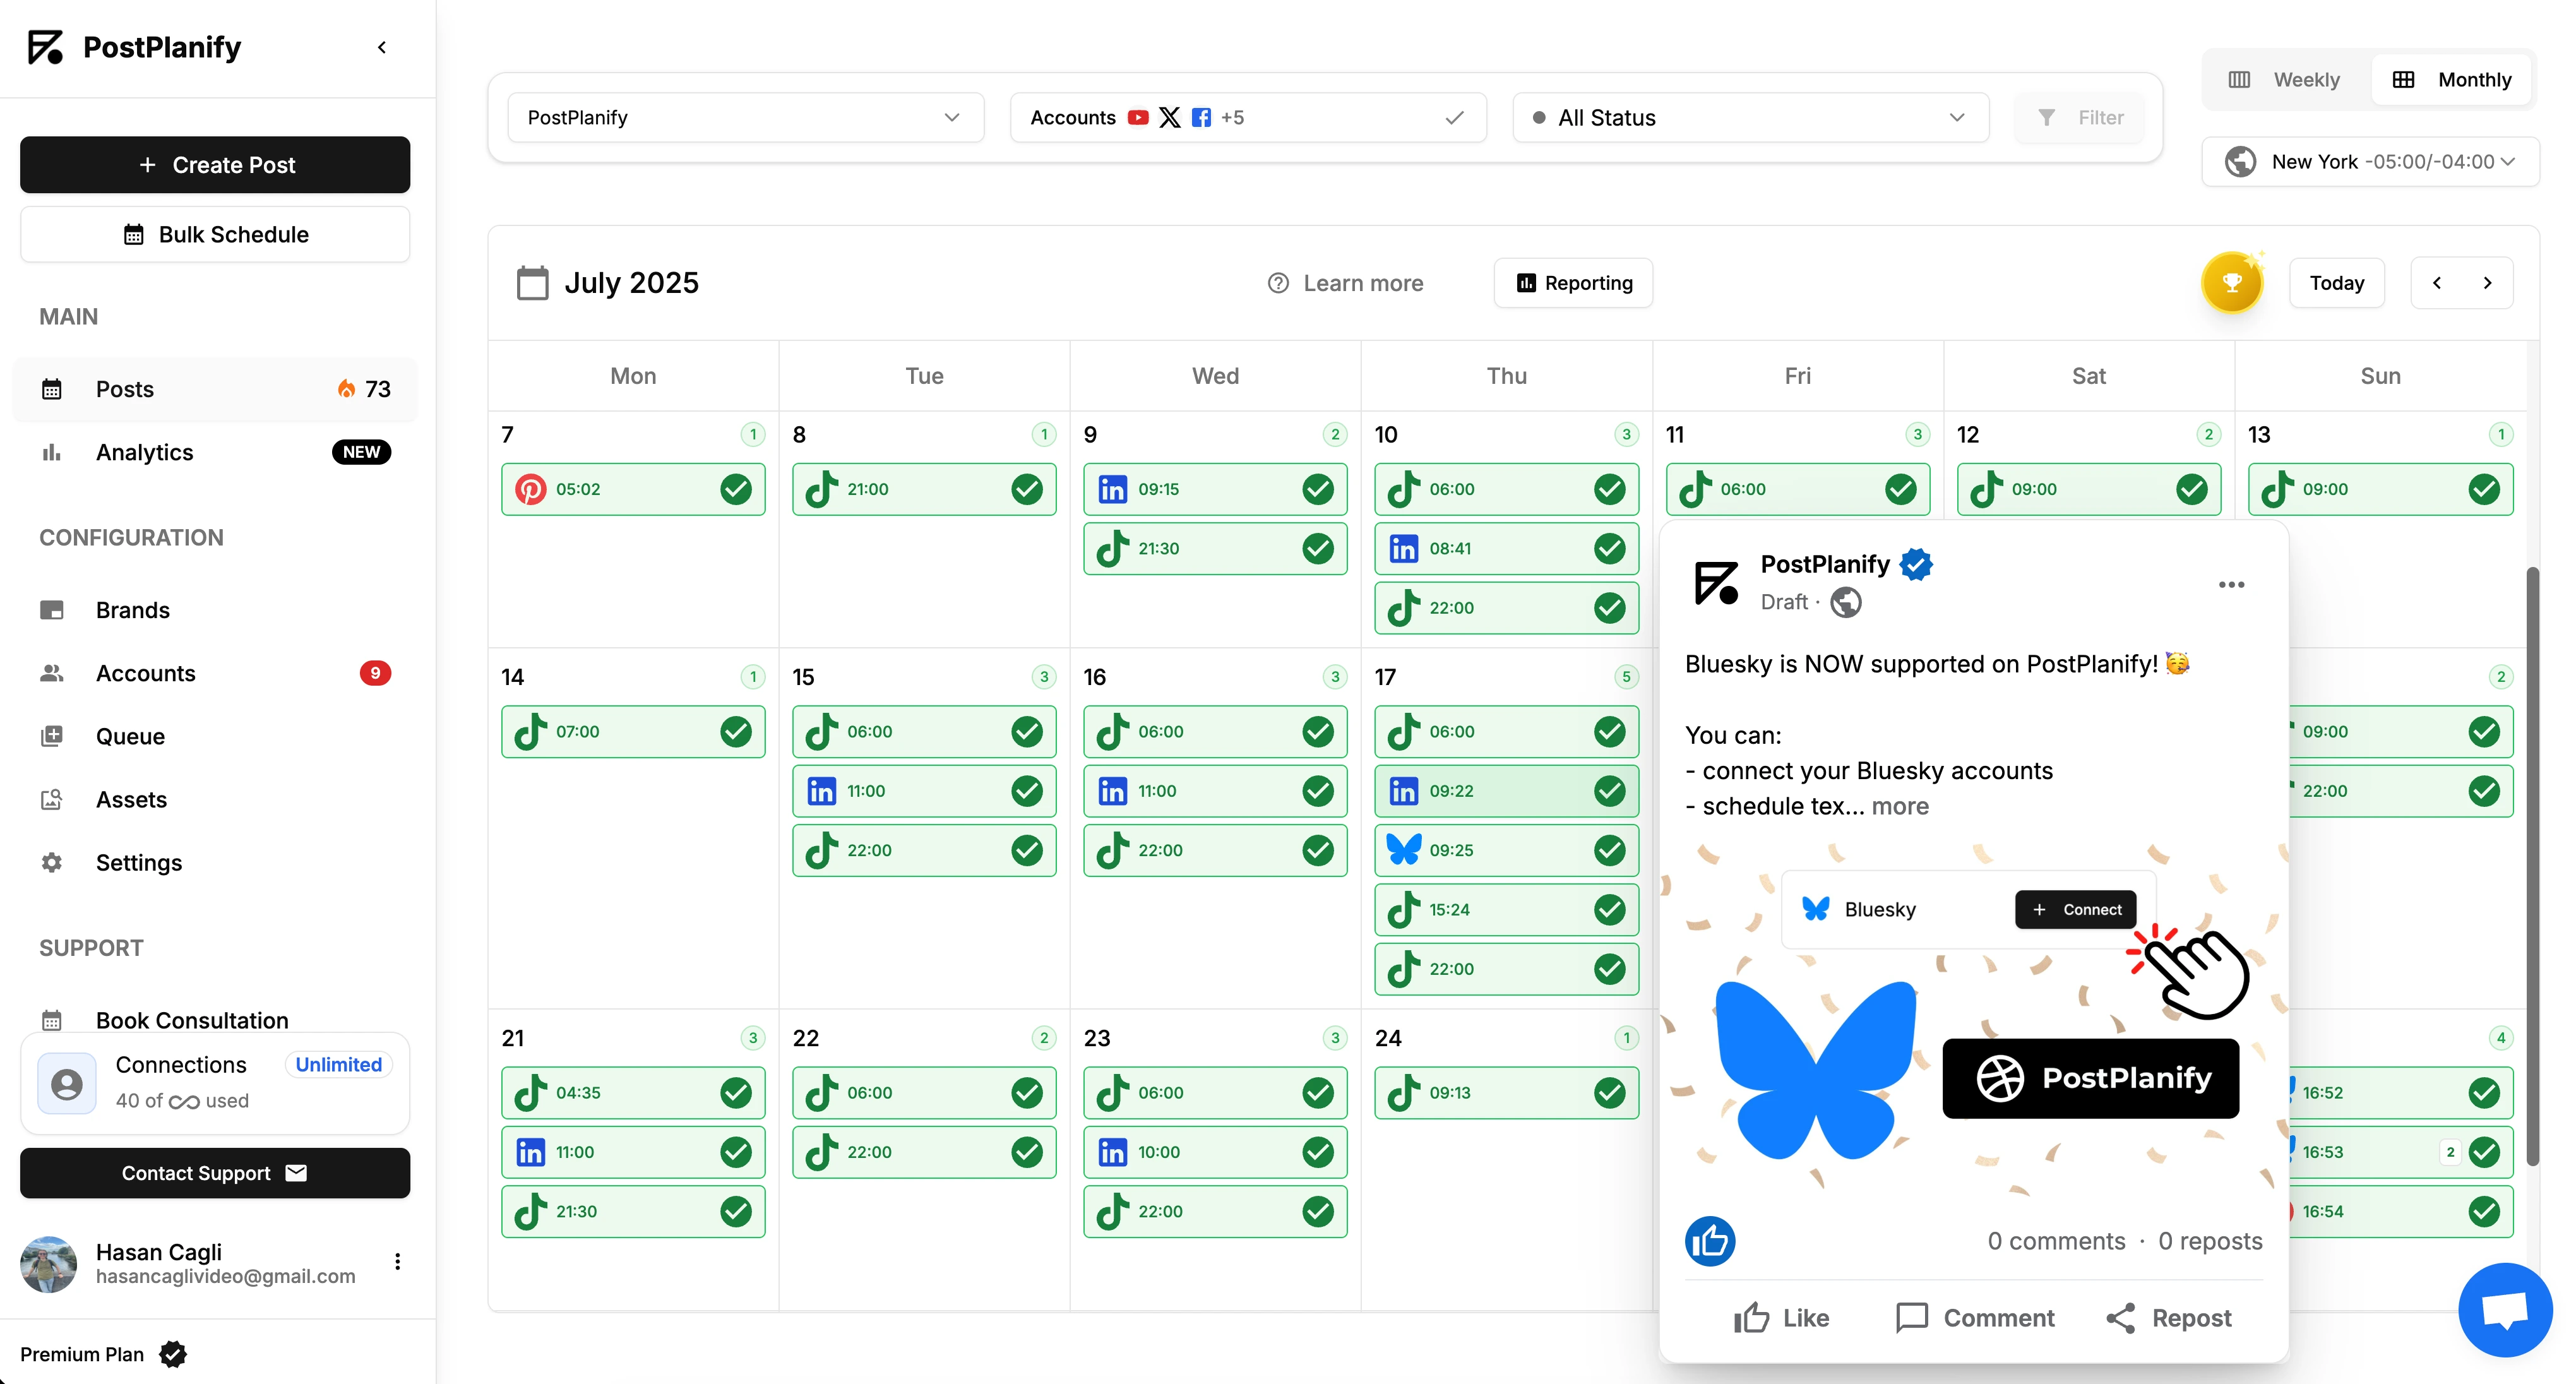
Step 7: Manage Scheduled Reels
Calendar view:
- See all scheduled Reels across all platforms
- Visual overview of content gaps
- Color-coded by platform and post type
Edit scheduled Reels:
- Click any scheduled Reel
- Edit caption, time, platforms
- Drag-and-drop to reschedule
- Duplicate for variations
Bulk actions (Growth and above):
- Upload up to 20 Reels via CSV
- Schedule entire month in 30 minutes
- Bulk reschedule if plans change
What PostPlanify Adds Over Native + Meta Business Suite
Exclusive features:
- ✅ AI caption generation (saves 10-15 hours/month)
- ✅ Canva direct import (no downloading, re-uploading)
- ✅ Google Drive integration
- ✅ Cross-post to 10 platforms (Instagram, TikTok, Facebook, YouTube, LinkedIn, X, Threads, Pinterest, Bluesky, Google Business)
- ✅ Bulk scheduling (CSV upload, up to 20 posts, Growth and above)
- ✅ First comment scheduling (keep links out of main caption)
- ✅ Multi-account scheduling (15 accounts on Growth, 30 on Premium, 100 on Scale)
- ✅ Platform-specific captions (AI adapts tone automatically)
- ✅ Advanced analytics (Growth and above, all 10 platforms)
- ✅ Team collaboration (3 users on Growth, 6 on Premium, 12 on Scale)
- ✅ Approval workflows and reports (Premium), with white-label PDF reports on Scale
- ✅ Content library (save high-performing Reels)
- ✅ Template system (recurring content types)
- ✅ Timezone management (post optimally for global audiences)
Cost comparison (for 3 platforms: Instagram + TikTok + Facebook):
- PostPlanify: Growth at $99/mo, or $79/mo billed yearly, for 15 accounts, 5 workspaces, and 3 users
- Buffer: $18/mo ($6 × 3 channels)
- Later: $45/mo (Growth plan for multiple platforms)
- Meta Business Suite: Free (but Instagram + Facebook only)
Time savings:
- Canva import: 2-3 min/post
- AI captions: 5-10 min/post
- Cross-posting: 10-15 min/post
- Total: 17-28 min saved per Reel
- At 10 Reels/month = 3-5 hours saved
When PostPlanify is Worth It
Use PostPlanify if you:
- Post 5+ Reels per week
- Manage multiple platforms (Instagram + TikTok + etc.)
- Want AI caption assistance
- Use Canva for graphics/video editing
- Need bulk scheduling capability
- Manage multiple accounts or clients
- Value time savings over the Growth plan cost
ROI calculation:
- If saves 5 hours/month
- At $50/hour value = $250/month
- Cost = $99/month, or $79/month billed yearly
- Net savings: $151-$171/month ($1,812-$2,052/year)
👉 Try PostPlanify free for 7 days
5 Best Instagram Reels Schedulers Compared
Quick Comparison Table
| Scheduler | Price | Best For | Key Features |
|---|---|---|---|
| Instagram Native | Free | 1-3 Reels/week, solo creators | Mobile app, up to 75 days, free |
| Meta Business Suite | Free | Desktop users, FB cross-posting | Calendar view, desktop + mobile |
| PostPlanify | $79/mo (yearly) | Multi-platform, AI users | Canva import, AI captions, 10 platforms |
| Later | $25/mo | Visual planners | Media library, best time suggestions |
| Buffer | $6/channel | Simplicity seekers | Proven tool, mobile app, queue |
1. Instagram Native Scheduler (Free)
Already covered above in Method 1.
Best for: Solo creators posting 1-3 Reels weekly with $0 budget.
Limitations: No bulk upload, desktop, AI, or cross-posting.
2. Meta Business Suite (Free)
Already covered above in Method 2.
Best for: Desktop users managing Instagram + Facebook who need calendar view.
Limitations: No AI, Canva integration, or cross-posting beyond Facebook.
3. PostPlanify - Best for Multi-Platform Creators
Already covered above in Method 3.
Price: Growth $99/mo or $79/mo billed yearly | Premium $199/mo or $159/mo billed yearly | Scale $299/mo or $239/mo billed yearly | Enterprise (custom)
Best for:
- Creators posting to Instagram + TikTok + Facebook + YouTube
- Agencies managing 5-15 client accounts
- Anyone using Canva for video editing
- Teams needing AI caption help
Key differentiator: Only scheduler with direct Canva import + AI captions tailored to your brand voice.
👉 PostPlanify Instagram Scheduler Features
4. Later - Best for Visual Content Planning
Price: Free plan | Starter $25/mo | Growth $45/mo | Advanced $80/mo
Best for: Visual thinkers who need media library organization and Instagram-first workflow.
Key Features:
- ✅ Visual content calendar (drag-and-drop)
- ✅ Media library with labels/folders
- ✅ Best time to post suggestions
- ✅ Hashtag analytics
- ✅ Linkin.bio tool
- ✅ User-generated content curation
- ✅ Instagram Stories + Reels scheduling
Instagram Reels support:
- Schedule Reels to Instagram
- Mobile app notification to publish
- Limited cross-posting (TikTok experimental)
Pricing:
- Free: 1 social set (IG + FB + TikTok + X + Pinterest), 10 posts/platform/month
- Starter: $25/mo - 1 social set, 30 posts/platform
- Growth: $45/mo - 3 social sets, unlimited posts
- Advanced: $80/mo - 5 social sets, unlimited posts
Pros:
- Beautiful visual interface
- Strong media organization
- Best time recommendations based on your data
- Linkin.bio monetization
Cons:
- Instagram-focused (other platforms feel secondary)
- Free plan very limited
- AI features cost extra
- Cross-posting limited compared to PostPlanify
Best for: Instagram-heavy creators who also dabble in TikTok/Facebook and prioritize visual planning.
5. Buffer - Best for Simplicity
Price: Free plan | Essentials $6/mo per channel | Team $12/mo per channel
Best for: Creators wanting the simplest possible tool with proven reliability.
Key Features:
- ✅ Queue system (set times, posts auto-fill)
- ✅ Mobile app (iOS/Android)
- ✅ Browser extension
- ✅ Basic analytics
- ✅ Clean interface
Instagram Reels support:
- Schedule Reels to Instagram
- Preview before publishing
- Mobile reminder notification (not auto-publish for some accounts)
Pricing:
- Free: 3 channels, 10 posts per channel
- Essentials: $6/mo per channel (unlimited posts)
- Team: $12/mo per channel (adds analytics, team features)
Pros:
- Trusted brand (founded 2010)
- Very simple learning curve
- Mobile app
- Affordable for single channel
Cons:
- Pricing adds up fast ($18/mo for 3 channels)
- No AI captions (just basic suggestions)
- No Canva integration
- Free plan very limited (10 posts total)
- Instagram Reels may require mobile confirmation
Best for: Beginners wanting simplicity or testing scheduling for first time.
👉 Buffer vs PostPlanify: Which Is Best?
Detailed Comparison Table
| Feature | Meta Suite | PostPlanify | Later | Buffer | |
|---|---|---|---|---|---|
| Price | Free | Free | $79/mo (yearly) | $25/mo | $6/channel |
| Free plan | ✅ | ✅ | 7-day trial | ✅ (10 posts) | ✅ (10 posts) |
| Desktop | ❌ | ✅ | ✅ | ✅ | ✅ |
| Mobile app | ✅ | ✅ | ❌ (coming) | ✅ | ✅ |
| AI captions | ❌ | ❌ | ✅ Brand-aware | Extra cost | Basic |
| Canva integration | ❌ | ❌ | ✅ Direct import | ❌ | ❌ |
| Cross-post TikTok | ❌ | ❌ | ✅ | ✅ | ✅ |
| Cross-post YouTube | ❌ | ❌ | ✅ | ✅ | ✅ |
| Bulk upload | ❌ | ❌ | ✅ (Growth+) | ✅ | ✅ |
| Calendar view | ❌ | ✅ | ✅ | ✅ | ✅ |
| Analytics | Basic | Basic | ✅ (Growth+) | Paid plans | Paid plans |
| Best time suggestions | ❌ | ❌ | ✅ (Growth+) | ✅ | ❌ |
| Media library | ❌ | ❌ | ✅ | ✅ | ❌ |
| Team features | ❌ | Basic | ✅ (Growth+ users; approvals on Premium+) | Paid plans | Paid plans |
| Best for | Solo, free | Desktop, FB | Multi-platform | Visual planning | Simplicity |
Which Scheduler Should You Choose?
Choose Instagram Native if:
- ✅ You post 1-3 Reels/week
- ✅ Budget is $0
- ✅ You edit on mobile anyway
- ✅ You don't need cross-posting
Choose Meta Business Suite if:
- ✅ You prefer desktop workflow
- ✅ You cross-post to Facebook
- ✅ You need calendar view
- ✅ Budget is $0
Choose PostPlanify if:
- ✅ You post 5+ Reels/week
- ✅ You use Canva for editing
- ✅ You want AI caption help
- ✅ You post to Instagram + TikTok + Facebook + etc.
- ✅ You value time savings
Choose Later if:
- ✅ You're Instagram-focused
- ✅ Visual planning is priority
- ✅ You need media library organization
- ✅ You want best time suggestions
Choose Buffer if:
- ✅ You want the simplest tool
- ✅ You only need basic scheduling
- ✅ You're testing scheduling for first time
Decision shortcut: If you post to 2+ platforms and value time savings, PostPlanify Growth can pay for itself quickly.
👉 Top 5 Social Media Scheduling Tools Compared
Best Times to Post Instagram Reels (2026 Data)
Scheduling Reels is only half the battle—timing determines reach. Instagram's algorithm gives fresh Reels a 1-2 hour "testing window" where it shows them to a small audience segment. High engagement in that window pushes your Reel to Explore pages and wider feeds.
Overall Best Times (Global Average)
Based on analysis of millions of Reels from Later, Buffer, and Hootsuite (2024-2025):
Top 5 time windows:
- Wednesday 9 AM - 12 PM (highest engagement across industries)
- Tuesday 10 AM - 1 PM (strong runner-up)
- Thursday 9 AM - 12 PM (B2B sweet spot)
- Friday 11 AM - 1 PM (pre-weekend browsing)
- Monday 10 AM - 12 PM (avoid early Monday mornings)
Best day overall: Wednesday
Worst day: Sunday (40-50% lower engagement than weekdays)
Best hours: 9 AM - 1 PM local time (varies by audience timezone)
Evening window: 6 PM - 9 PM also performs well for entertainment/lifestyle niches
By Niche/Industry
Different audiences = different peak times:
Fashion/Beauty:
- Best: Wednesday-Friday, 11 AM - 2 PM, 7 PM - 9 PM
- Why: Lunch breaks + evening "get ready with me" browsing
- Avoid: Early mornings (audience not thinking about fashion yet)
Fitness/Health:
- Best: Monday-Thursday, 6 AM - 8 AM (pre-workout), 5 PM - 7 PM (post-work)
- Why: Motivation peaks around workout times
- Avoid: Mid-afternoons (work-focused)
Food/Cooking:
- Best: Monday-Friday, 11 AM - 1 PM (lunch planning), 5 PM - 8 PM (dinner planning)
- Saturday-Sunday: 9 AM - 11 AM (brunch inspiration)
- Why: People browse food content when hungry
- Avoid: Mid-afternoon (3-5 PM)
Business/Finance:
- Best: Tuesday-Thursday, 8 AM - 11 AM
- Why: Decision-makers check social during morning coffee
- Avoid: Evenings, weekends (work mode off)
Entertainment/Comedy:
- Best: Wednesday-Sunday, 6 PM - 11 PM
- Why: Leisure browsing time, looking for laughs
- Avoid: Work hours (9 AM - 5 PM weekdays)
Travel:
- Best: Wednesday-Friday, 12 PM - 2 PM, Saturday-Sunday 10 AM - 2 PM
- Why: Daydreaming during work breaks, weekend planning
- Avoid: Monday mornings (back-to-reality blues)
Parenting/Family:
- Best: Monday-Friday, 8 PM - 10 PM (kids asleep, parents scrolling)
- Saturday-Sunday: 6 AM - 9 AM (early risers), 8 PM - 10 PM
- Why: Nap times and post-bedtime browsing
- Avoid: After-school hours (3-6 PM, too busy)
By Timezone
EST (US East Coast):
- Morning prime: 9-11 AM
- Lunch peak: 12-1 PM
- Evening window: 7-9 PM
CST (US Central):
- Morning prime: 8-10 AM (catches EST morning)
- Lunch peak: 11 AM-12 PM
- Evening window: 6-8 PM
PST (US West Coast):
- Morning prime: 6-8 AM (catches EST morning)
- Lunch peak: 12-2 PM local
- Evening window: 6-9 PM
GMT (UK/Europe):
- Morning prime: 8-10 AM local
- Lunch peak: 12-2 PM
- Evening window: 7-9 PM
AEST (Australia):
- Morning prime: 7-9 AM local
- Lunch peak: 12-1 PM
- Evening window: 6-8 PM
Multi-timezone strategy: If your audience spans multiple regions:
- Option 1: Post 2-3 Reels daily to hit different timezone peaks
- 9 AM EST (US East morning)
- 6 PM EST (US evening + early morning Asia)
- Option 2: Rotate posting times weekly to give each region optimal slots
- Option 3: Focus on timezone with largest follower concentration
How to Find YOUR Best Times (4-Week Testing Method)
Generic best times are starting points—your specific audience might behave differently.
Week 1-2: Test Time Variations
Schedule same type of Reel (e.g., all tutorials) at different times:
- Monday 9 AM
- Tuesday 12 PM
- Wednesday 7 PM
- Thursday 10 AM
- Friday 11 AM
- Saturday 10 AM
- Sunday 2 PM
Important: Keep content type consistent to ensure fair comparison.
Week 3: Analyze Results
- Open Instagram Insights
- Go to Content → Reels
- Sort by Engagement Rate (not just views)
- Note top 5 performing Reels and their posting times
- Look for patterns
Key metrics:
- Reach: How many unique accounts saw it
- Engagement rate: (Likes + Comments + Shares + Saves) / Reach × 100
- Watch time: Average % watched
- Shares: Indicates value (most important for Explore)
- Saves: Indicates usefulness (algorithm rewards this)
Week 4: Double Down on Winners
- Schedule 70% of Reels during proven best times
- Keep 30% experimental to discover new opportunities
- Re-test quarterly as audience habits change
Pro tip: Instagram Insights shows "When Your Followers Are Online"
- Go to Insights → Total Followers → See All
- Scroll to "Most Active Times"
- Heat map shows when YOUR specific audience is online
- This is more accurate than generic guides
Best Practices for Timing
1. Slight Time Variations
Don't post at exactly same time every day:
- Monday: 10 AM
- Tuesday: 9:30 AM
- Wednesday: 11 AM
- Thursday: 10:30 AM
Why: Reaches different audience segments, looks less robotic, prevents follower fatigue.
2. Consider Content Type
Match posting time to content consumption habits:
- Educational Reels: 9-11 AM (focused morning learning)
- Entertainment: 6-9 PM (relaxed scrolling)
- Motivation: 7-9 AM (start-of-day inspiration)
- Tutorials: 10 AM - 2 PM (project planning time)
- Behind-the-scenes: 6-8 PM (evening curiosity)
3. Account for Weekends
Weekend behavior differs:
- Saturday morning: Later start (10 AM - 12 PM, not 9 AM)
- Sunday: Lowest engagement (save best content for weekdays)
- Friday evening: Start of weekend scrolling (6-9 PM uptick)
4. Seasonal Adjustments
Times shift with seasons:
- Summer: Evening times perform better (people out during day)
- Winter: Daytime times stronger (more indoor browsing)
- Holidays: Engagement drops 30-50% (family time, not phone time)
5. Test After Algorithm Changes
Instagram updates algorithm frequently:
- Re-test best times every 3 months
- Watch for sudden engagement drops (signal of change)
- Join Instagram creator communities for early algorithm intel
Scheduling Advantage
Optimal times might be inconvenient for you personally:
- 6 AM: You're asleep
- 12 PM: You're in meetings
- 9 PM: You're with family
Scheduling solves this: Post at proven peak times without being glued to your phone.
PostPlanify bonus: Timezone-aware scheduling means your Reels post at correct local time even if you're traveling.
👉 Instagram Engagement Rate Calculator (Free)
Instagram Reels Optimization: Covers, Captions, Hooks
Scheduling at the right time + optimized content = maximum reach. Here's how to make every Reel scroll-stopping.
1. Create Thumb-Stopping Cover Images
Your cover image appears:
- In grid view on your profile
- In search results
- In Explore page suggestions
- In feed (if user hasn't tapped Play yet)
Cover image best practices:
Use a clear focal point:
- Faces perform best (eye contact grabs attention)
- Or bold text with high contrast
- Or single object/product (not cluttered background)
Keep text short and readable:
- 3-5 words maximum
- Big, bold fonts
- High contrast (white text on dark background or vice versa)
- Instagram crops covers differently across surfaces—keep text centered
Show the payoff:
- Before-and-after preview
- Result/reveal shot
- Step 1 of tutorial (creates curiosity)
- Emotional peak moment
Brand consistently:
- Same colors or visual style across all covers
- Tiny logo in same corner (bottom-left or top-right)
- Viewers should recognize YOUR Reels at a glance
Technical specs:
- 1080 x 1920px (9:16 vertical)
- JPG or PNG
- Upload in Canva → Import to PostPlanify → Schedule
Common mistakes:
- ❌ Random frame from middle of video (looks sloppy)
- ❌ Text too small to read on mobile
- ❌ Cluttered background (attention scattered)
- ❌ Face cut off (poor composition)
Pro workflow with PostPlanify:
- Design cover in Canva (use Reels template)
- Place cover as first frame of video
- Import from Canva to PostPlanify
- Preview before scheduling
- Adjust if needed
2. Write Captions That Hook and Convert
Instagram Reels captions can be up to 2,200 characters but most users see only the first 125 characters before "...more."
Caption structure:
Line 1: The Hook (Critical)
- Question: "Ever wonder why your Reels flop?"
- Bold statement: "This one tip tripled my reach."
- Surprising stat: "80% of creators make this mistake."
- Promise: "Watch this if you want more saves."
Lines 2-3: The Story/Context
- Explain the problem or setup
- Add personality (write like you talk)
- Create curiosity gap ("Here's what changed everything...")
Body: The Value
- Deliver on the hook's promise
- Break into short paragraphs (2-3 lines max)
- Use line breaks for readability
- Add emojis to break up text (but don't overdo it)
End: The Call-to-Action
- Ask a question ("Which tip will you try first?")
- Encourage engagement ("Save this for later 📌")
- Tag friends ("Tag someone who needs this")
- Direct to bio/DM ("Link in bio for the full guide")
Caption example:
Ever wonder why your Reels get views but no followers? 👀

The problem: Your hook doesn't match your content.

Here's what I mean:
• You promise "5 tips" in the video
• But your caption talks about something else
• Viewers feel confused and scroll away

The fix:
✅ Hook in video = Hook in caption
✅ Deliver exactly what you promise
✅ Make it ridiculously easy to follow

Try this on your next Reel and watch your follower count grow.

What's your biggest Reels struggle? Drop it below 👇

#instagramreels #reelstips #contentcreator #socialmediatips #instagramgrowth
Why this works:
- Hook asks relatable question
- Identifies specific problem
- Provides clear solution
- Ends with engagement CTA
- Uses 5-6 relevant hashtags
3. Hashtag Strategy (2026 Update)
How many hashtags? 5-8 is optimal in 2026.
Instagram's algorithm shifted from hashtag-heavy to keyword-heavy search. But hashtags still help with:
- Categorization
- Niche discovery
- Trending topic association
Hashtag mix:
- 3-4 niche tags (10K-500K posts): #sourdoughstarter, #couchto5k
- 2-3 broader tags (1M-10M posts): #baking, #running
- 1-2 community tags (brand/movement tags): #runnersofinstagram, #bakersofig
Avoid:
- ❌ Generic mega-tags (#love, #instagood) — too broad, no reach
- ❌ Banned tags — check before using (shadowban risk)
- ❌ 30 hashtags — looks spammy, no benefit
Research process:
- Search a hashtag on Instagram
- Check "Related" hashtags
- Aim for hashtags where you could realistically be in top posts
- Save your hashtag sets in Notes app or PostPlanify
Pro tip: Put hashtags in caption (not first comment). Instagram indexes caption text for search.
4. The First 3 Seconds (Make or Break)
Instagram shows Reels to a small test audience first. If those viewers watch for 3+ seconds, the algorithm pushes your Reel to more people.
Hook strategies:
Visual hooks:
- Fast motion (speeds up to grab attention)
- Unexpected reveal (cover something, then uncover)
- Before/after split screen
- Text on screen: "If you're making this mistake, stop scrolling"
Audio hooks:
- Surprising statement
- Question
- Trending sound (algorithm boost)
- Conflict setup
Editing hooks:
- Quick cuts (change scene every 1-2 seconds)
- Zoom in/out
- Motion graphics
- Text animations
Common mistake: Slow intro (logo, "Hey guys," long setup) loses 70% of viewers in first 3 seconds.
Fix: Start with the payoff, then explain how you got there.
5. Accessibility: Alt Text and Captions
Alt text:
- Instagram automatically generates it
- Or write custom alt text describing video content
- Helps visually impaired users
- Gives Instagram context (may boost search ranking)
How to add:
- Before scheduling, tap "Advanced Settings"
- Select "Write Alt Text"
- Describe video in one sentence
- Save
Captions (text overlays):
- 85% watch Reels without sound
- Add text overlays explaining key points
- Use large, readable fonts
- High contrast (white text on dark background)
6. First Comment Strategy
Why use first comment:
- Keeps caption clean and focused
- Pushes links/hashtags below fold (better reach)
- Allows expansion without caption clutter
What to put in first comment:
- ✅ Links (don't disrupt caption flow)
- ✅ Product tags
- ✅ Detailed hashtag research
- ✅ Additional context
- ✅ Related content links
How to schedule first comment:
- Instagram native: Can't schedule first comments
- Meta Business Suite: Can't schedule first comments
7. Calls-to-Action That Convert
What to ask for:
- Save this: "Bookmark this for later 📌"
- Share with friends: "Send this to someone who needs it"
- Comment: "Which tip surprised you most?"
- Follow: "Follow for daily tips like this"
- Click link: "Full tutorial linked in bio"
CTA placement:
- End of video (verbal)
- End of caption (text)
- First comment (link)
Avoid pushy CTAs:
- ❌ "Like and follow or you'll have bad luck"
- ❌ "Comment below to enter giveaway" (engagement bait = algorithm penalty)
Natural CTAs:
- ✅ "What's your experience with this?"
- ✅ "Save this if you found it helpful"
- ✅ "Check the link in my bio for the full breakdown"
Common Instagram Reels Scheduling Mistakes
Even with perfect timing and optimization, these mistakes can kill your Reels' performance.
Mistake 1: Scheduling Without Engaging After Publishing
The Problem: You batch-schedule 10 Reels, hit publish, and ignore Instagram for the week. Comments go unanswered.
Why it hurts:
- Instagram's algorithm prioritizes Reels that spark conversations
- Fast replies (within 1-2 hours) signal "active creator" to algorithm
- Unanswered comments = lost relationships and future engagement
- The first hour after posting is critical for algorithm testing
The Fix:
- Set up push notifications for comments
- Block 15 minutes after each scheduled Reel goes live for engagement
- Reply to every comment within 2 hours if possible
- Like and respond to DMs
- The 80/20 rule: 80% engagement time, 20% scheduling time
PostPlanify tip: After scheduling, add calendar reminder "Engage with Reel" 15 minutes after publish time.
Mistake 2: Over-Scheduling (Posting Too Many Reels)
The Problem: You schedule 3-5 Reels daily thinking "more content = more growth."
Why it hurts:
- Follower fatigue: Your Reels dominate their feed, causing unfollows
- Algorithm dilution: Multiple posts compete for same audience
- Lower engagement per Reel: 5 Reels get 100 views each vs. 1 Reel gets 500 views
- No time for engagement: You're scheduling, not building community
The Fix:
- 3-5 Reels per week is optimal for most creators (Later 2024 data)
- Daily posting: Only if you can maintain quality AND engagement
- Test your threshold:
- Week 1: Post 3 Reels
- Week 2: Post 5 Reels
- Week 3: Post 7 Reels
- Compare engagement rates—find your sweet spot
Warning signs you're posting too much:
- Engagement rate dropping per Reel
- Unfollows increasing
- Comments decreasing
- Reach plateauing or declining
Quality > Quantity: 3 great Reels > 10 mediocre Reels
Mistake 3: Ignoring Video Quality
The Problem: You schedule low-quality Reels (blurry, shaky, bad lighting, terrible audio).
Why it hurts:
- Instagram prioritizes high-quality video in algorithm
- Viewers scroll past blurry/poorly lit content instantly
- Low watch time = algorithm buries your Reel
- Damages your brand credibility
The Fix:
Video quality checklist:
- ✅ Lighting: Natural light or ring light (avoid dark/grainy)
- ✅ Stability: Use tripod or stabilizer (not shaky handheld)
- ✅ Resolution: 1080 x 1920px minimum
- ✅ Audio: Clear, no background noise (use lapel mic if needed)
- ✅ Editing: Smooth transitions, no jump cuts
- ✅ File size: Under 250MB (anything larger gets compressed)
- ✅ Format: MP4 (H.264 codec)
Quick quality improvements:
- Film near window (free natural light)
- Use phone on stack of books as DIY tripod
- Record audio separately with AirPods, sync later
- Edit in CapCut or InShot (free apps)
Don't sacrifice quality for quantity. One great Reel per week > five mediocre Reels per week.
Mistake 4: Scheduling Identical Content Across All Platforms
The Problem: You schedule the same Reel with identical caption to Instagram, TikTok, Facebook, YouTube Shorts.
Why it hurts:
- Instagram ≠ TikTok: Different tones, hashtags, caption styles
- Followers on multiple platforms see duplicate content (looks lazy)
- Platform-specific features ignored (Instagram Reels vs TikTok trends)
- Algorithm differences: What works on TikTok may not work on Instagram
The Fix:
Adapt content per platform:
Original Reel: "5 productivity tips for entrepreneurs"
Instagram caption:
5 game-changers for busy entrepreneurs ✨

1️⃣ Time-block your calendar
2️⃣ Automate repetitive tasks
3️⃣ Batch content weekly
4️⃣ Delegate $10/hr work
5️⃣ Schedule everything

Which one will you try this week? 👇

#entrepreneur #productivitytips #smallbusiness #timemanagement #worksmarter
Tone: Professional but accessible, 5-6 hashtags, emoji bullets
TikTok caption:
POV: you finally figured out how to 10x your productivity 😮💨
try these & watch your free time multiply ⏰
which tip hit different for you? 👀
#productivity #entrepreneurtiktok #businesstips #timemanagement #productivityhacks #entrepreneurlife
Tone: Casual, Gen-Z language, trending phrases, 6+ hashtags
Facebook caption:
Running a business? These 5 time management strategies helped me reclaim 20 hours per week.

Time-blocking eliminated constant context-switching.
Automation saved 10 hours/month on manual tasks.
Weekly content batching reduced planning stress.
Strategic delegation freed me for high-impact work.
Scheduling systems maintained consistency effortlessly.

The result: More time for strategy, client relationships, and actually living life.

What's your biggest time management challenge?
Tone: Conversational professional, detailed, storytelling, question engagement
PostPlanify solution: AI caption generator automatically adapts tone per platform.
Mistake 5: Scheduling During Breaking News or Crises
The Problem: You schedule a lighthearted Reel for Thursday. Wednesday night, major tragedy or news event breaks. Thursday morning, your scheduled Reel posts and looks tone-deaf.
Why it hurts:
- PR disaster: Appears insensitive or out-of-touch
- Massive unfollows and backlash
- Lost trust that's hard to rebuild
The Fix:
Daily morning check (30 seconds):
- Before your first scheduled Reel goes live, scan headlines
- Google News, X trending, your industry news
- If major breaking news: pause or reschedule Reels for the day
Set up alerts:
- Google Alerts for your brand name + "breaking news"
- News apps with push notifications
- Industry-specific alert systems
Keep a buffer:
- Don't schedule promotional content more than 7 days ahead
- Keep next 24 hours of Reels visible and easy to cancel
Emergency pause protocol:
- Open scheduler
- Pause all Reels for next 24-48 hours
- Assess situation
- Decide: cancel entirely, reschedule, or acknowledge event
PostPlanify feature: Calendar view lets you quickly see and pause all scheduled content.
Mistake 6: Wrong File Specs (Compression Issues)
The Problem: You upload a Reel that looks perfect on your computer. Instagram compresses it into blurry, pixelated mess.
Why it hurts:
- Low video quality = algorithm buries it
- Viewers scroll past blurry content
- Professional credibility damaged
The Fix:
Instagram Reels optimal specs:
- Resolution: 1080 x 1920px (9:16 vertical)
- Frame rate: 30 fps (standard) or 60 fps (smooth motion)
- Format: MP4 (H.264 codec)
- File size: Under 250MB (Instagram's max)
- Length: Up to 90 seconds (but under 60 sec performs better)
- Bitrate: 5-8 Mbps (prevents over-compression)
Export settings (CapCut/Premiere/Final Cut):
- Codec: H.264
- Resolution: 1080 x 1920
- Frame rate: 30 fps (or match source)
- Bitrate: 6-8 Mbps (quality vs file size balance)
Avoid:
- ❌ Uploading 4K video (Instagram downsizes anyway, wastes bandwidth)
- ❌ Files over 250MB (upload fails or severe compression)
- ❌ MOV format (use MP4 for best compatibility)
- ❌ Variable frame rate (causes playback issues)
Pro tip: Preview your Reel on phone before scheduling. If it looks blurry on your screen, it'll look worse to followers.
If your scheduled Reel still refuses to publish despite correct specs, the issue may be token expiration, account permissions, or an Instagram API outage. Our guide on Instagram scheduled posts not working walks through every common cause and fix.
Mistake 7: Ignoring Analytics (No Optimization)
The Problem: You schedule Reels consistently but never check what's working. You repeat mistakes and ignore wins.
Why it hurts:
- Wasted effort on content that doesn't perform
- Missed opportunities to double down on what works
- Stagnant growth because you're not learning
The Fix:
Weekly analytics review (15 minutes):
- Go to Instagram Insights → Content → Reels
- Sort by Engagement Rate (not just views)
- Identify top 3 performing Reels:
- What topic/format?
- What posting time?
- What caption style?
- What audio?
- Identify bottom 3 performing Reels:
- What went wrong?
- Poor hook?
- Wrong timing?
- Boring topic?
- Look for patterns:
- Does one content type always win?
- Do certain posting times consistently perform better?
- Which captions drive most saves?
Key metrics to track:
- Reach: How many unique accounts saw it
- Engagement rate: (Likes + Comments + Shares + Saves) / Reach × 100
- Watch time: Average % watched (higher = better)
- Shares: Most important for Explore algorithm
- Saves: Indicates value (algorithm loves this)
- Profile visits: Are Reels driving discovery?
- Follows from Reels: Ultimate conversion metric
Monthly action plan:
- Do more of what works: If tutorials perform best, schedule more tutorials
- Do less of what doesn't: If random vlogs flop, cut them
- Test one variable: Change posting time, caption style, or hook format
- Re-test quarterly: Audience behavior changes, stay nimble
PostPlanify (Growth and above): Advanced analytics track performance across all 10 platforms in one dashboard.
Mistake 8: Not Testing Hooks
The Problem: You use the same intro/hook style for every Reel: "Hey guys, today I'm going to show you..."
Why it hurts:
- Predictable = boring
- First 3 seconds determine if people watch
- Same hook = same (mediocre) results
The Fix:
A/B test hooks:
Same Reel, different hooks (test over 2 weeks):
Hook A (Question): "Ever wonder why your Reels flop?"
Hook B (Bold statement): "This one mistake kills 90% of Reels."
Hook C (Teaser): "If you're making this mistake, stop scrolling right now."
Hook D (Visual): [Text overlay: "The 3-second rule that changed everything"] [No verbal intro, jump straight into content]
Schedule each version, compare engagement rates.
Winning hook formats (2026):
- Questions ("Are you making this mistake?")
- Shocking stats ("80% of creators don't know this")
- Pattern interrupts ("Stop doing [X] wrong")
- Teasers ("Watch if you want [desired result]")
- Urgency ("Before you post again, watch this")
Avoid weak hooks:
- ❌ "Hey guys, welcome back"
- ❌ "Today I'm going to..."
- ❌ Long intros (10+ seconds of setup)
- ❌ Apologizing ("Sorry for the bad lighting...")
Frequently Asked Questions (FAQ)
Can I schedule Instagram Reels for free?
Yes. Instagram's native scheduler is completely free and built into the app. You can schedule Reels up to 75 days in advance.
Requirements:
- Creator or Business account (Personal accounts can't schedule)
- Instagram mobile app (desktop doesn't support native Reels scheduling)
Free alternatives:
- Meta Business Suite (free, desktop + mobile)
- Later Free (1 social set, 10 posts/platform/month)
- Buffer Free (3 channels, 10 posts per channel)
Best free option: Meta Business Suite for desktop workflow + calendar view.
How far in advance can I schedule Instagram Reels?
Instagram native app: Up to 75 days (2.5 months) ahead
Meta Business Suite: Up to 90 days (3 months) ahead for Reels
Third-party tools: Most allow unlimited advance scheduling (PostPlanify, Buffer, Later)
Practical recommendation: Schedule 1-2 weeks ahead for regular content, 1-3 months ahead for seasonal/evergreen content. Flexibility > over-planning.
Does scheduling Instagram Reels hurt reach?
No. Instagram has confirmed scheduled Reels receive identical algorithmic treatment as manually posted Reels.
What DOES affect reach:
- ✅ Posting consistency (scheduled posts help this)
- ✅ Timing (posting when audience is active)
- ✅ Engagement (likes, comments, shares, saves)
- ✅ Watch time (% of Reel watched)
- ✅ Content quality (video quality, hook strength, value)
Myth: "Instagram penalizes third-party schedulers"
Reality: All schedulers use Instagram's official API. The algorithm can't distinguish scheduled from manual posts.
Scheduling actually HELPS reach by ensuring you post during proven peak engagement windows.
What's the best time to post Instagram Reels?
General best times (2025 data):
- Wednesday 9 AM - 12 PM (peak)
- Tuesday 10 AM - 1 PM
- Thursday 9 AM - 12 PM
But YOUR audience might differ. Check Instagram Insights:
- Go to Insights → Total Followers
- Tap "See All"
- Scroll to "Most Active Times"
- Heat map shows when YOUR followers are online
Test for 2 weeks:
- Post at different times
- Track engagement rates
- Double down on winning times
Time varies by niche:
- Fashion/Beauty: 11 AM - 2 PM, 7 PM - 9 PM
- Fitness: 6-8 AM, 5-7 PM
- Food: 11 AM - 1 PM, 5-8 PM
- Business: 8-11 AM weekdays
- Entertainment: 6-11 PM
Can I edit a Reel after scheduling it?
Instagram native scheduler: ❌ No. You must delete and reschedule.
Meta Business Suite: ✅ Yes, you can edit caption and time before it publishes. Can't replace the video itself.
PostPlanify: ✅ Yes, you can edit caption, time, platforms, and cover image. Can't replace video file once uploaded.
After a Reel publishes: Instagram allows editing caption and cover image, but not the video.
Can I schedule Reels to Instagram and TikTok simultaneously?
Instagram native: ❌ No (Instagram only)
Meta Business Suite: ❌ No (Instagram + Facebook only)
PostPlanify: ✅ Yes
- Schedule to Instagram + TikTok + Facebook + YouTube Shorts simultaneously
- AI adapts captions per platform (Instagram tone vs TikTok tone)
- Upload once, publish everywhere
Other cross-posting tools:
- Later: Limited TikTok support (experimental)
- Buffer: No TikTok cross-posting
Time saved with cross-posting: 10-15 minutes per Reel (no re-uploading, rewriting)
👉 How to Schedule TikTok Posts
What video specs should I use for Instagram Reels?
Optimal specs:
- Resolution: 1080 x 1920px (9:16 vertical)
- Frame rate: 30 fps (or 60 fps for smooth motion)
- Format: MP4 (H.264 codec)
- File size: Under 250MB
- Length: Up to 90 seconds (but under 60 sec performs better)
- Bitrate: 6-8 Mbps
Avoid:
- 4K video (Instagram downsizes anyway)
- MOV format (use MP4)
- Files over 250MB (upload fails or severe compression)
- Horizontal video (looks bad on mobile)
Cover image:
- 1080 x 1920px
- JPG or PNG
- Place as first frame of video for automatic selection
How many hashtags should I use on Reels in 2026?
5-8 hashtags is optimal.
Mix:
- 3-4 niche hashtags (10K-500K posts): #sourdoughbaking, #apartmentworkout
- 2-3 broader hashtags (1M-10M posts): #baking, #fitness
- 1-2 community hashtags: #foodiesofinstagram, #runnersofig
Avoid:
- ❌ 1-2 hashtags (not enough reach)
- ❌ 20-30 hashtags (looks spammy, no benefit)
- ❌ Generic mega-tags (#love, #instagood) — too broad
- ❌ Banned hashtags (shadowban risk)
Placement: In caption, not first comment. Instagram indexes caption text for search.
Does PostPlanify support Instagram Reels?
Yes. PostPlanify fully supports Instagram Reels scheduling with:
- ✅ Reels up to 90 seconds
- ✅ Vertical video (9:16 ratio)
- ✅ Cover image selection
- ✅ Caption, hashtags, etc.
- ✅ AI caption generation
- ✅ Direct Canva or Google Drive import
- ✅ Cross-posting to TikTok, Facebook, YouTube
- ✅ Post previews
- ✅ Calendar management
- ✅ Instagram Stories
Not supported:
- ❌ Instagram Live (can't be scheduled by any tool)
Can I schedule Instagram Reels from desktop?
Instagram native: ❌ No (mobile app only)
Meta Business Suite: ✅ Yes (desktop + mobile)
PostPlanify: ✅ Yes (desktop web app)
Later: ✅ Yes (desktop + mobile)
Buffer: ✅ Yes (desktop + mobile)
Desktop advantages:
- Easier caption writing (full keyboard)
- Better file management (drag-and-drop)
- Calendar view (see full month)
- Faster workflow (no typing on phone)
For a complete guide to all desktop posting methods, see can you post on Instagram from desktop.
How often should I post Instagram Reels?
Optimal frequency: 3-5 Reels per week (Later 2024 study)
Breakdown:
- 1-2 Reels/week: Minimum for algorithm visibility
- 3-5 Reels/week: Optimal for consistent growth
- Daily Reels: Advanced strategy (only if quality remains high)
- 2+ Reels/day: Risky (follower fatigue, algorithm dilution)
Quality > Quantity: 3 great Reels > 7 mediocre Reels
Test your threshold:
- Week 1: Post 3 Reels
- Week 2: Post 5 Reels
- Week 3: Post 7 Reels
- Compare engagement rates—find your sweet spot
Warning signs you're posting too much:
- Engagement rate dropping
- Unfollows increasing
- Reach plateauing
Can I bulk upload Instagram Reels?
Instagram native: ❌ No (one at a time)
Meta Business Suite: ❌ No (one at a time)
PostPlanify (Growth and above): ✅ Yes
- Upload up to 20 Reels
- Schedule entire month in 30 minutes
- Bulk edit captions, times, platforms
Later: ✅ Yes (bulk upload to media library, then schedule)
Buffer: ✅ Yes (only via CSV)
Best for bulk: PostPlanify (Growth and above) or Later Growth plan
Do I need a Business or Creator account to schedule Reels?
Yes. Personal Instagram accounts cannot schedule posts (including Reels).
How to switch:
- Go to Settings → Account
- Tap "Switch to Professional Account"
- Choose Creator (influencers, content creators) or Business (brands, companies)
- Select category
- Confirm
It's free and reversible. You can switch back to Personal anytime.
Creator vs Business:
- Creator: Better for influencers (shows follower count, music access)
- Business: Better for brands (Instagram Ads, Shopping features)
- Both can schedule Reels
Can I schedule first comment on Instagram Reels?
Instagram native: ❌ No
Meta Business Suite: ❌ No
Why use first comment:
- Keep main caption focused
- Push links below fold (cleaner look, may improve reach)
- Add detailed hashtag research
- Include product links
How much time does scheduling Reels save?
Manual posting (daily):
- Film Reel: 30 min
- Edit: 20 min
- Write caption: 10 min
- Post at optimal time: Wait + post = 5 min
- Total: 65 min/day × 30 days = 32.5 hours/month
With scheduling (batching):
- Film 10-15 Reels in one session: 4 hours
- Edit batch: 3 hours
- Schedule with AI captions: 1 hour
- Engagement (daily): 15 min/day × 30 = 7.5 hours
- Total: 15.5 hours/month
Time saved: 17 hours/month = 204 hours/year
Value calculation:
- At $25/hour = $5,100/year saved
- At $50/hour = $10,200/year saved
- At $100/hour = $20,400/year saved
Plus intangible benefits:
- Reduced stress and decision fatigue
- Better quality content (focused creation sessions)
- Consistency (algorithm reward)
Can I use PostPlanify for free?
7-day free trial available:
- Test the scheduling workflow before committing
- Reels scheduling
- AI caption generation
- Canva import
- Cross-platform posting
- Cancel anytime (no commitment)
After trial:
- Growth: $99/mo, or $79/mo billed yearly (15 accounts, 5 workspaces, 3 users)
- Premium: $199/mo, or $159/mo billed yearly (30 accounts, 15 workspaces, 6 users, approvals + reports)
- Scale: $299/mo, or $239/mo billed yearly (100 accounts, 50 workspaces, 12 users, white-label PDF reports)
- Enterprise: custom pricing
All paid plans include a 14-day money-back guarantee.
No free-forever plan, but the 7-day trial and 14-day money-back guarantee let you test thoroughly.
How to maximize trial:
- Connect Instagram (+ TikTok, Facebook, etc.)
- Film and schedule 2 weeks of Reels
- Test AI caption generation
- Try Canva import workflow
- Compare time savings vs. the Growth plan cost
👉 Start PostPlanify free trial
Conclusion: Schedule Smarter, Grow Faster
Instagram Reels dominate the platform in 2026—but consistent, optimized posting is exhausting without a system.
By scheduling Reels strategically, you:
✅ Post at peak times without being glued to your phone
✅ Maintain consistency (the algorithm's #1 ranking factor)
✅ Batch-create content efficiently (save 15-20 hours/month)
✅ Cross-post to multiple platforms simultaneously
✅ Focus energy on engagement (which drives growth)
Quick Recap
Best Instagram Reels Schedulers:
For free basic scheduling:
- Instagram native (mobile, up to 75 days ahead)
- Meta Business Suite (desktop + mobile, calendar view, Facebook cross-posting)
For multi-platform creators:
- PostPlanify (from $99/mo, or $79/mo billed yearly, with AI captions, Canva import, cross-posting to 10 platforms)
For visual planners:
- Later ($25/mo, media library, best time suggestions)
For simplicity:
- Buffer ($6/channel, proven tool, mobile app)
Best Times to Post:
- Wednesday 9 AM - 12 PM
- Tuesday 10 AM - 1 PM
- Thursday 9 AM - 12 PM
(But always test for YOUR specific audience using Instagram Insights)
Reel Optimization Checklist:
- ✅ Scroll-stopping cover image
- ✅ Hook in first 3 seconds
- ✅ Caption with strong opening line
- ✅ 5-8 relevant hashtags
- ✅ Clear call-to-action
- ✅ High video quality (1080x1920px)
- ✅ Alt text for accessibility
- ✅ Post at proven best time
- ✅ Engage within first hour
- ✅ Analyze and adjust
Common Mistakes to Avoid:
- Scheduling without engaging after publishing
- Over-scheduling (5+ Reels/day)
- Ignoring video quality
- Copy-pasting across platforms
- Scheduling during breaking news
- Wrong file specs (compression issues)
- Ignoring analytics
- Not testing hooks
Ready to Start Scheduling?
Option 1: Start Free Use Instagram's native scheduler or Meta Business Suite to schedule your first week of Reels.
Option 2: Upgrade for Efficiency Try PostPlanify free for 7 days:
- Connect Instagram (+ TikTok, Facebook, YouTube)
- Import Reels from Canva
- Generate AI captions
- Schedule to calendar
- Save 15+ hours/month
👉 Start PostPlanify 7-day free trial
Questions? Email [email protected]
Related Resources
Scheduling Guides:
- Content Batching: Create 30 Days of Posts in 3 Hours
- How to Schedule Instagram Posts in 2026
- How to Schedule Instagram Stories
- How to Schedule Instagram Carousels
- How to Schedule TikTok Posts
Comparisons:
- Buffer vs PostPlanify: Which Is Best?
- Instagram Post Scheduler vs Planner: Which Saves More Time?
- Top 5 Social Media Scheduling Tools
Platform Schedulers:
Instagram Guides:
- How to Post a Long Video on Instagram
- Instagram Scheduled Posts Not Working? Every Fix Explained
- Social Media Safe Zones: Complete Guide for 2026
Tools:
Consistent Reels posting doesn't have to consume your life. Schedule strategically, optimize intentionally, engage authentically—and watch your Instagram grow.
All your social media in one simple dashboard
Schedule posts, track analytics, and reply to comments/DMs — without switching tabs.
Engagement
+18%
Views
52.8k
About the Author

Hasan Cagli
Founder of PostPlanify, a content and social media scheduling platform. He focuses on building systems that help businesses, agencies, and teams plan, publish, and manage content and social media more efficiently across platforms.


