
You’ve scheduled a week of Instagram content, but now you can't find it. Where did it go? Did it save as a draft, or is it actually queued up?
This is a common frustration, and the reason is simple: your scheduled Instagram posts live only in the tool you used to schedule them. There isn't a single, universal calendar where everything shows up.
Think of it like three separate notebooks:
- A post scheduled in the Instagram app is only visible in the app.
- A post scheduled in Meta Business Suite is only visible there.
- A post scheduled in a third-party tool (like PostPlanify) is only visible in that tool.
They don't sync with each other. The key to finding your content is to go back to the source—the platform where you hit "Schedule."
Quick Answer: How to View Scheduled Instagram Posts
To see scheduled posts on Instagram, follow the method that matches the tool you used:
- Instagram App — Go to your profile → tap the menu (☰) → select Scheduled content.
- Meta Business Suite — Go to business.facebook.com → click Planner → filter by Instagram.
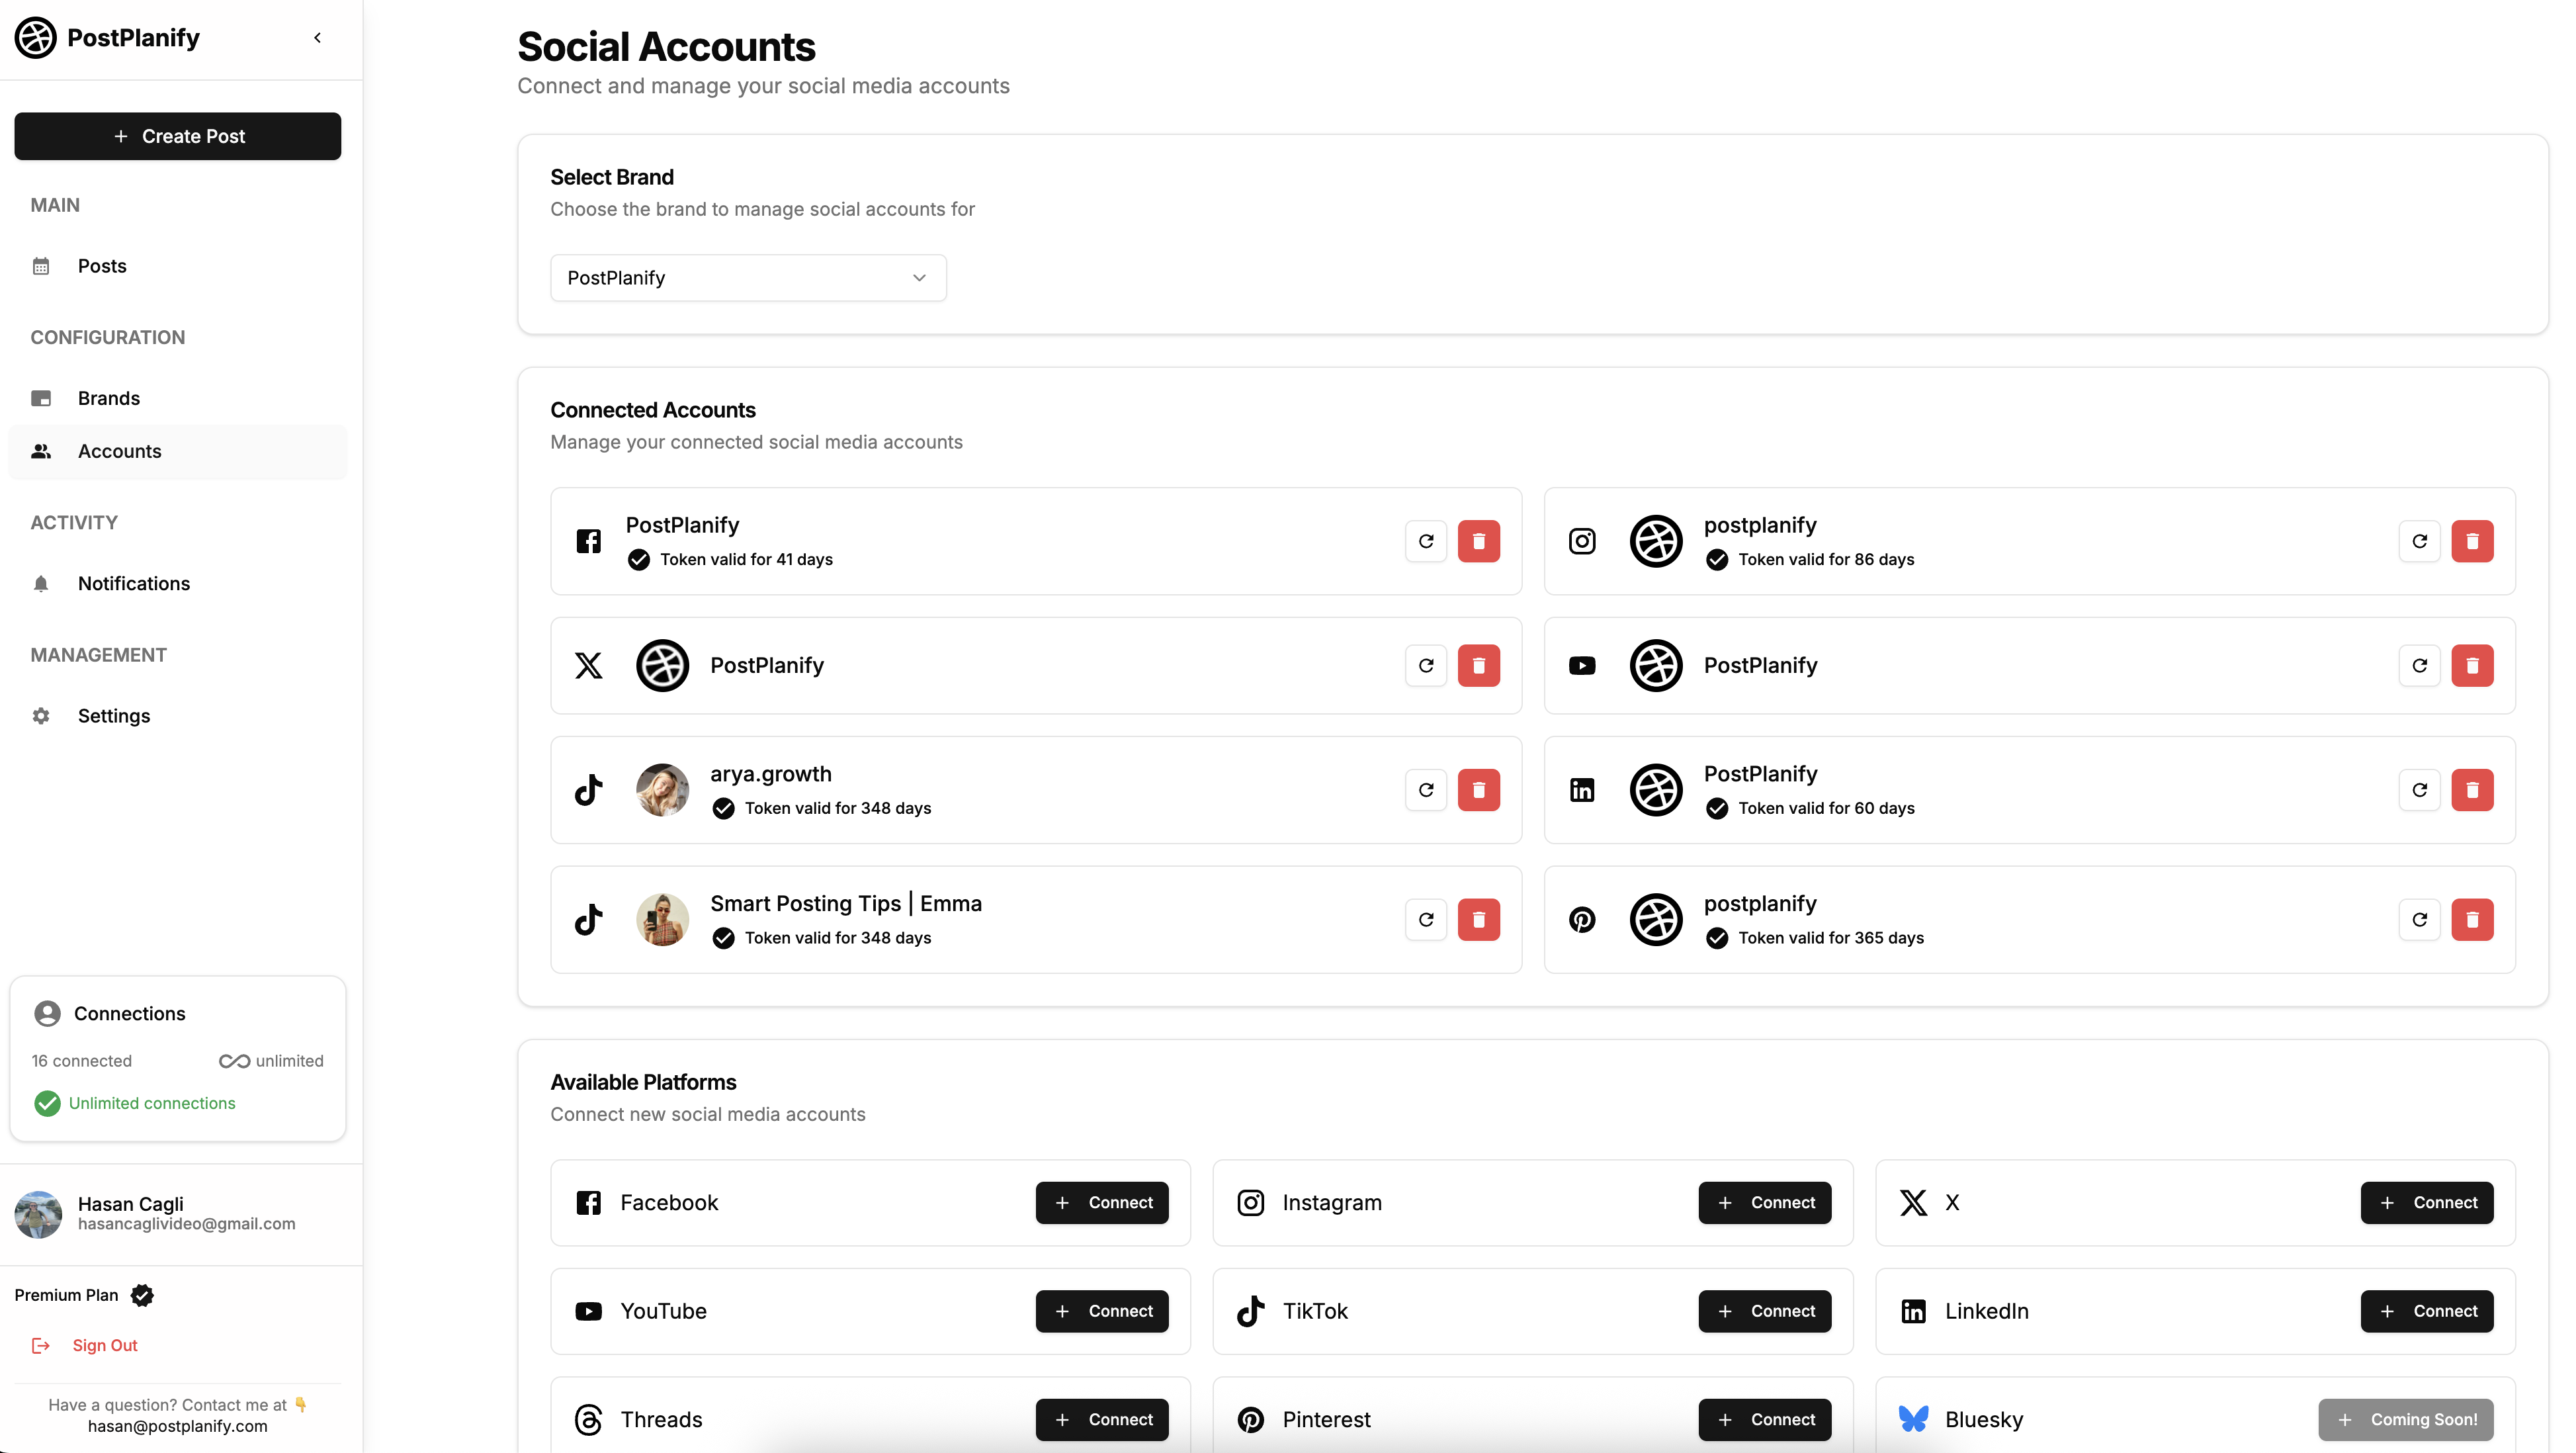
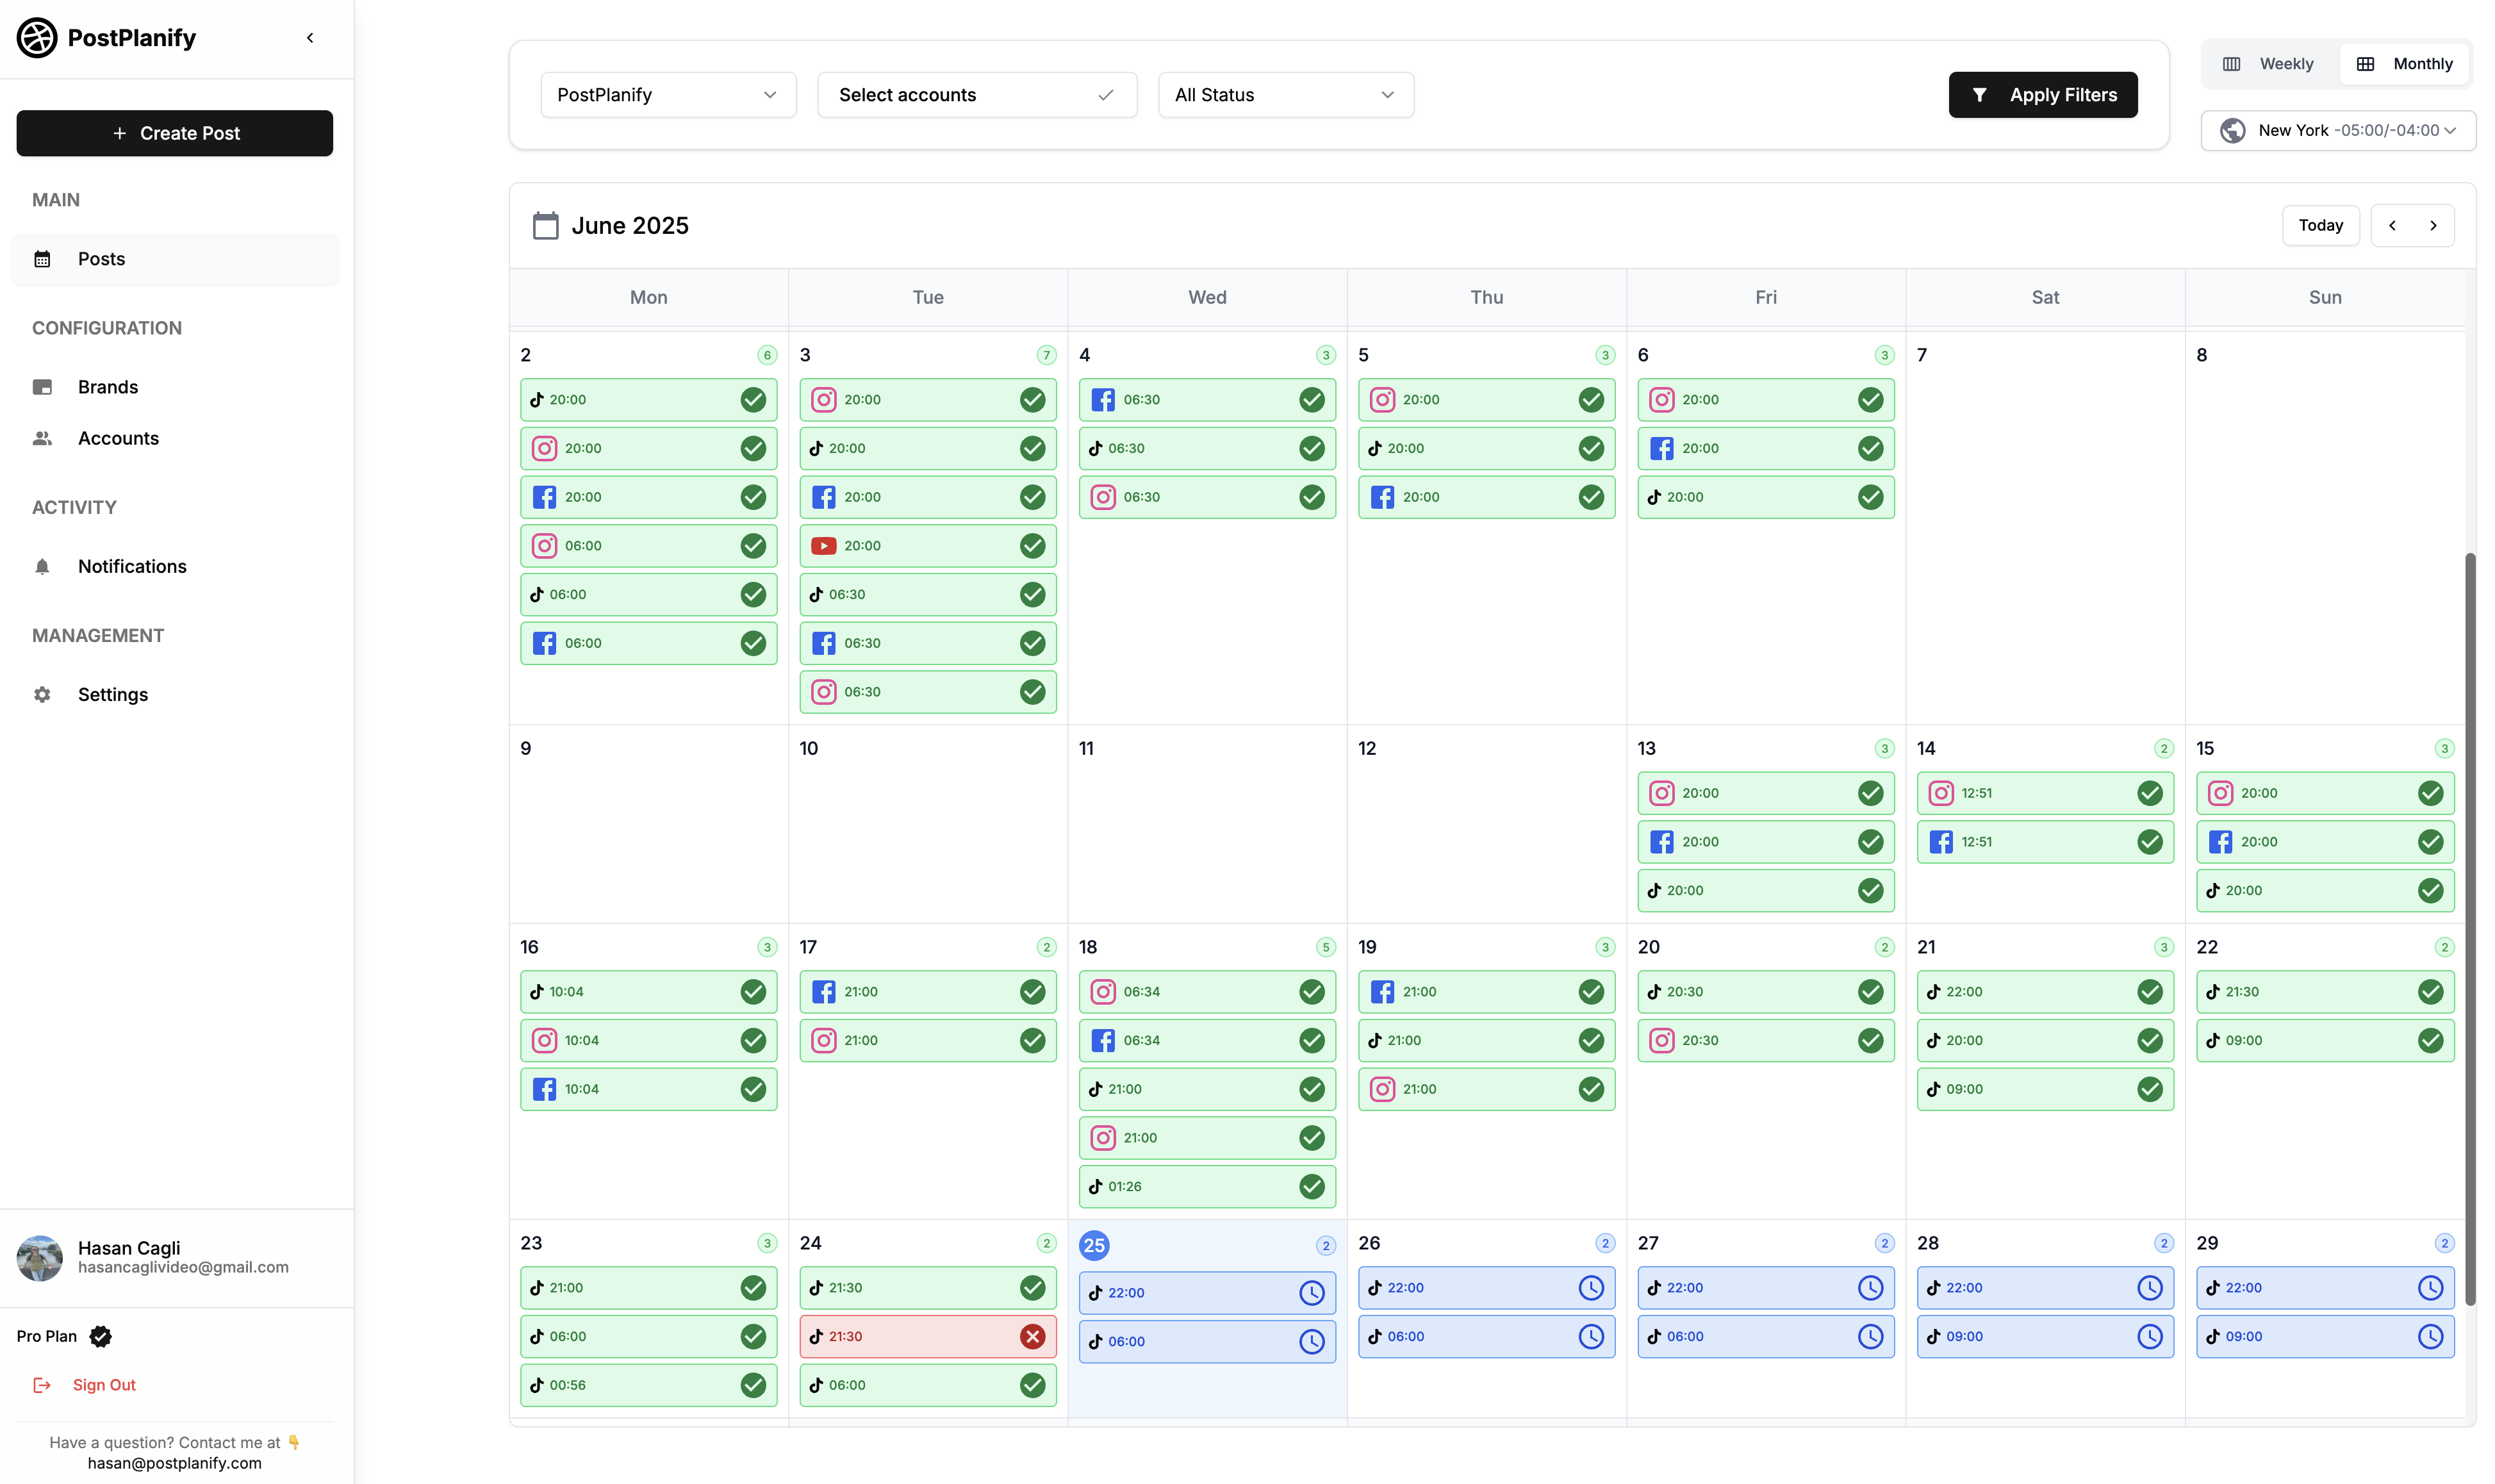
- Third-party tool — Log in to your scheduling tool (e.g., PostPlanify) → open the content calendar.
Scheduled posts only appear in the tool that created them. They do not sync across platforms.

This guide provides step-by-step instructions for finding your scheduled posts, no matter which method you used.
Where Your Scheduled Posts Live: A Quick Breakdown
This table shows exactly where to look based on your scheduling method.
| Scheduling Method | Where to Find Your Scheduled Posts | Required Account Type |
|---|---|---|
| Instagram App | In the app's "Scheduled Content" menu. | Any public account (Professional or Personal — expanded March 2026) |
| Meta Business Suite | In the "Planner" or "Content" tab on desktop. | Professional (Business or Creator) + linked Facebook Page |
| Third-Party Tool | In the tool's dedicated content calendar. | Professional account required (third-party API access still restricted) |
Instagram Scheduling Limits by Tool
Each scheduling method has different capabilities. Knowing these limits helps you pick the right tool and avoid surprises.
Note on the third-party daily cap: Meta's own documentation is genuinely inconsistent about the Graph API publishing limit. The main Content Publishing docs state 100 API-published posts per rolling 24-hour window, while the content_publishing_limit reference lists quota_total: 50 over 86,400 seconds. In practice, most tools conservatively enforce the lower 50-post figure to avoid triggering restrictions. Carousels count as 1 post regardless. If you're an agency scheduling high volume, check your tool's documentation for its specific enforcement.
| Feature | Instagram App | Meta Business Suite | PostPlanify |
|---|---|---|---|
| Cost | Free (built into Instagram) | Free (built into Meta) | Paid (free trial available) |
| Setup required | None — use the app you already have | None — log in with your Meta account | Account signup + connect profiles |
| Max scheduling window | 75 days ahead | 75 days ahead | Unlimited |
| Daily publish cap | 25 posts/Reels per day | 25 posts/Reels per day | 50–100 per 24h (API-enforced — see note below) |
| Account requirement | Any public account (as of March 2026) | Professional + linked Facebook Page | Professional |
| Feed posts | Yes | Yes | Yes |
| Reels | Yes | Yes | Yes |
| Stories | No (testing in 2026) | Yes (no interactive stickers) | Yes |
| Carousels (up to 20 slides) | Yes | Yes | Yes |
| First comment | No | No | Yes |
| Multi-platform scheduling | No | Facebook + Instagram only | Instagram, TikTok, X, LinkedIn, YouTube, and more |
| Visual grid preview | No | No | Yes |
| Team collaboration | No | Yes (limited) | Yes (full) |
| Bulk scheduling | No | No | Yes |
All your social media in one simple dashboard
Schedule posts, track analytics, and reply to comments/DMs — without switching tabs.

Engagement
+18%
Views
52.8k
Why Can't I Find My Scheduled Posts? Common Causes
If you're still stuck, it's likely one of these three scenarios:
- You're looking in the wrong place. This is the most common issue. A post scheduled in Meta Business Suite will not appear in the Instagram app's "Scheduled Content" section, and vice-versa. You need to check the specific tool you used for scheduling.
- Your account is private. Instagram's in-app scheduling is available to any public account (Professional or Personal) as of the March 2026 expansion — but private accounts still can't access it. If your profile is set to private, switch to public under Settings → Account privacy, or use a third-party tool via the Meta API.
- It's a draft, not a scheduled post. It's easy to mix these up. A draft is saved locally on your device without a publish date. A scheduled post is uploaded to Instagram's servers with a specific time to go live. Make sure you completed the final "Schedule" step.
Instagram originally launched in-app scheduling for Professional accounts in 2023. On March 1, 2026, Meta expanded access to all public accounts — Personal, Creator, and Business — no Professional Mode conversion required. You can schedule up to 75 days ahead and up to 25 posts per day directly from your phone.
What Changed in March 2026 (Instagram's Scheduling Expansion)
If you last tried Instagram scheduling before March 2026, you'll notice meaningful differences:
| Before (Pre-March 2026) | Now (2026) |
|---|---|
| Required switching to a Professional account (Business or Creator) | Works on any public account — Personal, Creator, or Business |
| Professional Mode was required for Insights and Trending Audio too | All three (scheduling, Insights, Trending Audio) now available to any public account |
| Private accounts excluded | Private accounts still excluded — switch to public first |
| 75-day max scheduling window | 75-day max scheduling window (unchanged) |
| 25 posts/Reels per day cap | 25 posts/Reels per day cap (unchanged) |
| Stories not schedulable in-app | Stories still not schedulable in-app (Meta is testing this separately) |
What this means for you: If you scheduled content in the Instagram app before March 2026 and don't see your scheduled posts now, it's almost always one of two things — your account got switched back to Personal, or the post was actually saved to Meta Business Suite instead of the app. The good news: your content didn't disappear; you just need to check the right source.
Method 1: Finding Scheduled Posts in the Instagram App
If you prefer managing content directly from your phone, Instagram's native scheduler is a convenient option — and as of the March 2026 update, it's available to any public account.
Problem: The scheduling feature doesn't appear on private accounts. If your profile is set to private, the "Schedule" option is hidden.
Fix: Switch your profile to public. It's free and takes under a minute.
- Go to your Instagram profile.
- Tap Settings and privacy.
- Select Account privacy.
- Toggle off Private account to make your profile public.
Still prefer a Professional account? Business and Creator accounts unlock additional features like Insights (deeper than the basic public-account version), Meta Business Suite integration, and third-party tool access. To switch: Settings and privacy → Account type and tools → Switch to professional account.
Step-by-Step: How to View Your In-App Schedule
Once you have a professional account, here’s how to find your scheduled content.
- Go to your Instagram profile page.
- Tap the hamburger menu (three horizontal lines) in the top-right corner.
- Select Scheduled content (it has a small calendar icon).
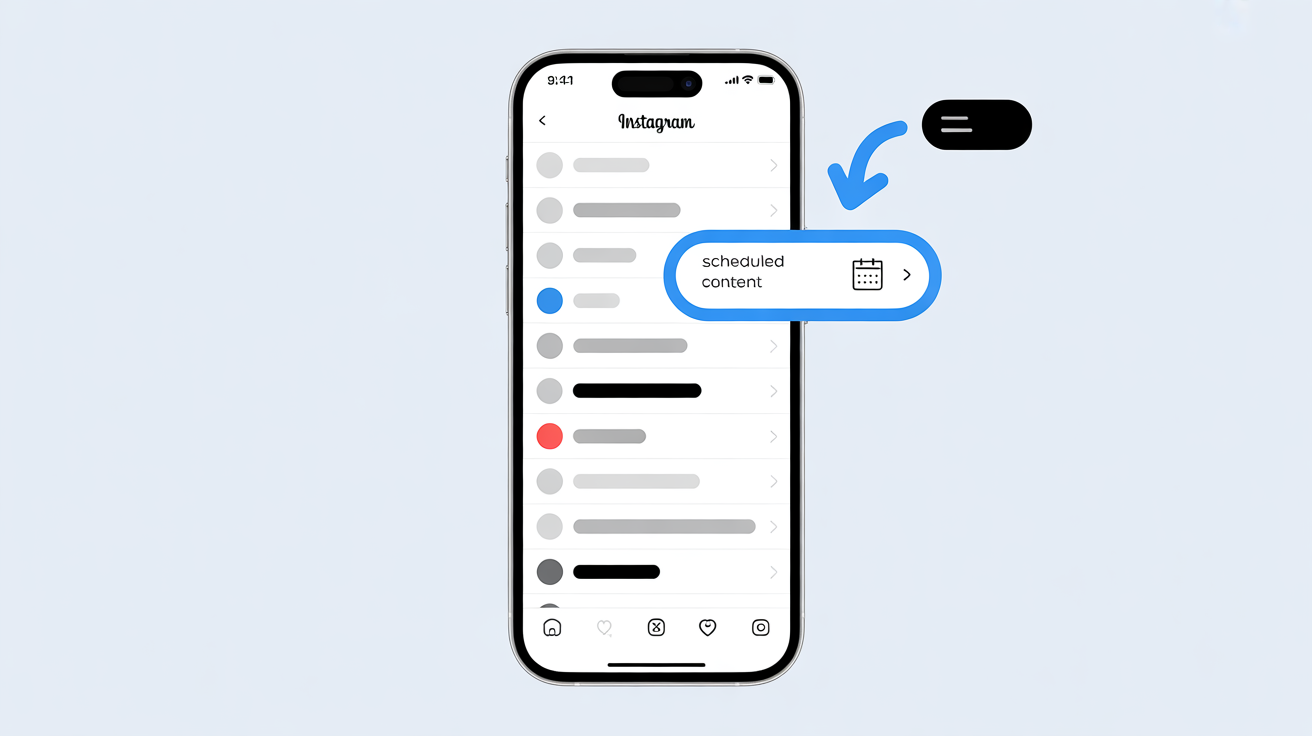
This screen displays all posts, Reels, and carousels you have scheduled directly through the Instagram app.
Limitation: This view only shows content scheduled within the Instagram app. Anything scheduled via Meta Business Suite or a third-party tool like PostPlanify will not appear here.
From the "Scheduled content" screen, you can manage your queue:
- Reschedule: Tap a post to change its publish date and time.
- Edit: Modify the caption, tags, or location.
- Delete: Permanently remove the post from your schedule.
This is ideal for quick, on-the-go edits. For a complete walkthrough of the process, our guide on how to schedule anything on Instagram provides more detail.
Related: Best Time to Post on Instagram | Instagram Image Size Guide
Method 2: Finding Scheduled Posts in Meta Business Suite
For users managing both a Facebook Page and an Instagram profile, Meta Business Suite is the native management tool. It centralizes content planning, but its interface can be confusing for new users.
Problem: Your scheduled Instagram posts are mixed in with your Facebook content, making them hard to find.
Fix: Use the Planner tab and its filtering options to isolate your Instagram content calendar.
Step-by-Step: How to View Your Schedule in Business Suite
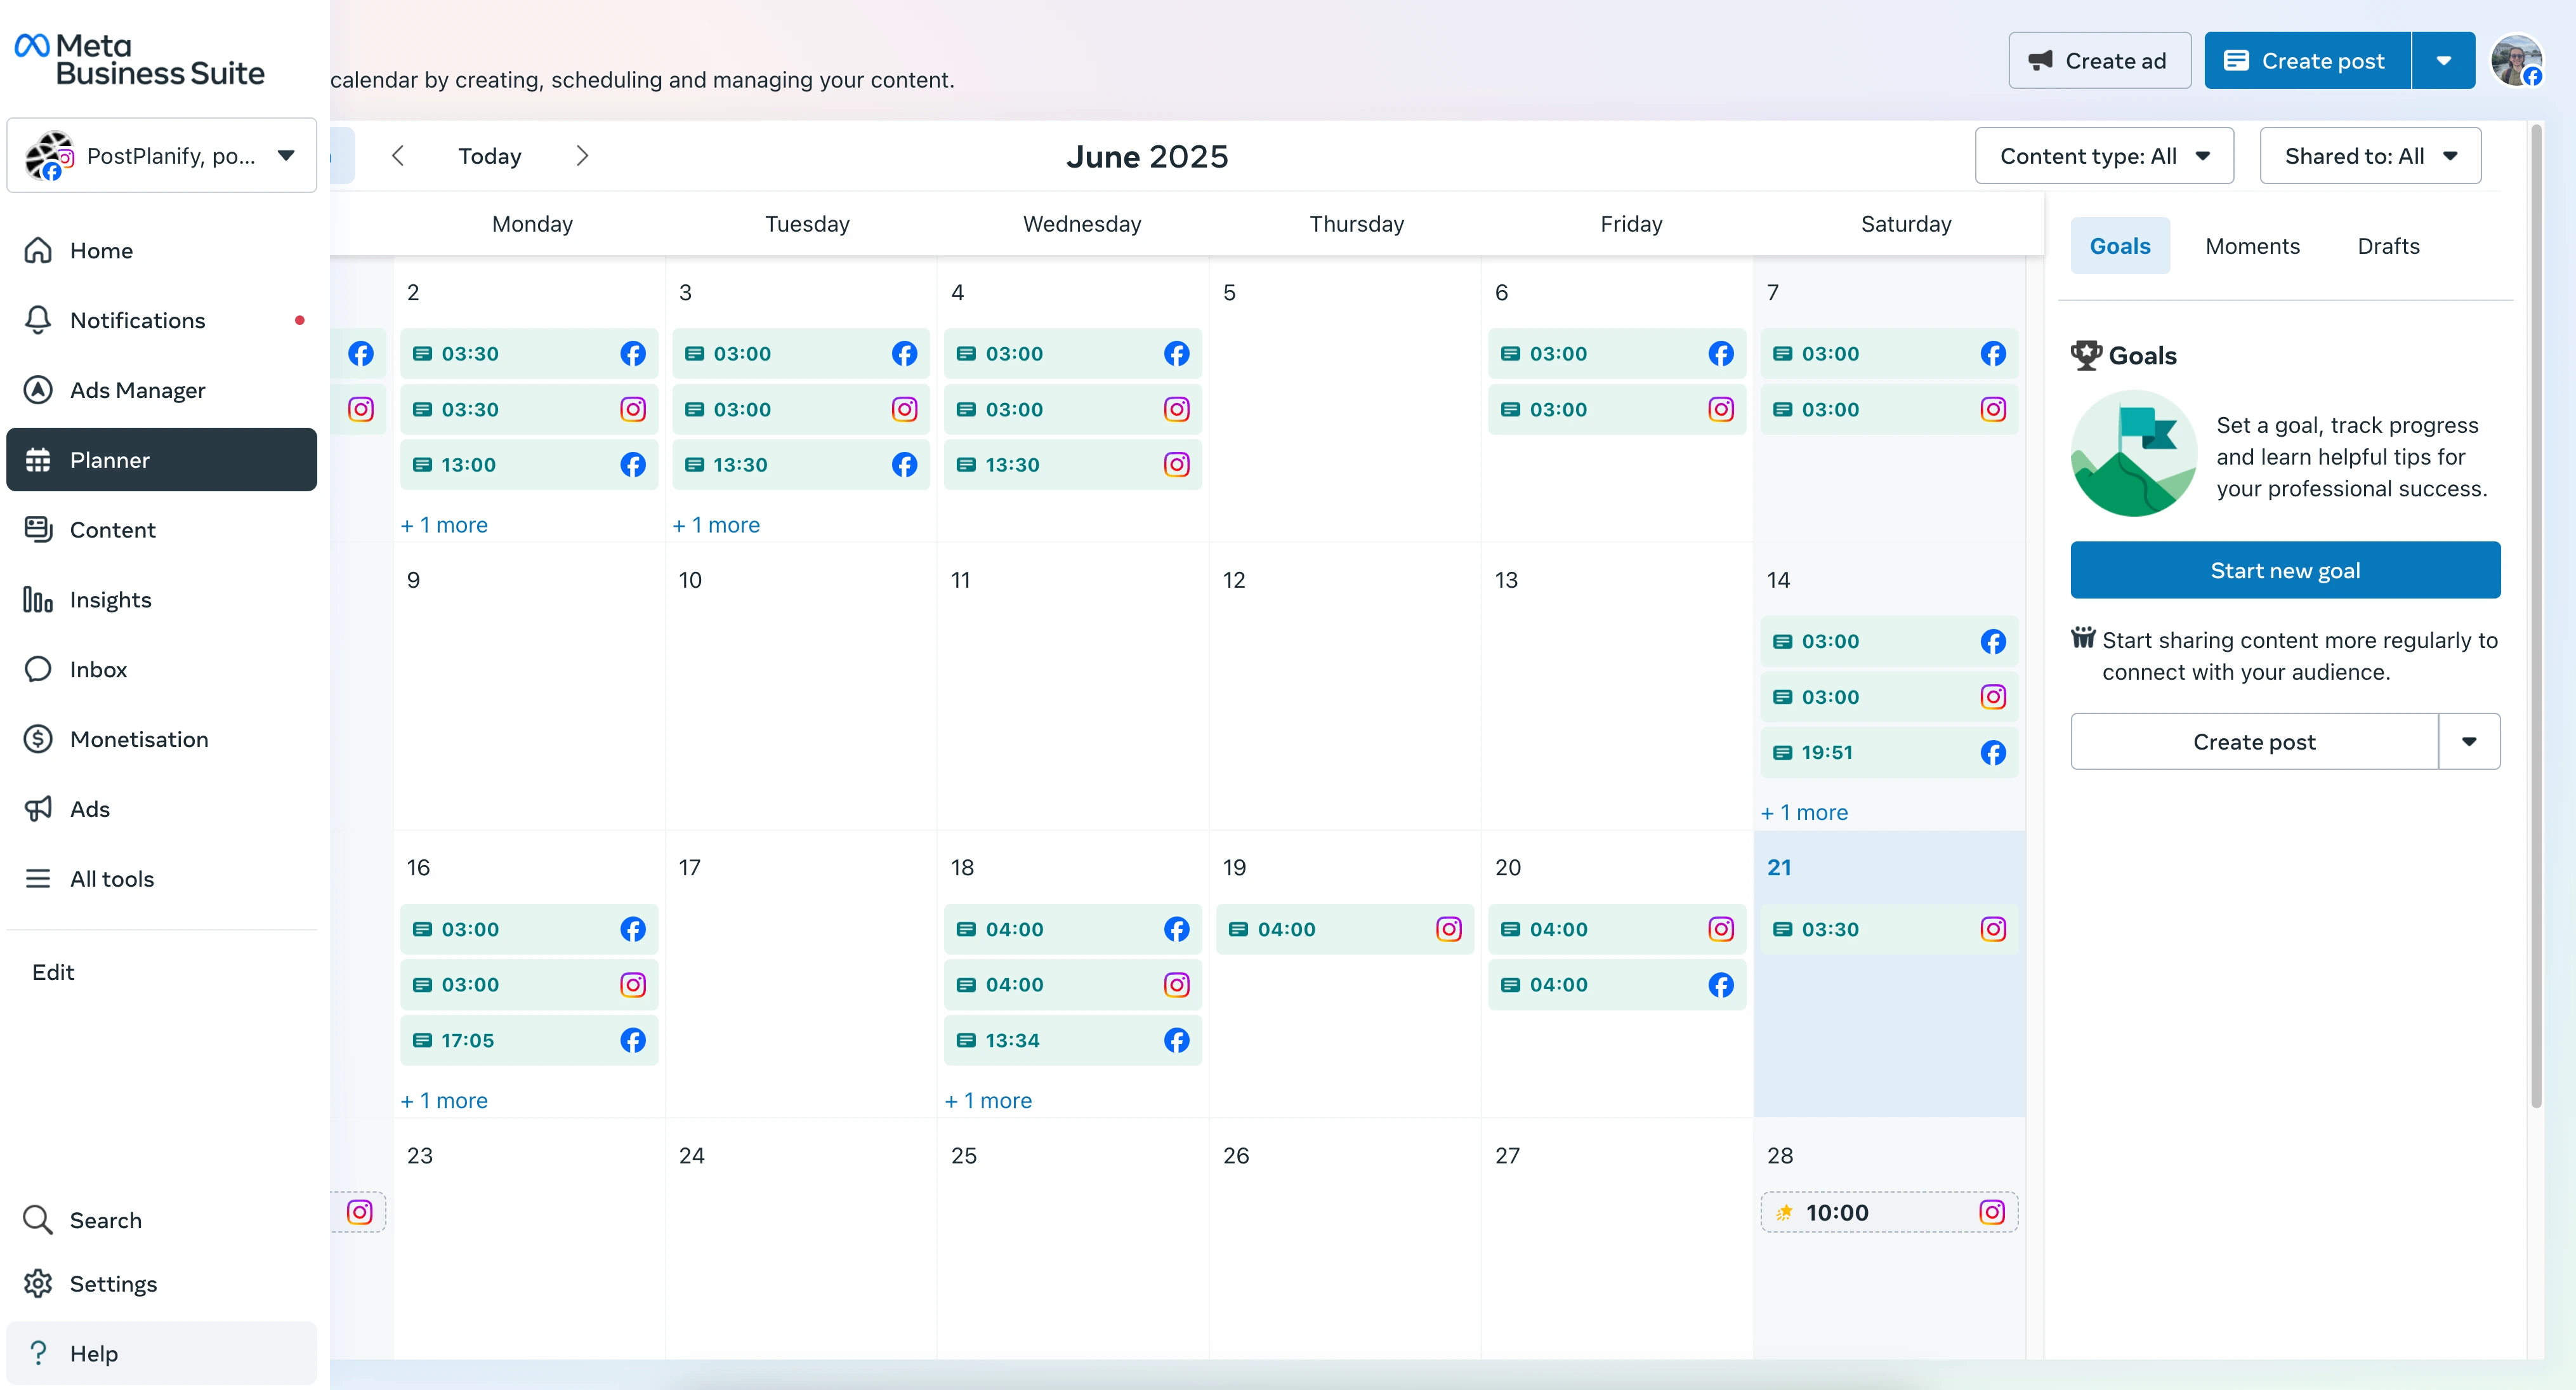
- Log in to Meta Business Suite on a desktop.
- From the left-hand menu, click Planner (it may be under the Content tab). This opens a weekly or monthly calendar view.
- At the top of the calendar, find the filter options. Uncheck Facebook and select only Instagram. This will hide all Facebook content and show only what’s scheduled for your Instagram profile.
- (Optional) You can further filter by content type (e.g., Feed posts, Reels, Stories) to check your content mix.
Common Issues and Solutions in Business Suite
- Sync Delays: Sometimes, a newly scheduled post doesn't appear in the Planner immediately. This is usually a temporary API delay.
- Fix: Wait a minute and refresh the page. The post should appear.
- Permission Issues: A team member might not be able to see the scheduled content. This is almost always a permissions problem.
- Fix: An admin must go into the Business Suite settings and grant that user the appropriate access level (e.g., "Content creator" or "Admin") to view and manage scheduled posts.
For a deeper dive into permissions and other scheduling essentials, check out our ultimate guide to scheduling Instagram posts.
Related: How to Schedule Instagram Reels | How to Schedule Instagram Stories
Pro Tip: Timing matters, but consistency matters more. Research from Sprout Social (analyzing 2.7 billion engagements across 463,000 profiles) found that Tuesday through Thursday between 11 AM and 6 PM consistently drives the highest Instagram engagement. But posting regularly at consistent times — even outside "perfect" windows — builds algorithmic momentum better than sporadic bursts at peak hours. For a full breakdown by day and industry, see our guide on the best time to post on Instagram. You can also review Instagram's official help page on scheduling for the latest feature details.
All your social media in one simple dashboard
Schedule posts, track analytics, and reply to comments/DMs — without switching tabs.
Engagement
+18%
Views
52.8k
Method 3: Using a Third-Party Tool for a Unified View
While Instagram’s native tools work, they keep your content calendars in separate silos. If you manage multiple social media accounts (e.g., Instagram, TikTok, Facebook, X), switching between platforms to see your schedule is inefficient.
Problem: You have no single place to see your entire content plan across all social platforms.
Fix: Use a third-party scheduling tool that offers a unified content calendar. This solves the visibility problem by consolidating everything into one master view.
Instagram App vs Meta Business Suite vs PostPlanify
Choosing the right tool depends on your workflow. Here's a side-by-side comparison of the viewing and management experience.
| Capability | Instagram App | Meta Business Suite | PostPlanify |
|---|---|---|---|
| Cost | Free | Free | Paid (free trial available) |
| Calendar view | List only | Weekly / monthly | Daily / weekly / monthly |
| Filter by platform | N/A (Instagram only) | Facebook + Instagram | All connected platforms |
| Edit scheduled posts | Yes | Yes | Yes |
| Reschedule by drag-and-drop | No | No | Yes |
| Notification on publish failure | No | Email only | In-app + email |
| Content approval workflow | No | Basic | Full (multi-step) |
| Best for | Solo creators who want zero setup | Small businesses already using Meta tools | Teams, agencies, multi-platform creators |
Best Times to Schedule Instagram Posts
Scheduling is only half the battle — posting at the right time drives reach. Three major studies analyzed millions of posts to identify peak engagement windows:
| Day | Peak Windows | Notes |
|---|---|---|
| Monday | 1–2 PM, 4–6 PM | Slower start to the week; afternoon picks up |
| Tuesday | 11 AM–6 PM | High engagement — all three studies agree |
| Wednesday | 11 AM–6 PM, 7–9 PM | Consistently the top-performing day |
| Thursday | 7–9 AM, 11 AM–5 PM | Strong all day; morning or midday depending on audience |
| Friday | 10 AM–5 PM | Mixed — decent for some niches, weak for others |
| Saturday | 10 AM–12 PM | Lowest engagement day across all studies |
| Sunday | 12–3 PM | Low to medium |
Sources: Sprout Social (2.7B engagements, 463K profiles), Buffer (9.6M posts), Hootsuite (1M+ posts across 118 countries).
These are broad patterns, not rules — your audience may behave differently. Check your Instagram Insights (Professional Dashboard > Total Followers > Most Active Times) for your specific data. For a full breakdown by industry and content type, read our best time to post on Instagram guide.
Why a Unified Calendar Is a Better Solution
Tools like an advanced Instagram scheduler are designed to give you the strategic overview that native apps lack.
Here are the key benefits:
- Unified Content Calendar: See all scheduled posts for Instagram, TikTok, X, LinkedIn, and more in one color-coded calendar. This helps you spot content gaps and ensure a balanced schedule across channels.
- Visual Grid Preview: See exactly how your scheduled posts will look on your Instagram profile grid before they go live. This allows you to plan your feed's aesthetic and avoid visual missteps.
- Campaign and Content Tagging: Organize your calendar by campaign, client, or content pillar using tags. This makes it easy to track the progress of specific initiatives without manual sorting.
A unified calendar helps you implement a more cohesive strategy. When you can see all your scheduled content at a glance — across every platform — it's easier to spot gaps, avoid overlaps, and maintain a consistent brand voice.
Related: How to Schedule TikTok Posts | How to Schedule YouTube Shorts
Troubleshooting: Why Did My Scheduled Posts Disappear?
You scheduled a post, but when you check later, it's gone. This is a common and stressful problem, but it’s rarely a bug. It's usually caused by a handful of predictable issues.
Here are the most common causes and their solutions.
Common Problems and Actionable Fixes
- Problem: Expired API Connection
- Why it happens: For security, Instagram requires you to periodically re-authorize any third-party tool connected to your account. If this connection token expires, the tool loses its ability to publish content on your behalf. Your scheduled posts are still there, but the tool can't "see" them or push them live.
- The Fix: Go to your scheduling tool's settings, find the connected social accounts, and disconnect your Instagram profile. Then, immediately reconnect and re-authenticate it. This refreshes the token and usually solves the problem instantly.
-
Problem: Incorrect User Permissions
- Why it happens: This is a common issue for teams. If a colleague scheduled posts but you can't see them, your account likely lacks the necessary permissions in Meta Business Suite or your third-party tool.
- The Fix: Ask an admin to check your user role. In Business Suite, you need at least "Content" access to view and manage the schedule. In third-party tools, you may need "Editor" or "Admin" permissions.
-
Problem: Accidental Deletion
- Why it happens: It’s easy to accidentally click "Delete" instead of "Edit."
- The Fix: Unfortunately, in most tools, a deleted scheduled post is gone permanently. You will need to recreate and reschedule it. Some advanced tools may have a "trash" folder, but this is rare.
If you are experiencing more persistent issues, such as posts failing to publish at the scheduled time, our guide on what to do when Instagram scheduled posts are not working offers a more detailed troubleshooting checklist. If you can't post on Instagram at all (not just scheduled posts), see why can't I post on Instagram for fixes covering action blocks, upload errors, and account restrictions.
Instagram Scheduling FAQ
Here are direct answers to the most common questions about viewing scheduled Instagram posts.
How far in advance can I schedule posts on Instagram?
The scheduling window depends entirely on the tool you use.
- Instagram App: You can schedule posts up to 75 days in advance, with a max of 25 posts per day.
- Meta Business Suite: 75 days ahead — same as the in-app scheduler, with the same 25 posts/day cap. (Older guides sometimes cite "6 months" — that was the pre-2024 limit. Meta unified both to 75 days.)
- Third-Party Tools: Professional schedulers like PostPlanify are built for long-term planning, often allowing you to schedule content a full year or more in advance. There's no scheduling-window limit, but Meta's Graph API enforces a 50–100 publishes per rolling 24-hour period cap (Meta's docs list both figures in different places — most tools play it safe at 50). Carousels count as a single publish regardless of slide count.
Can I see scheduled Instagram Stories and Reels?
Yes. Modern scheduling tools fully support Stories and Reels. In the past, many tools would only send a push notification reminder to publish Stories manually.
Today, Meta Business Suite and most third-party schedulers allow for direct, automated publishing of both Reels and Stories. You will see them in your content calendar alongside your feed posts, allowing you to plan a complete content strategy.
Why is a third-party tool better for viewing scheduled posts?
While native tools are functional, they are not designed for strategic, multi-platform management. A dedicated scheduling tool provides clarity and control that native apps lack.
The single biggest advantage is the unified calendar, which lets you see your entire content plan for all social platforms in one place.
Additionally, you get features built for professionals, such as:
- Visual grid previews to perfect your feed's aesthetic.
- Team collaboration features for approvals and feedback.
- Advanced analytics that go beyond Instagram's native insights.
If you're managing multiple accounts or are serious about content strategy, exploring the top free social media scheduling tools for creators can reveal capabilities you didn't know were possible.
Can I schedule Instagram posts from a personal account?
Yes, as of March 1, 2026. Instagram expanded in-app scheduling to all public accounts — Personal, Creator, and Business. No Professional Mode conversion required. The only restriction is that your profile must be public; private accounts still can't schedule. If you need deeper Insights, trending audio data, or third-party tool access, switching to a Professional account is still worth it — but for basic scheduling, a Personal public account now works. Third-party tools like PostPlanify still require a Professional account because Meta's Graph API (which the tools use) restricts third-party publishing to Business/Creator profiles.
Do scheduled Instagram posts get less reach than manual posts?
No. Instagram treats scheduled posts exactly the same as manually published posts. The algorithm does not penalize content based on how it was posted. What matters is the quality of the content, the timing, and how your audience engages with it. In fact, scheduling can improve reach because you're more likely to post consistently and at optimal times.
Can I edit a scheduled Instagram post before it goes live?
Yes, in all three methods. In the Instagram app, tap the scheduled post from the "Scheduled content" screen to change the caption, tags, location, or publish time. In Meta Business Suite, click the post in the Planner to edit it. In third-party tools like PostPlanify, you can edit any aspect of the post including media, caption, hashtags, and the scheduled time. Changes take effect immediately — just make sure you save before the post's publish time.
How many posts can I schedule at once on Instagram?
The Instagram app lets you schedule one post at a time — there is no bulk scheduling option. Meta Business Suite also handles posts individually. Third-party tools are where bulk scheduling shines: PostPlanify and similar platforms let you upload and schedule dozens of posts at once via CSV import or batch upload, saving significant time for creators and agencies managing high-volume accounts.
Why did my scheduled Instagram post fail to publish?
The most common reasons are: an expired API connection between your scheduling tool and Instagram, a content policy violation detected at publish time, or an internet/server issue during the publishing window. To fix this, reconnect your Instagram account in your scheduling tool, review the post for any flagged content, and reschedule. Check our detailed troubleshooting guide on Instagram scheduled posts not working for more solutions.
Can I schedule Instagram carousels and multi-image posts?
Yes. The Instagram app, Meta Business Suite, and most third-party tools all support scheduling carousel posts (up to 20 slides). When viewing your scheduled content, carousels appear alongside single-image posts and Reels. In PostPlanify, you can preview how each slide will look and reorder them before publishing. For a complete walkthrough, see our Instagram carousel guide.
What changed with Instagram scheduling in March 2026?
On March 1, 2026, Meta expanded three creator tools — in-app scheduling, the Insights dashboard, and Trending Audio access — to all public Instagram accounts, not just Professional (Business/Creator) accounts. The scheduling window (75 days), daily cap (25 posts/Reels), and supported content types (photos, Reels, carousels — no Stories) all stayed the same. Private accounts are still excluded. This update removed the single biggest friction point for casual creators: you no longer need to switch to Professional Mode just to schedule a post.
Can I schedule Instagram Stories natively in the app in 2026?
No, not yet. As of the March 2026 update, Stories still cannot be scheduled inside the Instagram app. Meta has been testing native Story scheduling separately but hasn't rolled it out. Your options for scheduling Stories:
- Meta Business Suite (desktop only) — works but strips interactive stickers (polls, quizzes, question stickers, music, location tags, mentions)
- Third-party tools like PostPlanify — offer full Story scheduling with most interactive elements preserved
- Manual posting — still the only way to use every Story feature at publish time
What's the difference between an Instagram draft and a scheduled post?
A draft is saved locally on your device without a publish date — it's an unfinished post you can come back to later. A scheduled post is fully uploaded to Instagram's servers (or your scheduling tool's servers) with a specific date and time to go live automatically. Drafts appear in your post creation flow under "Drafts," while scheduled posts appear in the "Scheduled content" menu (Instagram app), Planner (Meta Business Suite), or your tool's content calendar. If you can't find a post you thought you scheduled, check your drafts — you may not have completed the final "Schedule" step.
All your social media in one simple dashboard
Schedule posts, track analytics, and reply to comments/DMs — without switching tabs.
Engagement
+18%
Views
52.8k
Checklist: How to Find Your Scheduled Instagram Posts
- Step 1: Identify Your Tool. Did you schedule in the Instagram app, Meta Business Suite, or a third-party tool like PostPlanify? You can only see the post in the tool where it was created.
- Step 2: Check In-App. If you used the app, go to your profile > Menu > Scheduled Content. (Requires a Professional account).
- Step 3: Check Meta Business Suite. If you used Meta's tools, log in on a desktop and go to the Planner tab. Use the filters to show only Instagram content.
- Step 4: Check Your Third-Party Tool. If you used a scheduler, log in to its dashboard and navigate to its content calendar.
- Step 5: Troubleshoot. If a post is missing, reconnect your Instagram account to refresh the API connection and verify your user permissions.
Ready to see all your scheduled content in one clean, unified calendar? PostPlanify gives you the visual grid previews and multi-platform planning you need to stay organized and strategic.
Key Takeaways
- Scheduled Instagram posts only appear in the tool that created them — the Instagram app, Meta Business Suite, and third-party tools do not sync with each other
- As of March 1, 2026, Instagram's in-app scheduler is open to any public account — Personal, Creator, or Business. You no longer need to switch to Professional Mode
- Both the Instagram app and Meta Business Suite schedule up to 75 days ahead with a 25-posts-per-day cap. Third-party tools using the Graph API have no scheduling-window limit but are subject to Meta's API publish cap — officially 50–100 posts per rolling 24-hour period (Meta's own docs conflict; most tools enforce the lower 50). Carousels count as 1 post
- If a scheduled post disappears, the most common cause is an expired API connection — reconnect your Instagram account in your scheduling tool to fix it
- Drafts and scheduled posts are different — drafts are saved locally without a publish date, while scheduled posts are uploaded to servers with a specific go-live time
- Stories still cannot be scheduled natively inside the Instagram app — use Meta Business Suite (without interactive stickers) or a third-party tool
- For a unified view of all scheduled content across multiple platforms, a third-party scheduling tool with a content calendar is the most efficient approach
Related Reading
- How to Draft an Instagram Post That Gets Results
- How to See Scheduled Posts on Facebook
- How to See Scheduled Posts on TikTok
- How to See Scheduled Posts on LinkedIn
- How to Schedule Instagram Posts: Full Guide
- How to Schedule Instagram Reels
- How to Schedule Instagram Stories
- Instagram Scheduled Posts Not Working? 10 Quick Fixes
- Best Instagram Post Scheduler Tools
- Best Time to Post on Instagram
- How to Schedule Carousel Posts on Instagram & Facebook
- Automating Instagram Posts Safely
- Can You Post on Instagram from Desktop?
- Best Social Media Scheduling Tools
All your social media in one simple dashboard
Schedule posts, track analytics, and reply to comments/DMs — without switching tabs.
Engagement
+18%
Views
52.8k
About the Author

Hasan Cagli
Founder of PostPlanify, a content and social media scheduling platform. He focuses on building systems that help businesses, agencies, and teams plan, publish, and manage content and social media more efficiently across platforms.


