
When we talk about automating Instagram posts, we mean using an official, API-approved tool to schedule your content—images, Reels, and carousels—to publish at a specific time. It’s the single safest and most effective way to manage an Instagram account at scale, freeing you from the daily grind of manual uploads.
This guide provides a step-by-step process for setting up your account, choosing the right tools, and building a workflow that saves time without putting your account at risk.
Why Automating Instagram Posts Is a Necessity, Not a Luxury
Manually posting to Instagram every day is a significant drain on time and creativity. For an agency juggling multiple client accounts or a brand maintaining a consistent feed, the pressure is constant. You need to create high-quality content and publish it at the optimal moment, day after day. This cycle often leads to burnout and reactive, last-minute posts that don't align with a larger strategy.
This is where smart automation becomes a practical solution. To be clear, this isn't about shady bots or services that violate Instagram's rules by auto-commenting or mass-following. True automation uses official, API-approved tools to schedule content in advance.
The Problem: Manual Posting Drains Resources
The core issue with manual posting is its inefficiency. It forces you into a reactive state where your focus is on the next post, not the overall picture.
Common Causes of Inefficiency:
- Time-Consuming Uploads: Logging in, selecting media, writing captions, and adding hashtags for every single post takes time, especially when managing multiple accounts.
- Inconsistent Posting Times: It's difficult to consistently publish when your audience is most active, especially if those times are outside of your working hours.
- Lack of Strategic Oversight: When you're focused on daily tasks, there's little time left for strategic planning, performance analysis, or meaningful community engagement.
The Solution: An Automated Workflow
Implementing an automation workflow changes your relationship with Instagram from a daily chore to a managed marketing channel. The primary benefit is reclaiming time. Instead of logging in multiple times a day, you can batch-create and schedule an entire week or month of posts in a single session.
This frees up hours to focus on high-impact activities:
- Strategic Planning: Analyze performance data, research trends, and map out cohesive content campaigns.
- Community Engagement: Interact with your audience in real-time by responding to comments and DMs—the one thing you shouldn't automate.
- Creative Development: With deadlines managed, you can focus on producing higher-quality photos, videos, and graphics.
Automating the publishing process allows you to focus on the human side of social media: connection, conversation, and community building.
Scheduling tools like PostPlanify also enable you to publish content when your audience is most active, even at 10 PM on a Saturday, without being tied to your phone. For anyone trying to scale content marketing, this level of consistency is essential for growth. For more strategies across different platforms, see our guide on how to automate social media posts.
All your social media in one simple dashboard
Schedule posts, track analytics, and reply to comments/DMs — without switching tabs.

Engagement
+18%
Views
52.8k
Step 1: Prepare Your Instagram Account for Safe Automation
Before connecting any scheduling tool, you must configure your Instagram account correctly. Most connection errors and permission issues happen because these foundational steps are missed. Getting this groundwork right ensures a secure, stable connection to any third-party platform.
The entire system of authorized automation is built on Meta's official API (Application Programming Interface). Think of the API as the only legitimate channel allowing third-party tools to communicate with Instagram. Access to this API is strictly limited to professional accounts.
Action: Convert to a Business or Creator Account
Why it's necessary: A standard personal Instagram account is invisible to the API. To make your account discoverable by a tool like PostPlanify, you must switch it to either a Business or Creator account. Meta designed the API for professional use, and this switch unlocks features required for marketing, including analytics, contact buttons, and third-party permissions.
How to do it (step-by-step):
- Open the Instagram app, go to your profile, and tap the menu icon (☰).
- Navigate to Settings and privacy > Account type and tools.
- Select Switch to professional account and follow the on-screen prompts to choose a category that describes your work.
Action: Link to a Facebook Business Page
Why it's necessary: This is a critical and often overlooked step. Because Meta owns Instagram, all business integrations and permissions are managed through the Facebook Business Suite. Your Instagram professional account must be linked to a Facebook Business Page for a scheduling tool to authenticate it properly. Even if you don't use the Facebook Page for posting, it must exist and be connected. It serves as the administrative backend for your Instagram business identity.
This Facebook Page connection is the bridge that lets an external tool verify you as the legitimate owner of the Instagram account without ever asking for your password. It’s a core security measure.
How to do it:
- If you don't have a Facebook Page, the Instagram app will prompt you to create one when you switch to a professional account.
- If you already have a page, you can link it during the same process.
Action: Verify Your Facebook Page Permissions
Why it's necessary: Having the correct permission level on the linked Facebook Page is essential. Many "permission denied" errors stem from this single issue. If you are not an "Admin" on the linked Facebook Page, the connection will fail when you try to authorize a scheduling tool.
How to check your role (step-by-step):
- Go to your Facebook Business Page.
- Click Manage, then find Page Access in the left-hand menu.
- Your profile should be listed under "People with Facebook access." Your role must be listed as having full control (Admin). If it's not, you'll need the page owner to update your permissions.
Completing these three steps—a professional account, a linked Facebook page, and admin permissions—will prevent 90% of the common connection problems people face.
Step 2: Choose and Connect Your Scheduling Tool
With your Instagram account properly configured, it's time to choose an automation tool. The market has two distinct types: safe, API-approved schedulers and unauthorized bots that can get your account banned.
Knowing the difference is critical. Unauthorized bots often ask for your Instagram password—a major red flag. They work by scraping Instagram and simulating human behavior in ways that violate platform rules. Legitimate tools never ask for your login details. They use the official Meta API and authenticate you through a secure Facebook pop-up.

What to Look for in a Safe Automation Tool
When evaluating a scheduler, look for features that prioritize safety, efficiency, and strategic planning.
- Official API Integration: The tool must clearly state it uses the Instagram Graph API. This is your guarantee that it adheres to Meta's rules and won't jeopardize your account.
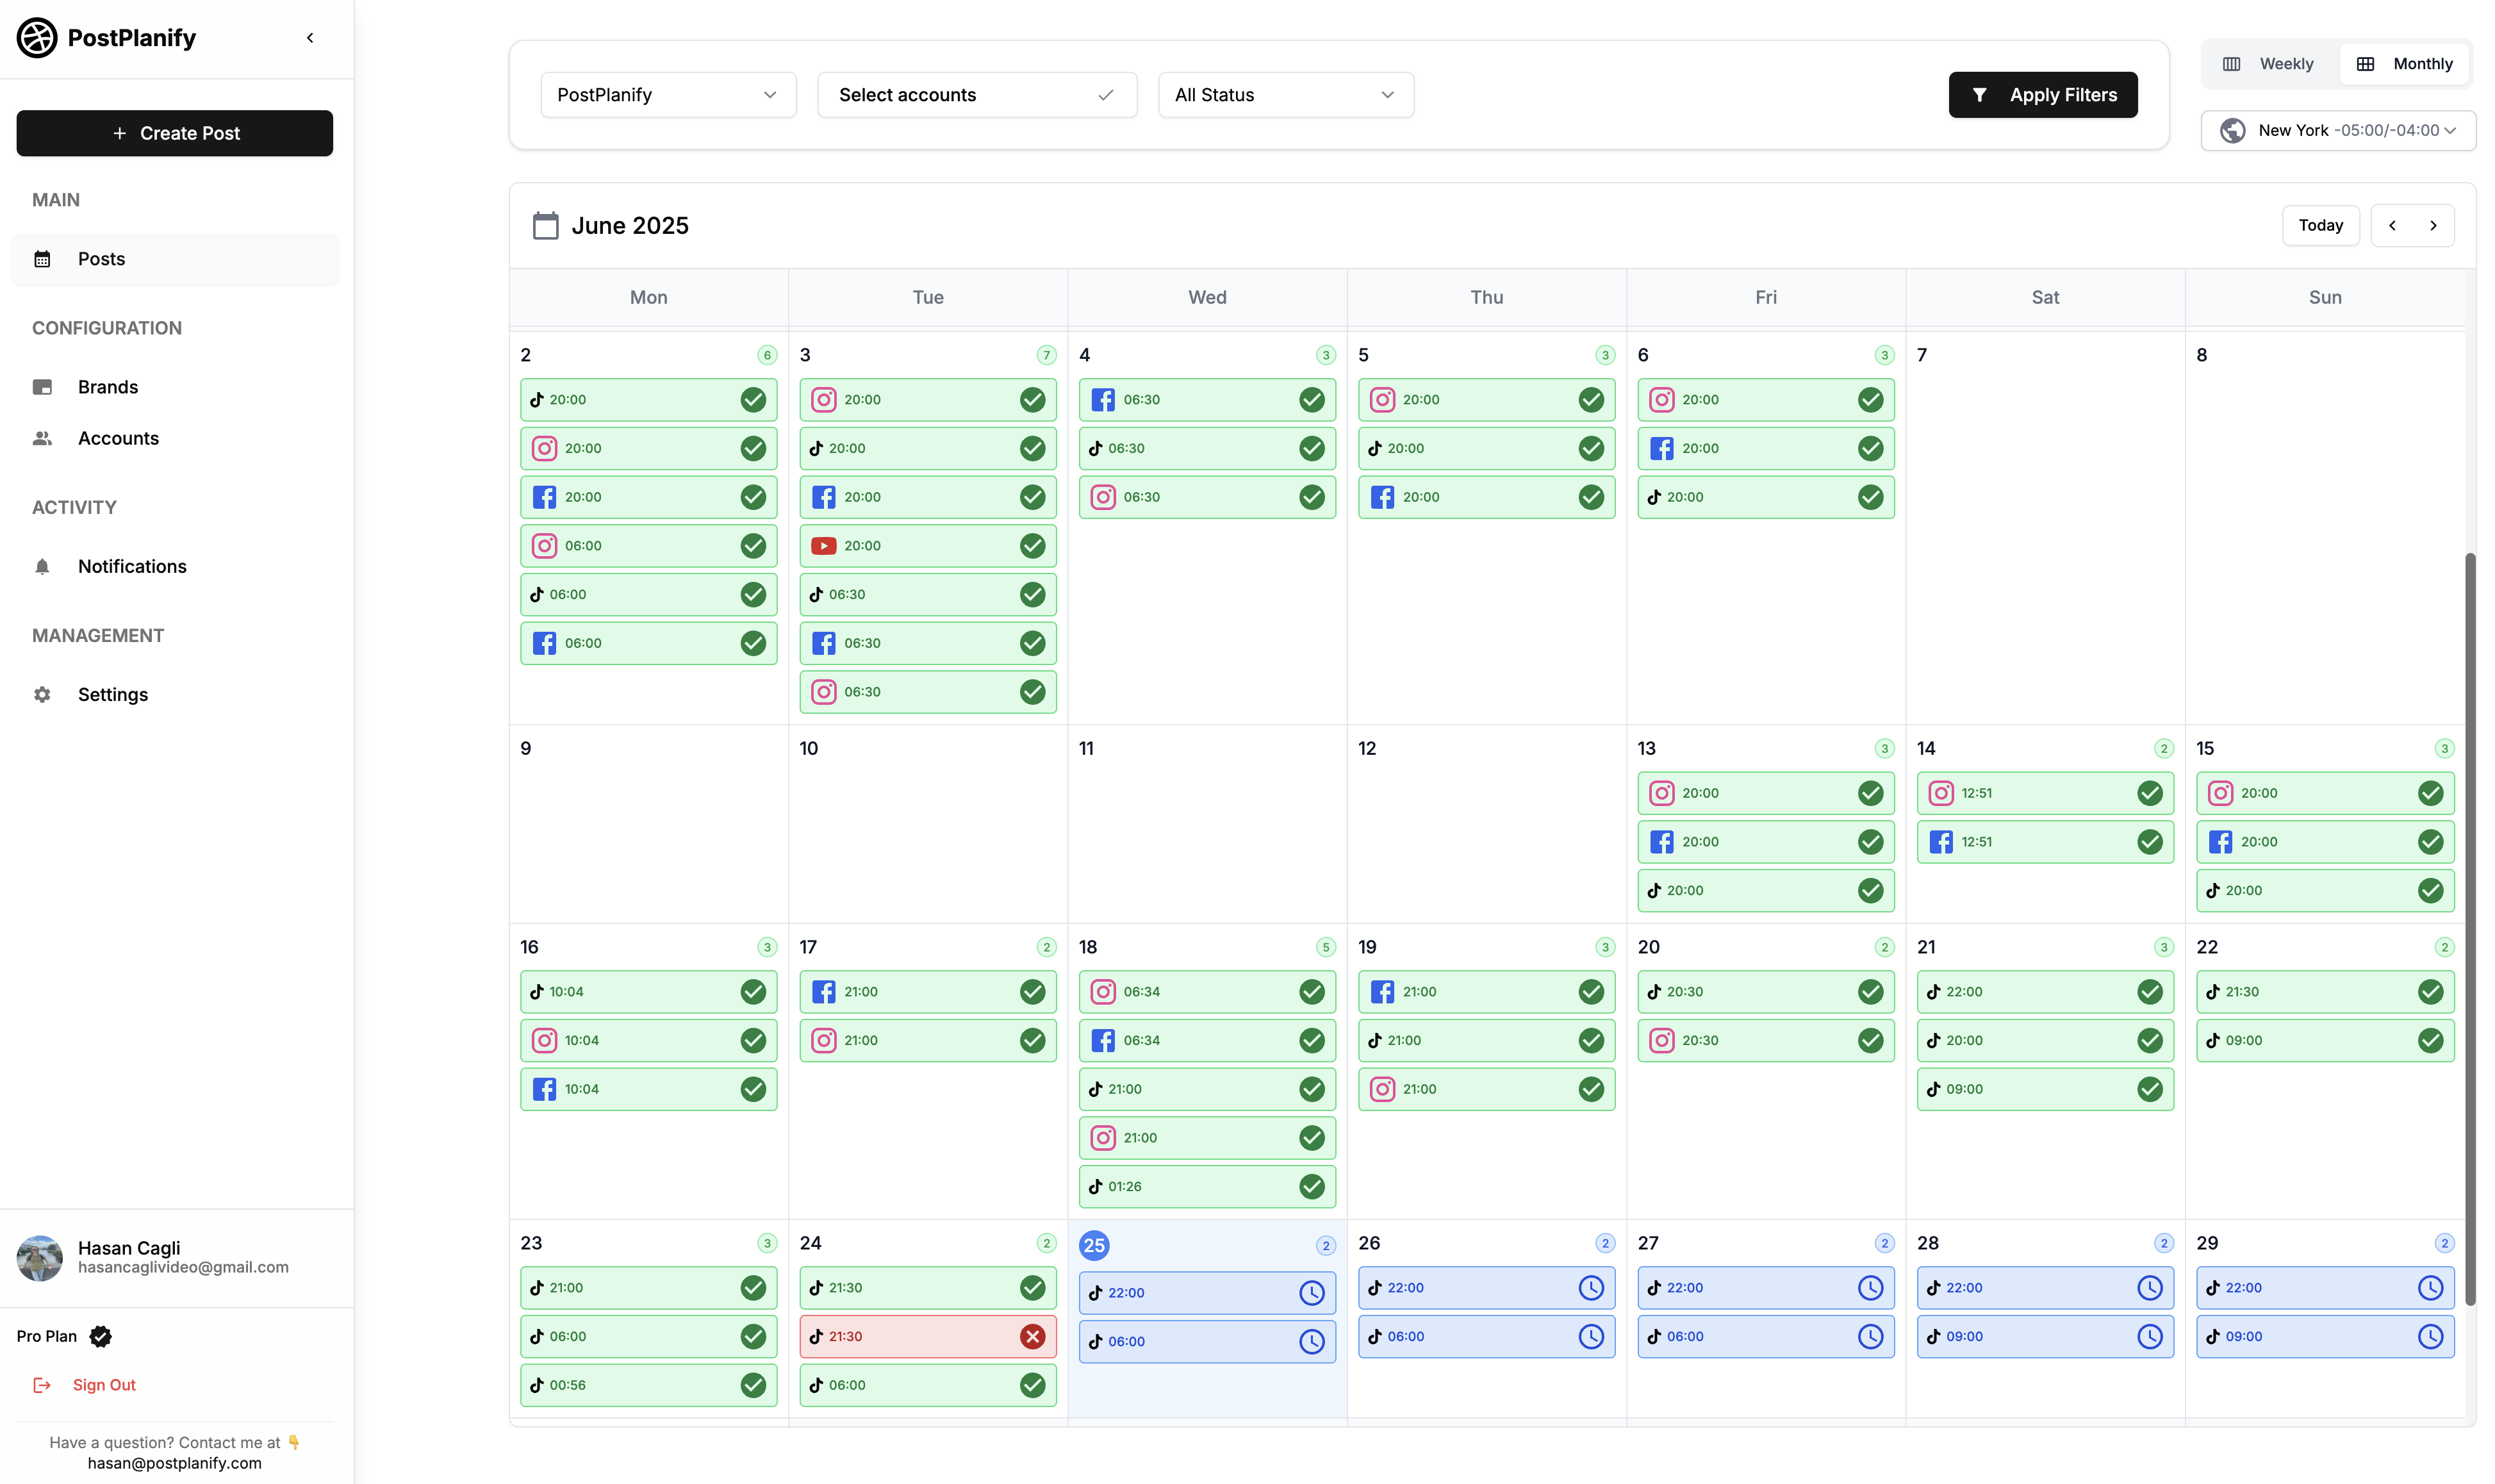
- Visual Content Calendar: A drag-and-drop calendar provides a high-level view of your content plan, helping you spot gaps and maintain a consistent grid aesthetic.
- Post Previews: The tool should show you exactly how your post will look on Instagram before it publishes, helping you catch awkward image crops or formatting issues.
- Secure Authentication: The connection process must redirect you to Facebook to grant permissions. If a tool asks you to enter your Instagram username and password directly on its website, avoid it.
Tools like PostPlanify are built on these principles, offering a visual calendar and live previews while using the official API to keep your account secure. The move to professional tools is widespread; with 49% of brands already automating social media, using the right systems is necessary to remain competitive. You can explore more data on this trend at Moengage.com.
How to Securely Connect Your Account
Connecting your Instagram account to a scheduler should be a secure and straightforward process using the official Facebook authentication flow. You will not be asked for your Instagram password at any point.
The connection process (step-by-step):
- Start the Connection: In your scheduling tool, click "Add Social Account" or a similar button. When you select Instagram, you should be redirected to Facebook.
- Authenticate via Facebook: A Facebook pop-up window will appear. Log into the Facebook account that has admin rights to the Business Page linked to your Instagram account.
- Select Your Instagram Business Account: Meta will display a list of the Instagram Business Accounts associated with your Facebook profile. Choose the correct one.
- Select the Linked Facebook Page: Next, you'll see a list of your Facebook Pages. Select the exact page that is linked to your Instagram account.
- Grant All Permissions: The final screen will show a list of permissions the tool requires, such as "publish content" and "access insights." You must approve all of them for the tool to function correctly. These permissions are granted through the secure API and can be revoked at any time in your Facebook Business settings.
Once approved, you will be redirected back to your scheduler, and your Instagram account will be connected and ready for use. If you need help choosing a platform, our guide on the top Instagram post scheduler tools reviews the best options available.
Step 3: Build an Efficient Content Workflow
An automation tool is only as effective as the content pipeline that feeds it. A streamlined workflow allows you to shift from reactive posting to proactive content batching—preparing a week or month's worth of content in one or two focused sessions.
Action: Centralize Your Media Assets
The problem: Searching for visuals across random desktop folders, emails, or your phone’s camera roll is a major time sink.
The solution: Use a centralized, cloud-based media library like Google Drive or Dropbox. Create a simple folder structure to keep assets organized.
- /Instagram Content/
- /Ready to Schedule/ (Final, edited assets)
- /Content Ideas/ (Raw photos, UGC, inspiration)
- /Archived Posts/ (Visuals already used)
Many scheduling platforms, including PostPlanify, offer direct integrations with cloud storage, allowing you to import media directly into your calendar without downloading and re-uploading files. To ensure high quality, learn the optimal export settings for Instagram to prevent compression issues.
Action: Standardize Captions and Hashtags
The problem: Writing a unique, engaging caption from scratch for every post is mentally taxing.
The solution: Create reusable templates for your core content themes.
- Educational Tips: A template with a hook, three bullet points, and a call-to-action to save the post.
- Behind-the-Scenes: A storytelling format that shares a personal insight or a glimpse into your process.
- Product Spotlights: A structure that highlights a problem, presents your product as the solution, and lists key benefits.
This approach applies to hashtags as well. Build tiered hashtag groups to mix and match.
- Broad/Industry Hashtags: (e.g., #socialmediamarketing) - High volume.
- Niche/Community Hashtags: (e.g., #contentstrategytips) - More targeted.
- Branded Hashtags: (e.g., #YourBrandName) - Unique to you.
Most scheduling tools let you save hashtag groups and automatically publish them in the first comment, keeping your caption clean.
Action: Schedule Different Post Types Correctly
To avoid publishing errors, you must adhere to the technical specifications set by Instagram's API for each content format.
- Single Image Posts: The easiest to automate. Use a square (1:1) or vertical (4:5) aspect ratio for the best visibility in the feed.
- Carousel Posts: You can schedule up to 10 images or videos. All slides in the carousel must have the same aspect ratio. If they differ, the tool will crop all slides to match the dimensions of the first one.
- Reels: You can fully schedule Reels that are between 3 seconds and 15 minutes long, have a 9:16 aspect ratio, and are in
.MP4or.MOVformat.
Not sure which format to prioritize in your automation queue? Our Instagram Post vs Story vs Reel guide compares the strengths of each content type so you can build a balanced schedule.
If you encounter issues, our guide on what to do when your Instagram scheduled posts are not working provides detailed troubleshooting steps.
What You Can and Cannot Automate on Instagram
Before going further, here's a clear breakdown of what Instagram's official API allows and what will get your account flagged or banned:
| Action | Safe to Automate? | Method | Risk Level |
|---|---|---|---|
| Scheduling feed posts | ✅ Yes | Instagram Graph API | None |
| Scheduling Reels | ✅ Yes | Instagram Graph API | None |
| Scheduling carousels | ✅ Yes | Instagram Graph API (up to 10 slides) | None |
| First comment (hashtags) | ✅ Yes | Supported by most schedulers | None |
| Comment moderation (hide/delete spam) | ✅ Yes | Graph API + tool filters | None |
| Auto-reply to DMs (keywords) | ⚠️ Partially | Meta-approved chatbot tools only | Low if API-compliant |
| Scheduling Stories (basic media) | ✅ Yes | Graph API (no interactive stickers) | None |
| Auto-liking posts | ❌ No | Violates Terms of Service | High — shadowban or ban |
| Auto-following/unfollowing | ❌ No | Violates Terms of Service | Very high — immediate action blocks |
| Auto-commenting | ❌ No | Violates Terms of Service | Very high — ban risk |
| Mass DMs | ❌ No | Violates Terms of Service | Very high — permanent ban |
| Scraping follower data | ❌ No | Violates Terms of Service | Very high — legal risk |
The simple rule: If the action goes through Meta's official Instagram Graph API, it's safe. If a tool bypasses the API by simulating human behavior (clicking, scrolling, typing), it violates Instagram's terms regardless of what the tool's marketing claims.
Automated Comment Moderation: The Underrated Time-Saver
One automation most guides overlook is comment moderation. If you manage accounts with significant engagement, manually filtering spam, offensive comments, and bot replies is exhausting. API-approved tools can automatically:
- Hide comments containing specific keywords (competitor names, profanity, spam triggers)
- Delete comments from known bot accounts
- Flag comments for manual review based on sentiment
PostPlanify's social inbox lets you manage comments across platforms from one dashboard — so moderation doesn't require jumping between apps. This is especially valuable for brands running campaigns that generate hundreds of comments.
All your social media in one simple dashboard
Schedule posts, track analytics, and reply to comments/DMs — without switching tabs.
Engagement
+18%
Views
52.8k
Understanding API Limitations and Best Practices
While automation is powerful, it's important to understand its limitations to set realistic expectations and maintain a healthy content strategy.
Limitation: No Interactive Stickers in Stories
This is a key limitation of the API. You cannot schedule Instagram Stories with interactive stickers like polls, quizzes, question boxes, or sliders. Meta requires these high-engagement features to be added manually within the app to preserve their interactive nature.
The workaround: Most schedulers use a push notification system.
- You schedule the basic Story media (image or video) in the tool.
- At the scheduled time, you receive a push notification on your phone.
- Tapping the notification opens the media in the Instagram app, where you can manually add stickers before publishing.
Limitation: Daily Posting Limits
Instagram’s API imposes a limit of 25 posts per 24-hour period for a single account. However, you should never aim to hit this limit. Posting excessively can lead to audience fatigue and lower engagement rates.
A best practice is to post 1-2 high-quality posts per day. This maintains consistency without overwhelming your followers. The goal of automating Instagram posts is to build a sustainable, high-quality presence, not to flood the feed. For more strategic advice, review these best practices for social media.
Troubleshooting & FAQs
Here are answers to common questions about automating Instagram posts.
Can I get my account banned for automating posts?
No, you will not be banned for scheduling posts as long as you use an official, Meta-approved tool that utilizes the Instagram Graph API. Platforms like PostPlanify are built to work within Instagram's rules. The risk of being banned comes from using unauthorized bots that scrape data, ask for your password, or perform spammy actions like auto-following or auto-commenting. If you ever find yourself on the wrong side of these rules, our guide on dealing with a suspended Instagram account explains the steps to recover.
What is the difference between scheduling and automating?
Scheduling is a specific type of safe automation focused on publishing content at a future time. This is what most social media managers refer to as automation.
The broader term "automation" can also include riskier activities not supported by the official API, such as auto-DMs or auto-likes. For safe and effective Instagram management, scheduling is the only type of automation you should use.
Why can't I automate Instagram Stories with stickers?
The official Instagram API does not support the automatic publishing of interactive elements like polls, quizzes, or question stickers. This is a deliberate limitation by Meta to ensure these features remain a real-time, native experience within the app. You can schedule the base media for a Story, but stickers must be added manually just before publishing.
How many posts should I automate per day?
While the technical API limit is 25 posts in 24 hours, a sustainable and effective strategy focuses on quality over quantity. For most accounts, scheduling 1-2 high-quality posts per day is optimal. This keeps your audience engaged and your feed valuable without causing burnout.
Signs You're Over-Automating (Shadowban Warning Signs)
Even when using safe, API-approved tools, over-automation can trigger Instagram's detection systems. Watch for these warning signs:
Behavioral Red Flags Instagram Detects
| Signal | Why It's Flagged | How to Fix |
|---|---|---|
| Posting at exact same time daily | Human behavior has natural variation — robotic precision looks automated | Vary posting times by 15-30 minutes each day |
| Identical hashtag sets on every post | Repetitive hashtag use signals spam to Instagram's systems | Rotate between 4-5 hashtag groups and vary the order |
| Posting more than 5 times/day | Excessive volume triggers rate-limiting even through the API | Stick to 1-2 posts per day, 3 max for high-volume accounts |
| Zero engagement within minutes of posting | If you schedule and walk away, the algorithm notices you're not present | Engage with comments and DMs within 30 minutes of each scheduled post |
| Sudden posting volume spike | Going from 2 posts/week to 3 posts/day overnight looks unnatural | Ramp up gradually — increase by 1 post/day per week |
How to Tell If You've Been Shadowbanned
If your reach drops suddenly after implementing automation, check for these symptoms:
- Hashtag pages don't show your posts — Search your own hashtags and look for your recent content. If it's missing, you may be shadowbanned.
- Explore page traffic drops to zero — Check Instagram Insights → Content → Reach. If "Explore" disappears as a traffic source, your content is being suppressed.
- Non-followers stop seeing your content — A healthy account gets 20-40% of reach from non-followers. If this drops below 5%, something is wrong.
- Engagement rate drops sharply — Use the Instagram engagement calculator to benchmark your rate before and after implementing automation.
Recovery Steps
If you suspect over-automation is causing issues:
- Pause all automation for 48-72 hours and post manually
- Remove any unauthorized third-party apps from your Instagram connected apps settings
- Reduce posting frequency to 1 post/day for 2 weeks
- Engage manually — spend 15-20 minutes after each post responding to comments and interacting with other accounts in your niche
For a deeper dive into shadowban detection, see our guide on shadowbans on TikTok — the detection patterns and recovery steps are similar across platforms.
All your social media in one simple dashboard
Schedule posts, track analytics, and reply to comments/DMs — without switching tabs.
Engagement
+18%
Views
52.8k
Summary: Your Instagram Automation Checklist
To ensure a safe and efficient workflow, follow these steps:
- Account Setup:
- Convert your Instagram profile to a Business or Creator account.
- Link it to a Facebook Business Page.
- Confirm you have Admin permissions on that Facebook Page.
- Tool Selection:
- Choose a scheduler that uses the official Instagram Graph API and never asks for your password.
- Ensure the tool offers a visual calendar and post previews.
- Workflow:
- Centralize your media assets in a cloud-based library.
- Create templates for captions and hashtags to speed up content creation.
- Adhere to the technical specs for images, carousels, and Reels.
- Best Practices:
- Post 1-2 times per day to maintain quality and consistency.
- Use the notification workaround for scheduling Stories with interactive stickers.
- Dedicate the time you save to genuine community engagement.
Related Reading
- How to Schedule Instagram Posts in 2025
- Instagram Post Scheduler Tools (2025)
- Instagram Scheduled Posts Not Working: How to Fix It
- How to Schedule Instagram Reels
- How to Schedule Carousel Posts on Instagram and Facebook
- Instagram Post vs Story vs Reel
- Best Time to Post on Instagram
- Suspended Instagram Account: How to Appeal
- How to Go Viral on Instagram
- Instagram Image Size Guide
- Automate Social Media Posts (All Platforms)
- Social Media Cross-Posting Guide
- Best MCP Servers for Social Media Management — Automate Instagram posting from Claude or ChatGPT
All your social media in one simple dashboard
Schedule posts, track analytics, and reply to comments/DMs — without switching tabs.
Engagement
+18%
Views
52.8k
About the Author

Hasan Cagli
Founder of PostPlanify, a content and social media scheduling platform. He focuses on building systems that help businesses, agencies, and teams plan, publish, and manage content and social media more efficiently across platforms.


