
Yes, you can post on Instagram directly from a desktop computer, and it's much easier than you think. If you're a creator, social media manager, or business owner, editing photos on a large monitor, writing captions on a real keyboard, and managing all your media files in one place isn't just a convenience—it’s a more efficient and professional way to work.
For a long time, Instagram was a mobile-only platform, which forced a clunky workflow of transferring files from your computer to your phone just to post. This changed in October 2021 when Instagram officially added a native desktop posting feature to its website. While this was a great start, several more powerful methods have since become the standard for anyone serious about content creation.
This guide will walk you through the four main ways to post to Instagram from your desktop, from the simplest direct upload to the advanced scheduling tools used by professionals.
Why You Can't Always Post from Desktop Natively
The core reason posting from a desktop was historically difficult is simple: Instagram was built from the ground up as a mobile-first app. Its entire user experience, from the camera-centric interface to the quick-tap interactions, was designed for on-the-go use. While Instagram has added desktop functionality, the web version is still a simplified experience compared to the mobile app.
Common scenarios where users hit a wall:
- Creating engaging Stories: The desktop interface lacks access to interactive stickers like polls, quizzes, and Q&As, which are crucial for audience engagement.
- Using trending audio for Reels: You can't browse or add trending audio clips to your Reels from the desktop version, a major limitation for discoverability.
- Scheduling content in advance: The main Instagram website has very limited, basic scheduling. You can't plan a full content calendar or schedule posts in bulk.
- Managing multiple accounts: Switching between different Instagram accounts on the desktop website is more cumbersome than in the mobile app or a dedicated management tool.
These limitations push serious users toward more robust solutions.
Method 1: Use the Instagram Website's Native Uploader
The most straightforward way to post to Instagram from your computer is by using the feature built directly into Instagram.com. This method is perfect for quick, one-off posts when you don't need to schedule anything in advance.
Actionable Steps:
- Navigate to Instagram.com: Open your preferred web browser (like Chrome, Firefox, or Safari) and go to the Instagram website.
- Log In: Enter your username and password to log in to your account.
- Click "Create": In the left-hand navigation menu, look for the Create button, which has a plus icon (+) inside a square. Click it.
- Upload Your Media: A new window will pop up. You can drag and drop your photo or video files directly into this window or click Select from computer to browse your files. You can select multiple images or videos to create a carousel post.
- Edit and Crop: Instagram provides basic editing tools. You can choose different aspect ratios (1:1, 4:5, 16:9), zoom in, or apply one of their standard filters. You can also make minor adjustments to brightness, contrast, and saturation.
- Add Your Details: Write your caption, add a location, tag people, and enter your alt text. This is where using a desktop shines—writing on a full keyboard is far easier.
- Share or Schedule: Click Share to publish the post immediately. There is also a basic scheduling option here under "Advanced settings," but it's very limited.

Limitations and Edge Cases:
- No Stories: You cannot create or post Instagram Stories using this method.
- Limited Reel Features: While you can upload a video as a Reel, you can't add trending audio, use interactive stickers, or access the advanced editing tools available on the mobile app.
- Basic Scheduling: The built-in scheduler is rudimentary. You can't view your posts on a calendar, schedule in bulk, or set up recurring posts. It's meant for one post at a time.
- Account Type: This works for all account types (Personal, Creator, and Business).
This method is ideal for a casual user or a quick update, but for anyone managing a brand or creating content consistently, it lacks the necessary planning features.
For a full rundown of supported dimensions, check our Instagram image size guide.
All your social media in one simple dashboard
Schedule posts, track analytics, and reply to comments/DMs — without switching tabs.

Engagement
+18%
Views
52.8k
Method 2: Use Meta Business Suite for Scheduling
For businesses and creators, Meta Business Suite is the next logical step up. It’s Meta’s free, official tool for managing your Instagram and Facebook presence from a single dashboard. Its main advantage over the Instagram website is the ability to schedule posts, Stories, and Reels for free.
Why use Meta Business Suite?
It solves the immediate problem of needing to plan content ahead of time without paying for a third-party tool. It also allows you to manage comments and messages for both Facebook and Instagram in one inbox.
Actionable Steps:
- Meet the Requirements: To use Meta Business Suite, your Instagram account must be a Business or Creator account. It also needs to be connected to a Facebook Page you manage. If you haven't done this yet, check out our guide on how to link Facebook and Instagram.
- Go to Meta Business Suite: Navigate to Meta Business Suite and log in.
- Open the Planner: In the left-hand menu, click on Planner. This will show you a calendar view of your scheduled and published content.
- Create Your Content: Click the Create post button in the top right. You can also choose to create a Story or Reel.
- Select Platforms: Choose whether you want to post to your Instagram account, your Facebook Page, or both.
- Build Your Post: Upload your media, write your caption (you can customize it for each platform), add hashtags, and tag accounts.
- Schedule or Publish: At the bottom, you have three options: Publish now, Schedule for a specific date and time, or Save as draft to finish later.

Limitations and Edge Cases:
- Clunky Interface: Many users find the Business Suite interface to be slow, buggy, and less intuitive than other tools.
- Limited Creative Tools: Just like the Instagram website, you can't add interactive stickers (polls, quizzes) to Stories or use trending audio in Reels. This often forces a hybrid workflow where you create the content on your phone and schedule it on your desktop.
- API Limitations: The tool is bound by Meta's own API rules, which can sometimes be more restrictive than what they offer to official partners. For example, some Reel editing features might not be available.
- Meta-Only Ecosystem: It only works for Facebook and Instagram. If you also manage TikTok, X, LinkedIn, or Pinterest, you'll still need other tools.
Meta Business Suite is a powerful free option for those just starting with scheduling, but professional users often outgrow it quickly. Once you've scheduled content, you can check on it anytime — our guide on how to see scheduled posts on Instagram shows you exactly where to look.
Method 3: The "Browser Inspect" Trick (A Technical Workaround)
If you need a quick way to access Instagram's mobile interface on your desktop—for example, to post a Story without using Business Suite—this developer trick is a handy workaround. It essentially tricks your browser into identifying itself as a mobile device, which then displays the mobile version of the Instagram site, complete with the mobile upload button.
Why this trick works:
Websites use "responsive design" to adapt their layout to different screen sizes. By manually telling the browser to emulate a mobile device, you force Instagram.com to show you the mobile layout.
Actionable Steps:
For Google Chrome (or other Chromium browsers like Edge, Brave):
- Go to Instagram.com and log in.
- Right-click anywhere on the page and select Inspect from the dropdown menu. This will open the Developer Tools panel.
- In the toolbar of the Developer Tools panel, find and click the Toggle device toolbar icon. It looks like a small tablet and phone.
- The page will instantly resize to a mobile view. If you don't see the mobile interface (with the + icon at the bottom), refresh the page (F5 or Cmd+R).
- Click the + icon to open the mobile upload flow and post from your computer's files.
For Safari:
- First, enable the Develop menu. Go to Safari > Settings > Advanced and check the box for "Show features for web developers."
- Go to Instagram.com and log in.
- From the top menu bar, click Develop > Enter Responsive Design Mode.
- The page will switch to a mobile layout. As with Chrome, you may need to refresh the page to see the mobile UI correctly.
- Use the + icon to post.
Limitations and Edge Cases:
- Not Officially Supported: This is a developer workaround, not a feature. Instagram or browser updates could break it at any time without notice.
- No Scheduling: This method only gives you access to the immediate posting function of the mobile app. You cannot schedule anything.
- Limited Functionality: You can post a single photo or a basic Story, but advanced features like creating multi-image carousels can be clunky or may not work at all.
- Best for Personal Accounts: This trick is most useful for personal accounts that don't have access to Meta Business Suite or for a one-time Story post from a desktop.
All your social media in one simple dashboard
Schedule posts, track analytics, and reply to comments/DMs — without switching tabs.
Engagement
+18%
Views
52.8k
Method 4: Use a Third-Party Social Media Scheduler
For agencies, social media managers, and businesses that need efficiency, collaboration, and advanced features, a third-party scheduling tool is the professional standard. Platforms like PostPlanify are built to solve the limitations of Instagram's native tools.
These tools connect to Instagram via its official API, making them 100% safe and approved by Meta. They offer a centralized command center for all your social media accounts, not just Instagram and Facebook.
Why a Third-Party Tool is the Best Solution for Professionals:
A dedicated scheduler moves you beyond simple posting and into strategic content management. It addresses the core problems of inefficiency and platform limitations.
Key Features and How They Solve Problems:
- Full Content-Type Support: Schedule and auto-publish all content types—single images, carousels, Stories, and Reels—directly from your desktop. Some tools, like PostPlanify, even support advanced features like adding a cover image for Reels and scheduling the first comment to keep captions clean.
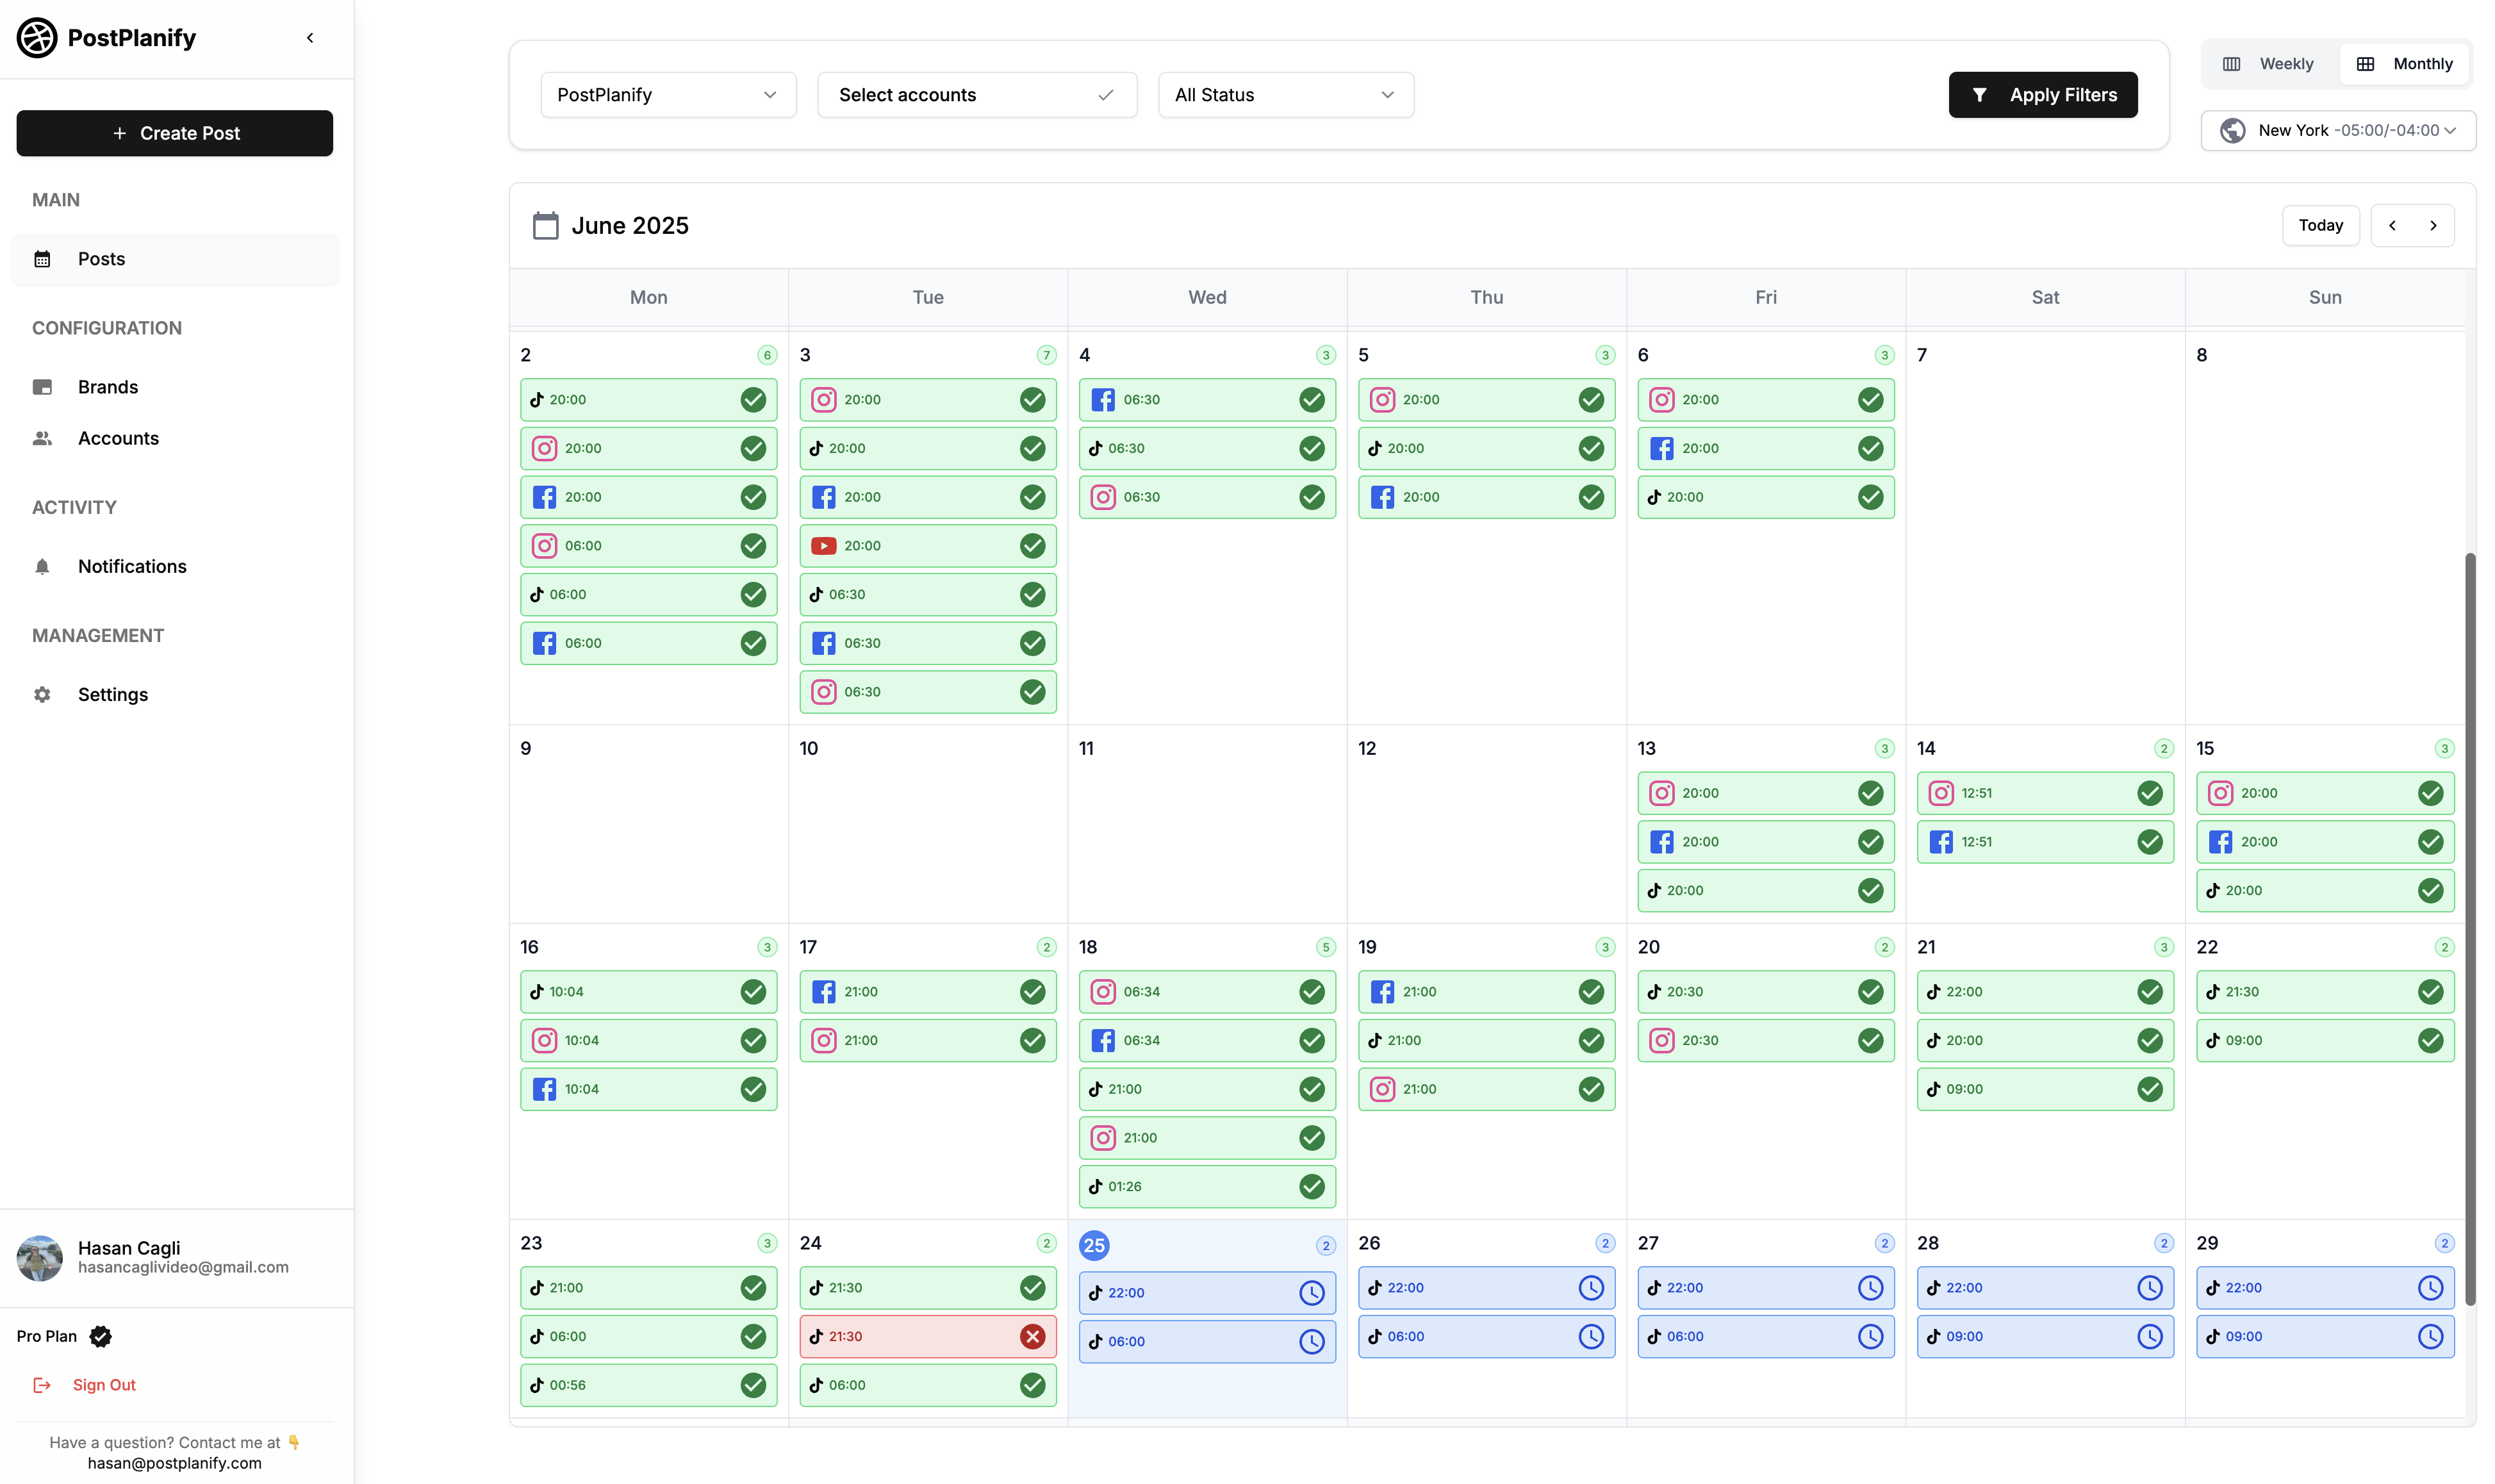
- Unified Content Calendar: Manage content for Instagram, Facebook, TikTok, X, LinkedIn, and more, all from a single drag-and-drop calendar. This provides a holistic view of your entire marketing strategy.
- Advanced Scheduling Options: Go beyond "schedule for later." Create content queues to automatically publish evergreen posts, schedule in bulk by uploading a CSV, and get AI-powered recommendations for the best times to post based on your audience's activity.
- Team Collaboration & Approval Workflows: Invite team members or clients to collaborate. You can assign roles (e.g., creator, editor, approver) and create posts that require approval before they are scheduled. This prevents errors and ensures all content is on-brand.
- In-Depth Analytics and Reporting: Get detailed performance data that goes far beyond likes and comments. Track metrics like reach, engagement rate, and follower growth over time. Generate professional, white-label reports for clients or stakeholders.
- First Comment Scheduling: Keep your captions clean by automatically posting your hashtags as the first comment the moment your post goes live.

Actionable Steps (General workflow for most schedulers):
- Choose an Official Partner Tool: Sign up for a trusted scheduler that uses the official Instagram API.
- Connect Your Social Accounts: Follow the on-screen prompts to securely connect your Instagram Business/Creator account. This process uses a secure Meta pop-up and will never ask for your password.
- Use the Content Composer: Open the post composer, upload your media from your computer, and craft your post.
- Leverage Advanced Features: Write your caption, use the first comment scheduler for your hashtags, select a cover image for your Reel, and tag your location and other accounts.
- Schedule: Choose your desired date and time, or add the post to a predefined content queue.
- Review on the Calendar: See your newly scheduled post appear on the visual content calendar alongside all your other social media content.
Limitations and Edge Cases:
- Requires a Subscription: Unlike native tools, professional schedulers are paid services. However, the time saved and the advanced features provided typically deliver a significant return on investment.
- API Restrictions Still Apply: While these tools offer the most functionality, they are still bound by Instagram's API. For instance, some new, highly interactive Story stickers might only be available in the mobile app for a short period before they are added to the API.
For a deeper dive into professional workflows, our guide on how to schedule Instagram posts in 2026 provides a complete system for building an efficient content strategy. You can also learn how to schedule Instagram Reels and schedule Instagram Stories specifically.
Desktop vs Mobile: What You Can and Can't Do
Before diving into troubleshooting, here's a clear breakdown of what Instagram supports on desktop versus mobile.
| Feature | Desktop (Instagram.com) | Desktop (Meta Business Suite) | Desktop (Third-Party Tool) | Mobile App |
|---|---|---|---|---|
| Single photo posts | ✅ | ✅ | ✅ | ✅ |
| Carousel posts | ✅ | ✅ | ✅ | ✅ |
| Reels (basic upload) | ✅ | ✅ | ✅ | ✅ |
| Reels (trending audio) | ❌ | ❌ | ❌ | ✅ |
| Stories | ❌ | ✅ | ✅ | ✅ |
| Interactive stickers | ❌ | ❌ | ❌ | ✅ |
| Schedule posts | ✅ (basic) | ✅ | ✅ (advanced) | ✅ (75 days max) |
| Bulk scheduling | ❌ | ❌ | ✅ | ❌ |
| First comment | ❌ | ❌ | ✅ | ❌ |
| Visual grid preview | ❌ | ❌ | ✅ | ❌ |
| Multi-platform posting | ❌ | Facebook + Instagram | ✅ (10+ platforms) | ❌ |
Instagram Desktop Upload Specs
Getting your media specs right avoids failed uploads and quality loss. Here's what Instagram accepts.
| Media Type | Aspect Ratio | Resolution | File Format | Max File Size |
|---|---|---|---|---|
| Feed photo | 1:1, 4:5, 1.91:1 | 1080×1080 (square), 1080×1350 (portrait) | JPG, PNG | 30 MB |
| Carousel | 1:1, 4:5, 1.91:1 | Same as feed photo | JPG, PNG, MP4 | 30 MB per slide |
| Reels | 9:16 | 1080×1920 | MP4, MOV | 4 GB (up to 15 min) |
| Stories | 9:16 | 1080×1920 | JPG, PNG, MP4 | 30 MB (photo), 4 GB (video) |
For a full breakdown of every dimension and format, see our Instagram image size guide.
All your social media in one simple dashboard
Schedule posts, track analytics, and reply to comments/DMs — without switching tabs.
Engagement
+18%
Views
52.8k
Troubleshooting & FAQ
Can I post Instagram Reels and Stories from my desktop?
Yes, but the method matters.
- Instagram Website: You can upload a video as a Reel, but with no advanced editing (no trending audio, limited effects). You cannot post Stories at all.
- Meta Business Suite: You can schedule both Reels and Stories, but again, without the interactive stickers and trending audio that make them engaging.
- Third-Party Scheduler: This is the best method. Tools like PostPlanify allow you to schedule fully-featured Reels and Stories directly from your desktop.
Is it safe to use a third-party app to post on Instagram?
Yes, provided you use an official Meta Partner. Reputable tools use Instagram's official API to connect to your account. This is a secure handshake authorized by Meta. Never use an app that asks for your Instagram password directly. This is a major security risk and violates Instagram's terms of service.
What's the best way for a business to post from a desktop?
For any business, agency, or serious creator, a third-party social media management tool is the most efficient and powerful solution. While Meta Business Suite is a good free starting point, a dedicated scheduler like an Instagram scheduler provides cross-platform support, advanced automation, collaboration features, and superior analytics that are essential for growth. If you encounter issues, a dedicated tool often provides better diagnostics, as explained in our guide on what to do when Instagram scheduled posts are not working.
Why can't I see the "Create" button on the Instagram website?
This feature was rolled out to all users in late 2021. If you don't see the "+" Create button in the left-hand menu, the issue is almost always browser-related.
- Hard Refresh: Try a hard refresh of the page (Ctrl+F5 or Cmd+Shift+R).
- Clear Cache: Clear your browser's cache and cookies.
- Update Browser: Ensure your browser (Chrome, Firefox, Safari) is updated to the latest version. An outdated browser is the most common cause.
Can I post an Instagram carousel from my desktop?
Yes. All four methods support carousel posts. On Instagram.com, click the multiple-image icon in the upload window to select up to 20 photos or videos. In Meta Business Suite and third-party tools, carousel creation is built into the post composer. For a complete walkthrough, see our guide on how to schedule carousel posts on Instagram and Facebook.
Can I post Instagram Stories from my computer?
Not directly from Instagram.com — the website does not support Story creation. However, you can post Stories from your desktop using Meta Business Suite or a third-party tool like PostPlanify. Both allow you to upload Story media, add links, and schedule Stories in advance. Learn more in our how to schedule Instagram Stories guide.
Can I add trending audio to Reels from desktop?
No. Trending audio from Instagram's music library is only available in the mobile app. If you upload a Reel from desktop (via any method), you'll need to add your own original audio or a royalty-free track before uploading. If trending audio is essential to your strategy, create the Reel on mobile and schedule it with a desktop tool for optimal timing.
Do I need a business account to post from desktop?
For Method 1 (Instagram.com), no — any account type can post. For Method 2 (Meta Business Suite) and Method 4 (third-party tools), you need a Professional account (Business or Creator) because these tools connect through Meta's API, which requires professional-level access. Switching is free and takes under a minute.
Can I post to multiple Instagram accounts from my desktop?
Using Instagram.com, you can only manage one account at a time (logging in and out). Meta Business Suite lets you manage accounts linked to your Facebook Pages. Third-party tools are the best option here — platforms like PostPlanify let you connect and post to multiple Instagram accounts (plus other platforms) from a single dashboard without logging in and out.
What happens if my scheduled desktop post fails to publish?
The most common causes are an expired API token, a media file that doesn't meet Instagram's specs, or a temporary Instagram outage. Your scheduling tool should notify you of the failure. To fix it, reconnect your Instagram account, verify your media meets the specs listed above, and reschedule. For a detailed troubleshooting checklist, see Instagram scheduled posts not working.
Desktop Posting Checklist
- For quick, one-off posts: Use the native uploader on Instagram.com.
- For free scheduling on Instagram & Facebook: Use Meta Business Suite (requires a Business/Creator account).
- For posting a quick Story without other tools: Use the "Browser Inspect" trick.
- For professional, efficient, multi-platform management: Use a third-party scheduler like PostPlanify.
Ready to unlock a more efficient and powerful way to manage your content? With PostPlanify, you can schedule posts across all your social channels, collaborate with your team, and get the insights you need to grow—all from one simple dashboard. Start your free 7-day trial today and see how much time you can save.
Key Takeaways
- You can post on Instagram from a desktop using four methods: Instagram.com, Meta Business Suite, a browser inspect trick, or a third-party scheduling tool
- Instagram.com supports feed posts, carousels, and basic Reel uploads — but not Stories, interactive stickers, or trending audio
- Meta Business Suite adds free scheduling and Story support, but only works for Instagram and Facebook with a Professional account
- The browser inspect trick is a quick workaround for accessing the mobile interface, but it's not officially supported and has limited functionality
- Third-party schedulers like PostPlanify offer the most complete desktop experience: bulk scheduling, visual grid previews, first comment scheduling, and multi-platform support across 10+ networks
- Desktop posting does not reduce reach — Instagram treats scheduled and desktop-published posts the same as mobile posts
- Always verify your media meets Instagram's upload specs before scheduling to avoid failed publishes
Related Reading
- How to Schedule Instagram Posts: Full Guide
- How to Schedule Instagram Reels
- How to Schedule Instagram Stories
- How to Schedule Carousel Posts on Instagram & Facebook
- How to See Scheduled Posts on Instagram
- Instagram Scheduled Posts Not Working? 10 Quick Fixes
- Best Instagram Post Scheduler Tools
- Instagram Image Size Guide
- Best Time to Post on Instagram
- Automating Instagram Posts Safely
- Best Social Media Scheduling Tools
- How to Link Facebook and Instagram
All your social media in one simple dashboard
Schedule posts, track analytics, and reply to comments/DMs — without switching tabs.
Engagement
+18%
Views
52.8k
About the Author

Hasan Cagli
Founder of PostPlanify, a content and social media scheduling platform. He focuses on building systems that help businesses, agencies, and teams plan, publish, and manage content and social media more efficiently across platforms.


